Introduction
Welcome to another anynode video tutorial.
In this episode, we invite you to sit back and watch as we share information on using Local Media Optimization with Microsoft Teams Direct Routing in anynode.
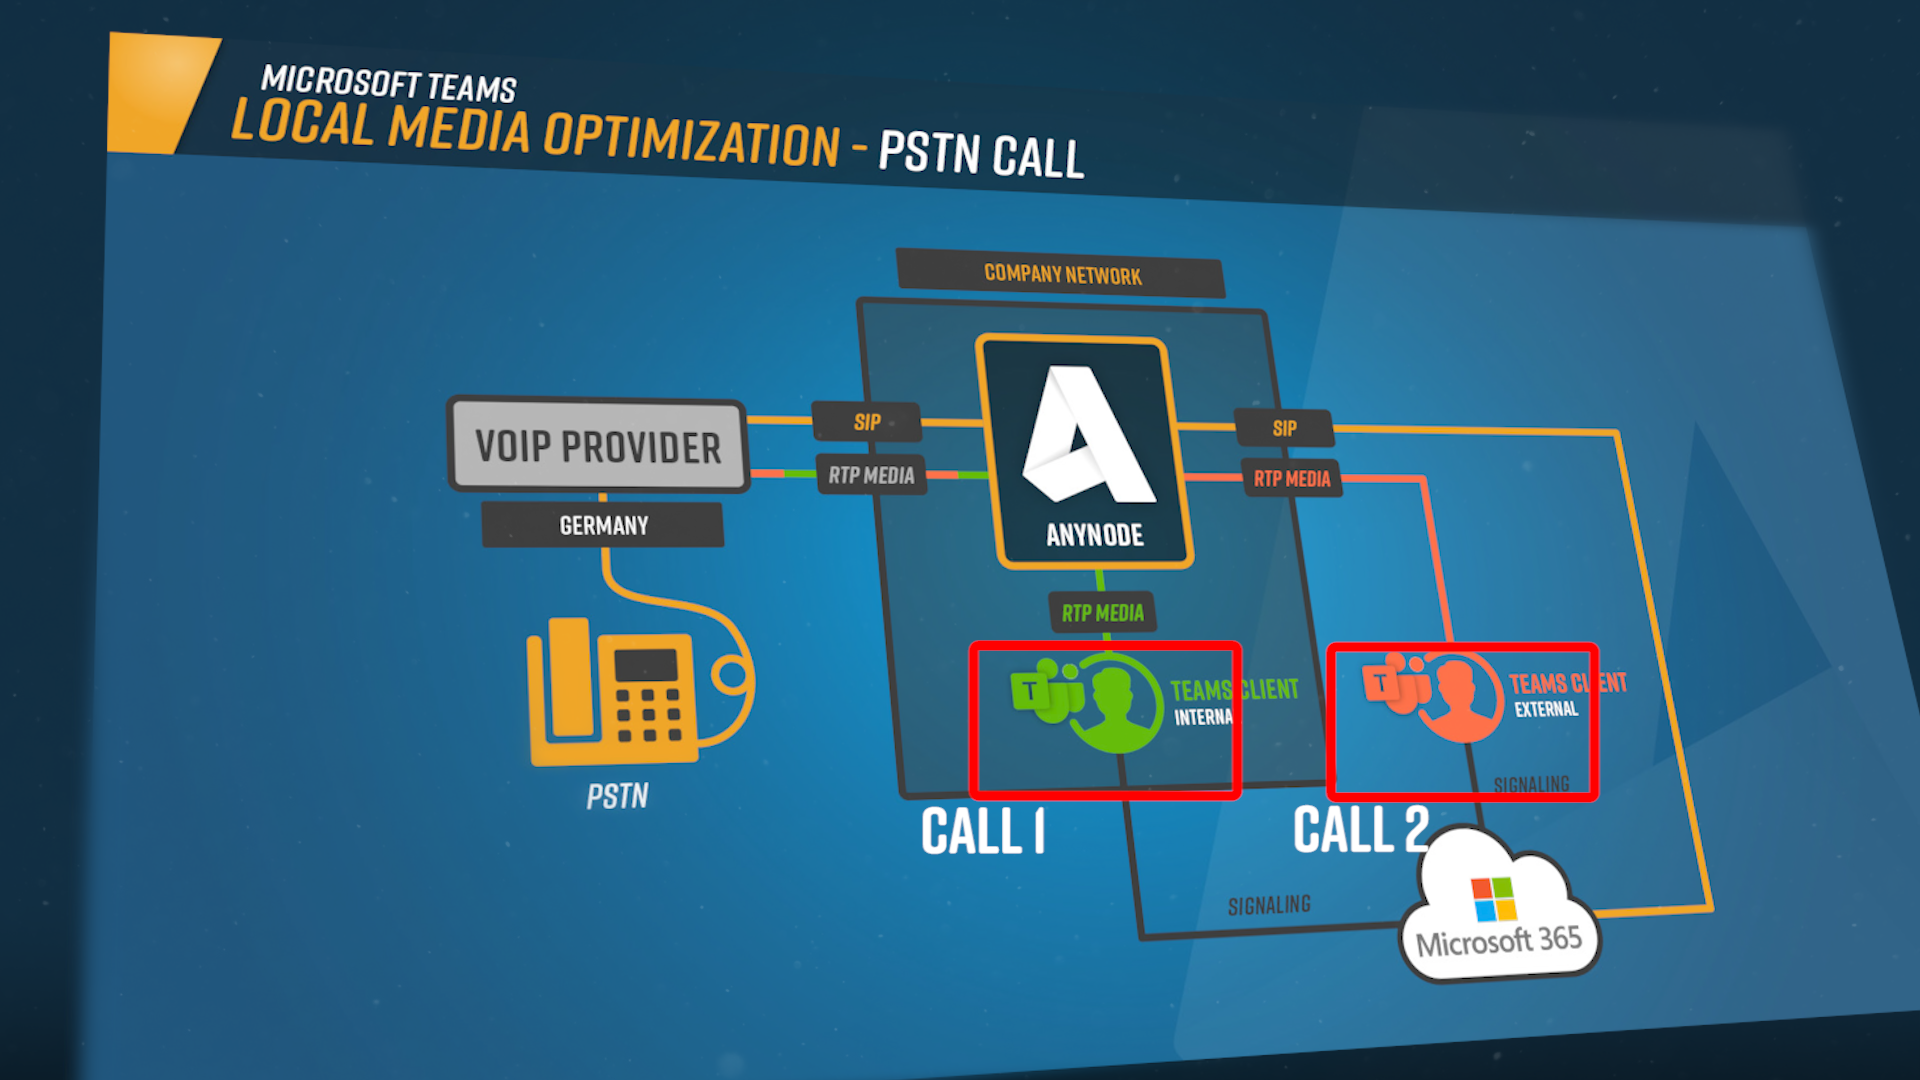
Local Media Optimization is a new feature within Direct Routing that enables you to keep media local to the network. For instance, a user calling another user within the same organization would keep the call locally on the company’s network.
With Local Media Optimization, Microsoft Teams and anynode enables the optimal RTP media flow for in-house hosted SBC’s with local connections to providers or PBX around the world.
You can enable this feature in the anynode frontend and on the corresponding Microsoft Teams side. anynode and the Teams server can then distinguish between Teams clients that are on the external public network and Teams clients that are on the internal company network.
There are at least two practical applications:
Option 1: anynode is used as the only SBC in the company network
anynode is used as the only SBC in the company network and has an internal and an external network card. If an employee within the company network wants to make a call to the PSTN via the Teams client, Teams recognizes that the Teams client is in the internal company network and negotiates with anynode that the RTP media data is exchanged with the Teams client via the internal network card / IP address.
If a mobile employee now wants to use his external Teams client for a call to the PSTN outside of the company network, the external network card / IP address is used for the RTP voice data.
Option 2: anynode is used as Proxy SBC with a Site SBC in the company network
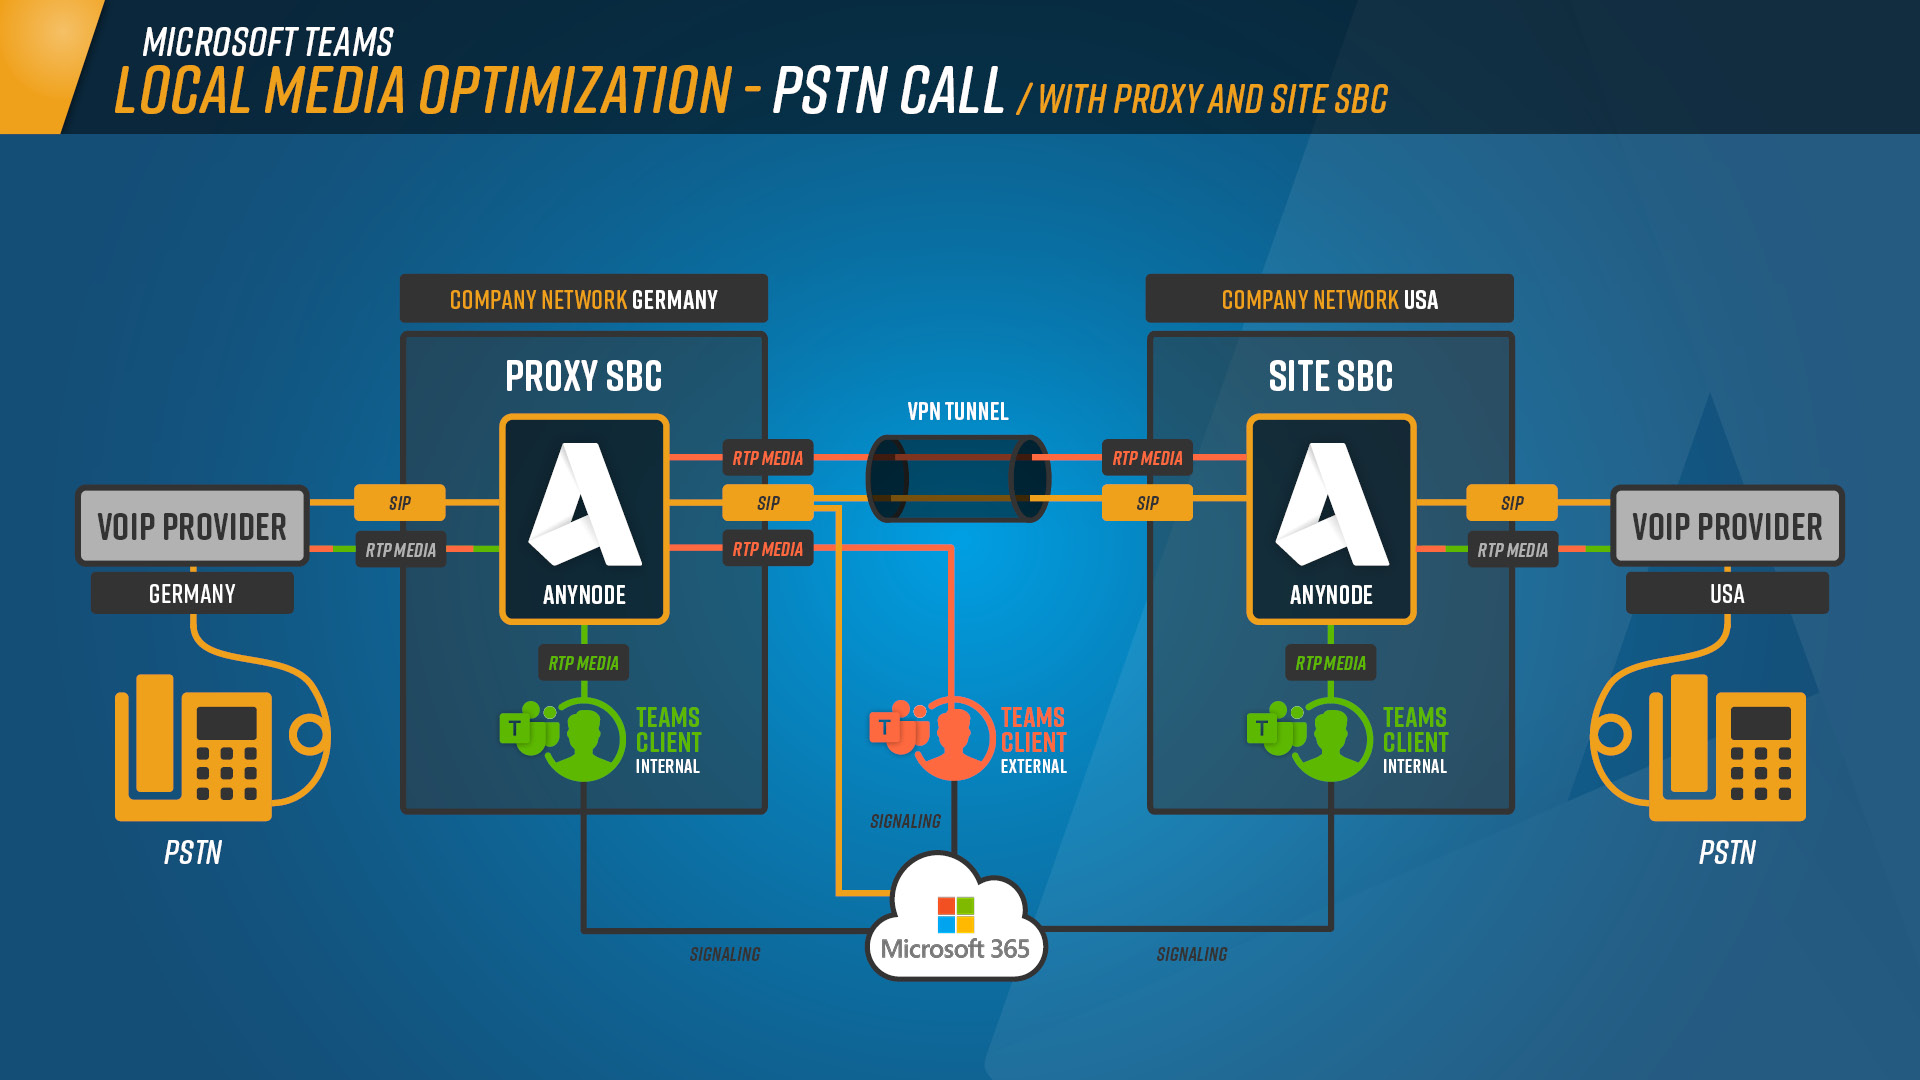
In this scenario, all calls go to anynode, which is configured as a Proxy SBC. They are then routed to a local anynode as a Site SBC. Configured this way, anynode as Proxy SBC provides access to the Teams server for other Site SBC’s in the company network.
An internal and external IP address is also used here. A practical application is to use a single Microsoft Teams Direct Routing connection from several geographically separate locations in a company and the RTP data streams remain local in the respective locations, as long as the Teams client is located in the respective location.
In our example we will use the following domains and FQDNs:
- anynodesbc.com is the default domain and the registered base domain of the tenant set in the Microsoft Office 365 admin center.
- sbc1.anynodesbc.com is the FQDN used on the Proxy SBC (located in Europe/Germany).
This FQDN is set in the Office365 Phone System, it must be correctly resolvable through a public DNS carrier with a public IP address.
- sbc2.anynodesbc.com is the FQDN used by anynode’s Site SBC (located in the USA). This FQDN doesn’t require a resolvable public DNS carrier entry with a public IP address, it just must be reachable within the local network.
Each anynode SBC site is bound to a local SIP provider. The SIP provider-related configurations are not shown in detail.
Prerequisites
As a pre-requisite, all preliminary administrative configurations for the Microsoft Phone System environment have to be completed. This includes network and cloud-related configurations.
An example of this is accessing Microsoft’s cloud service via PowerShell. Check to make sure that the administrative account and Microsoft Windows can access the cloud via PowerShell and that the appropriate cmdlets can be invoked for proper configurations.
To enable the Direct Routing services for the appropriate Teams users, you must configure anynode as a session border controller in the Microsoft Phone System environment.
Configuration with one SBC in the company network (option 1)
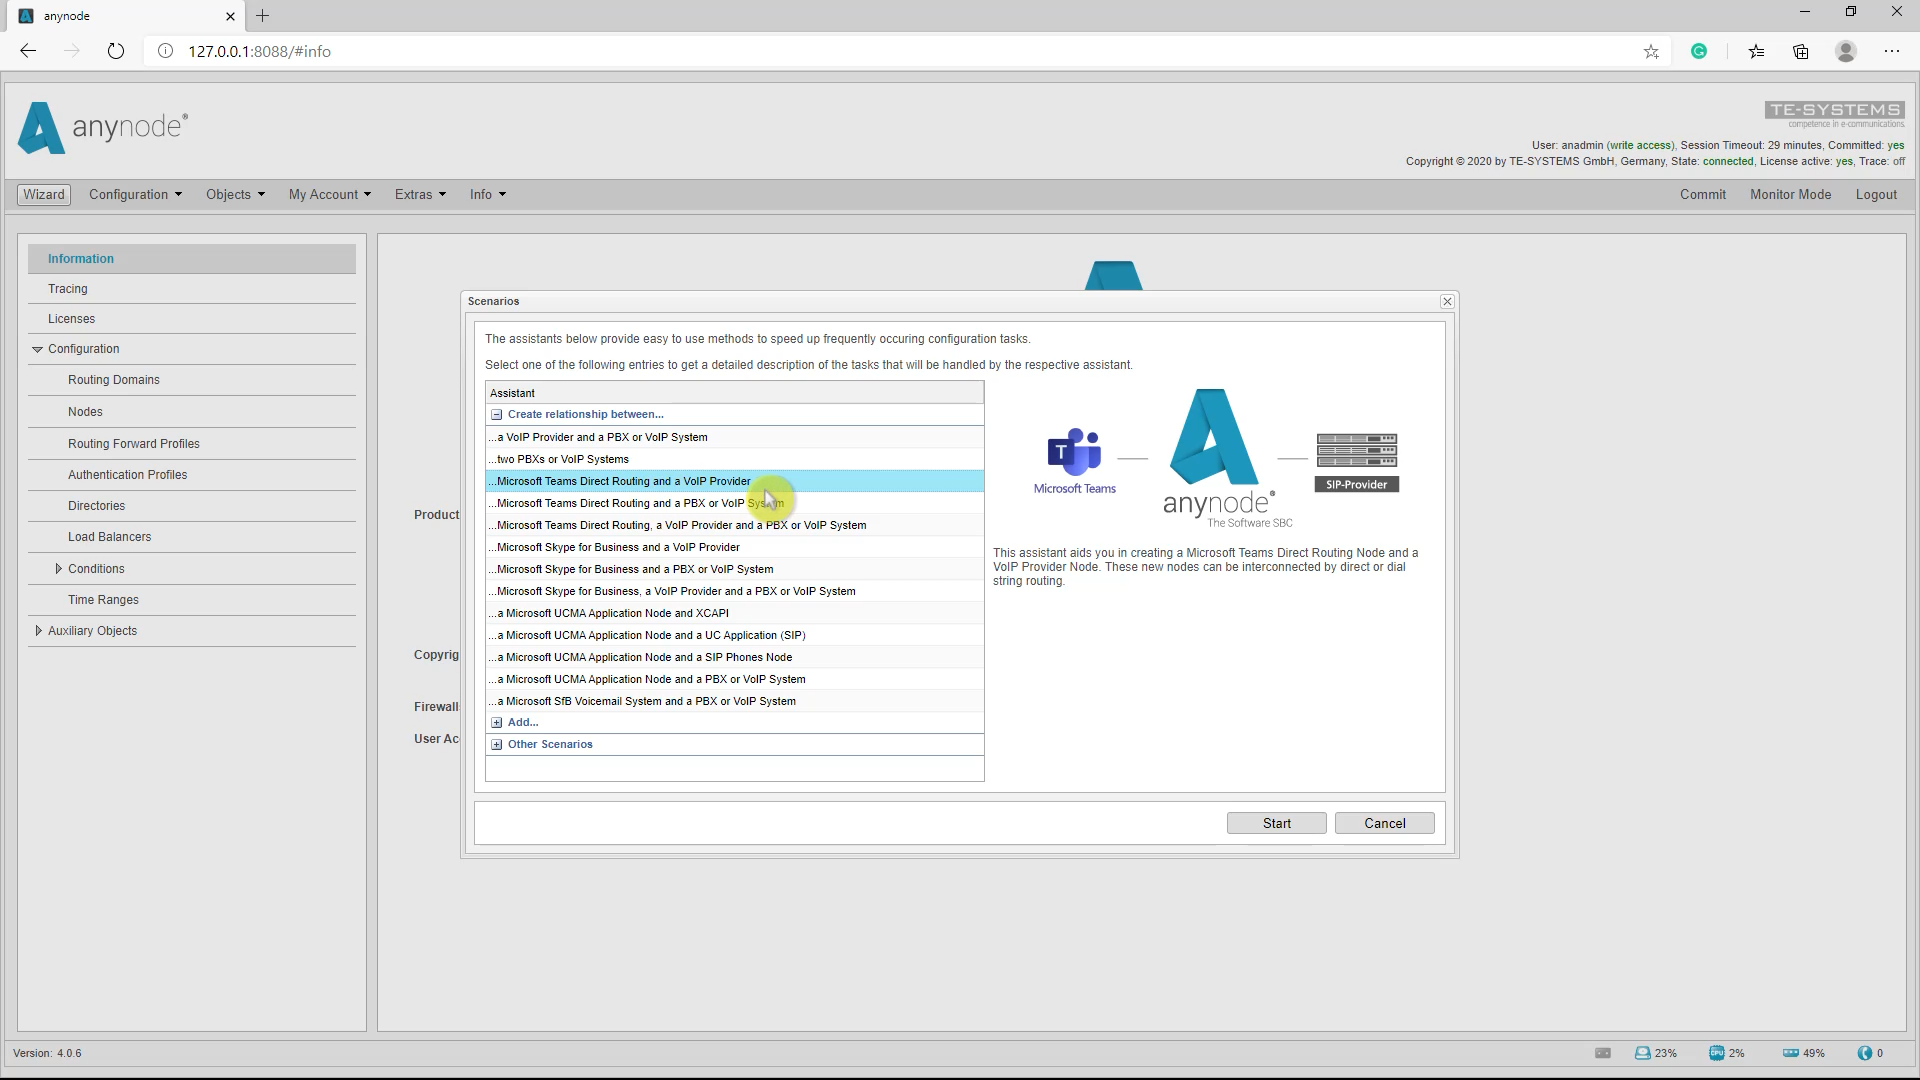
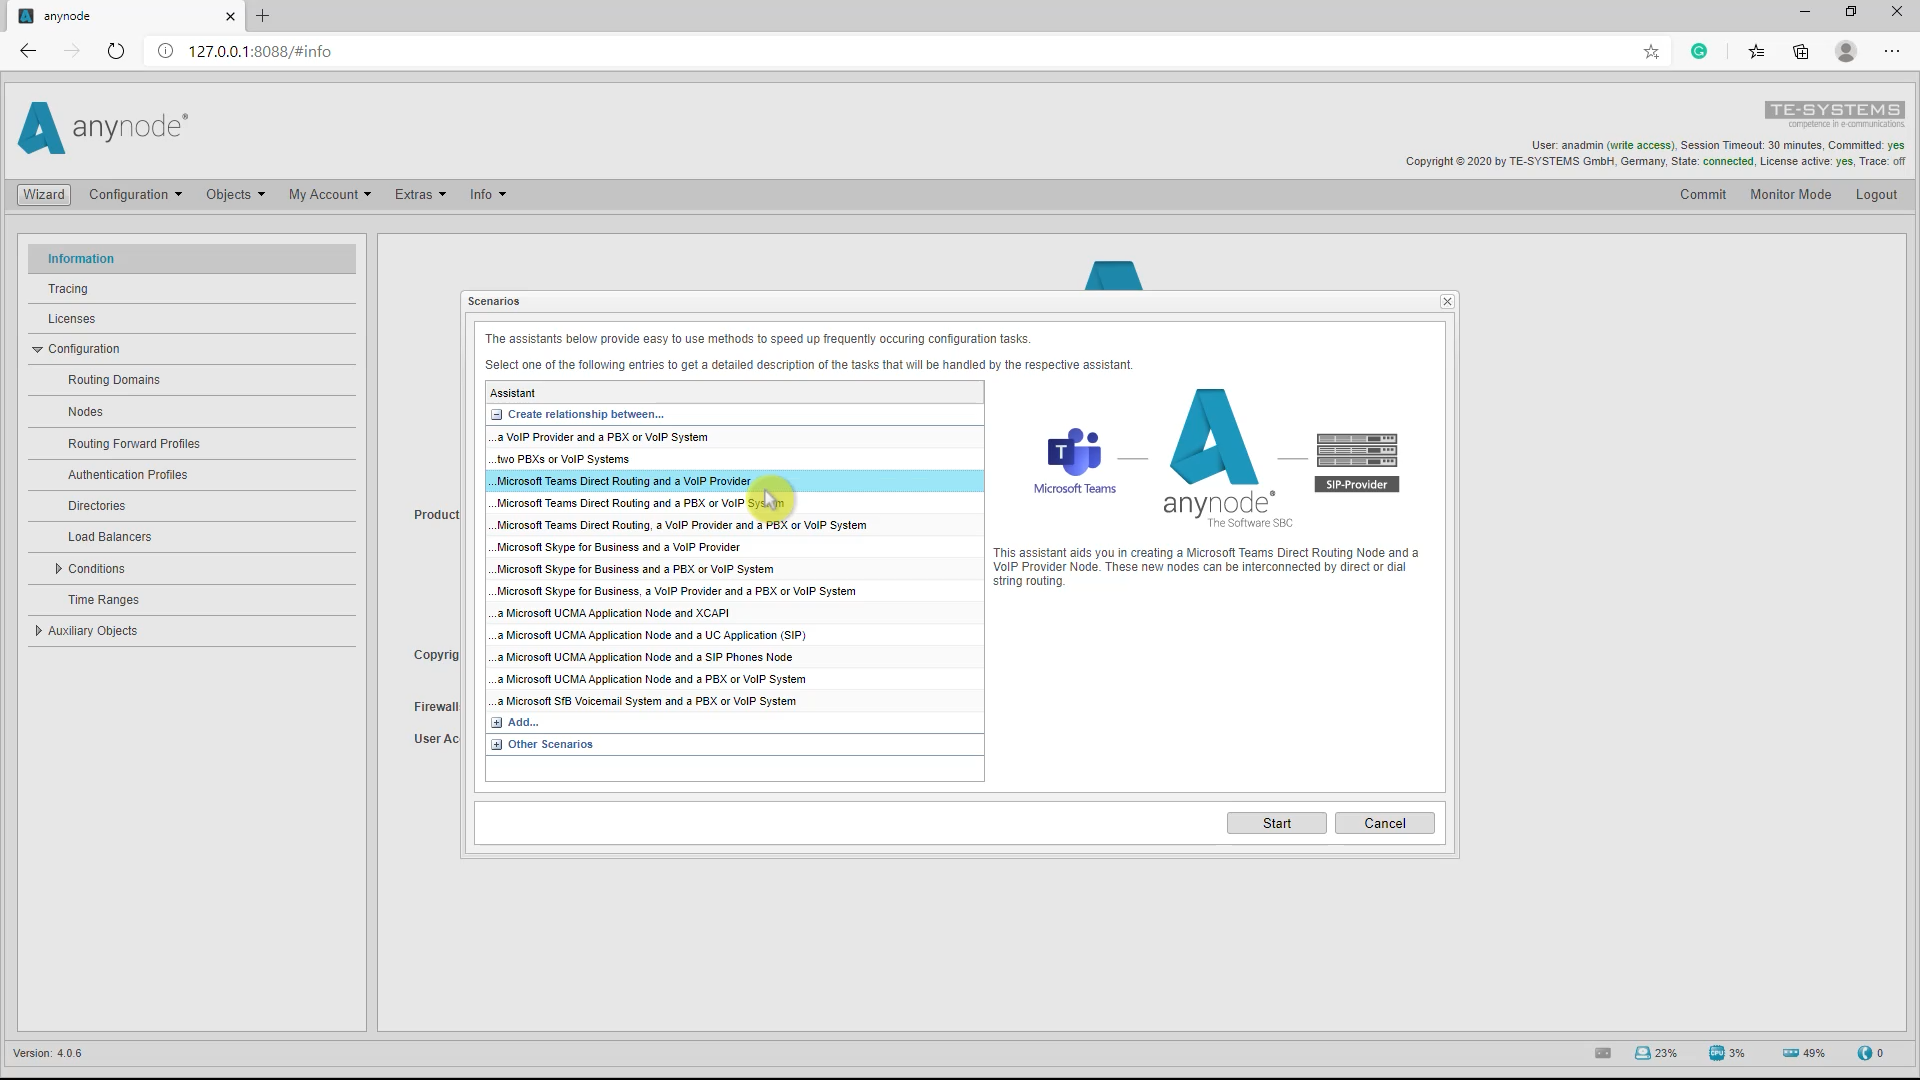
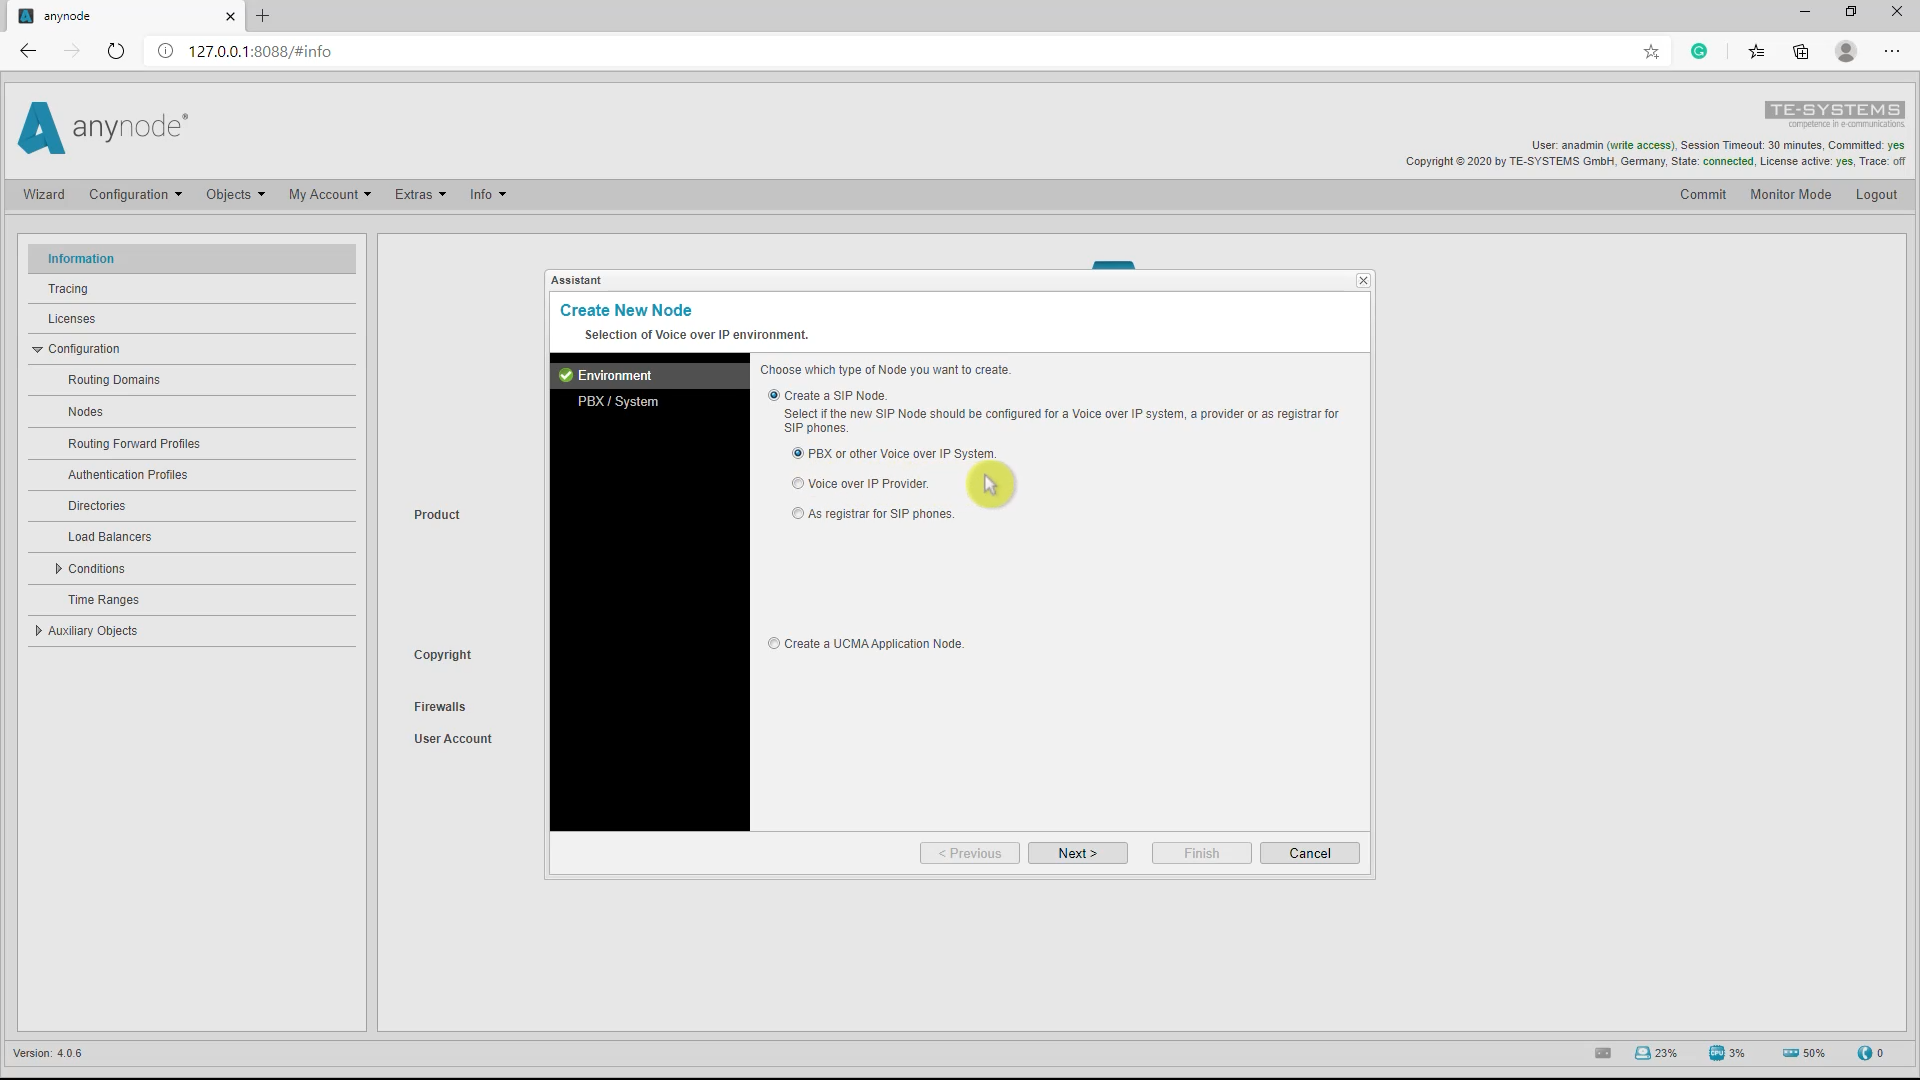
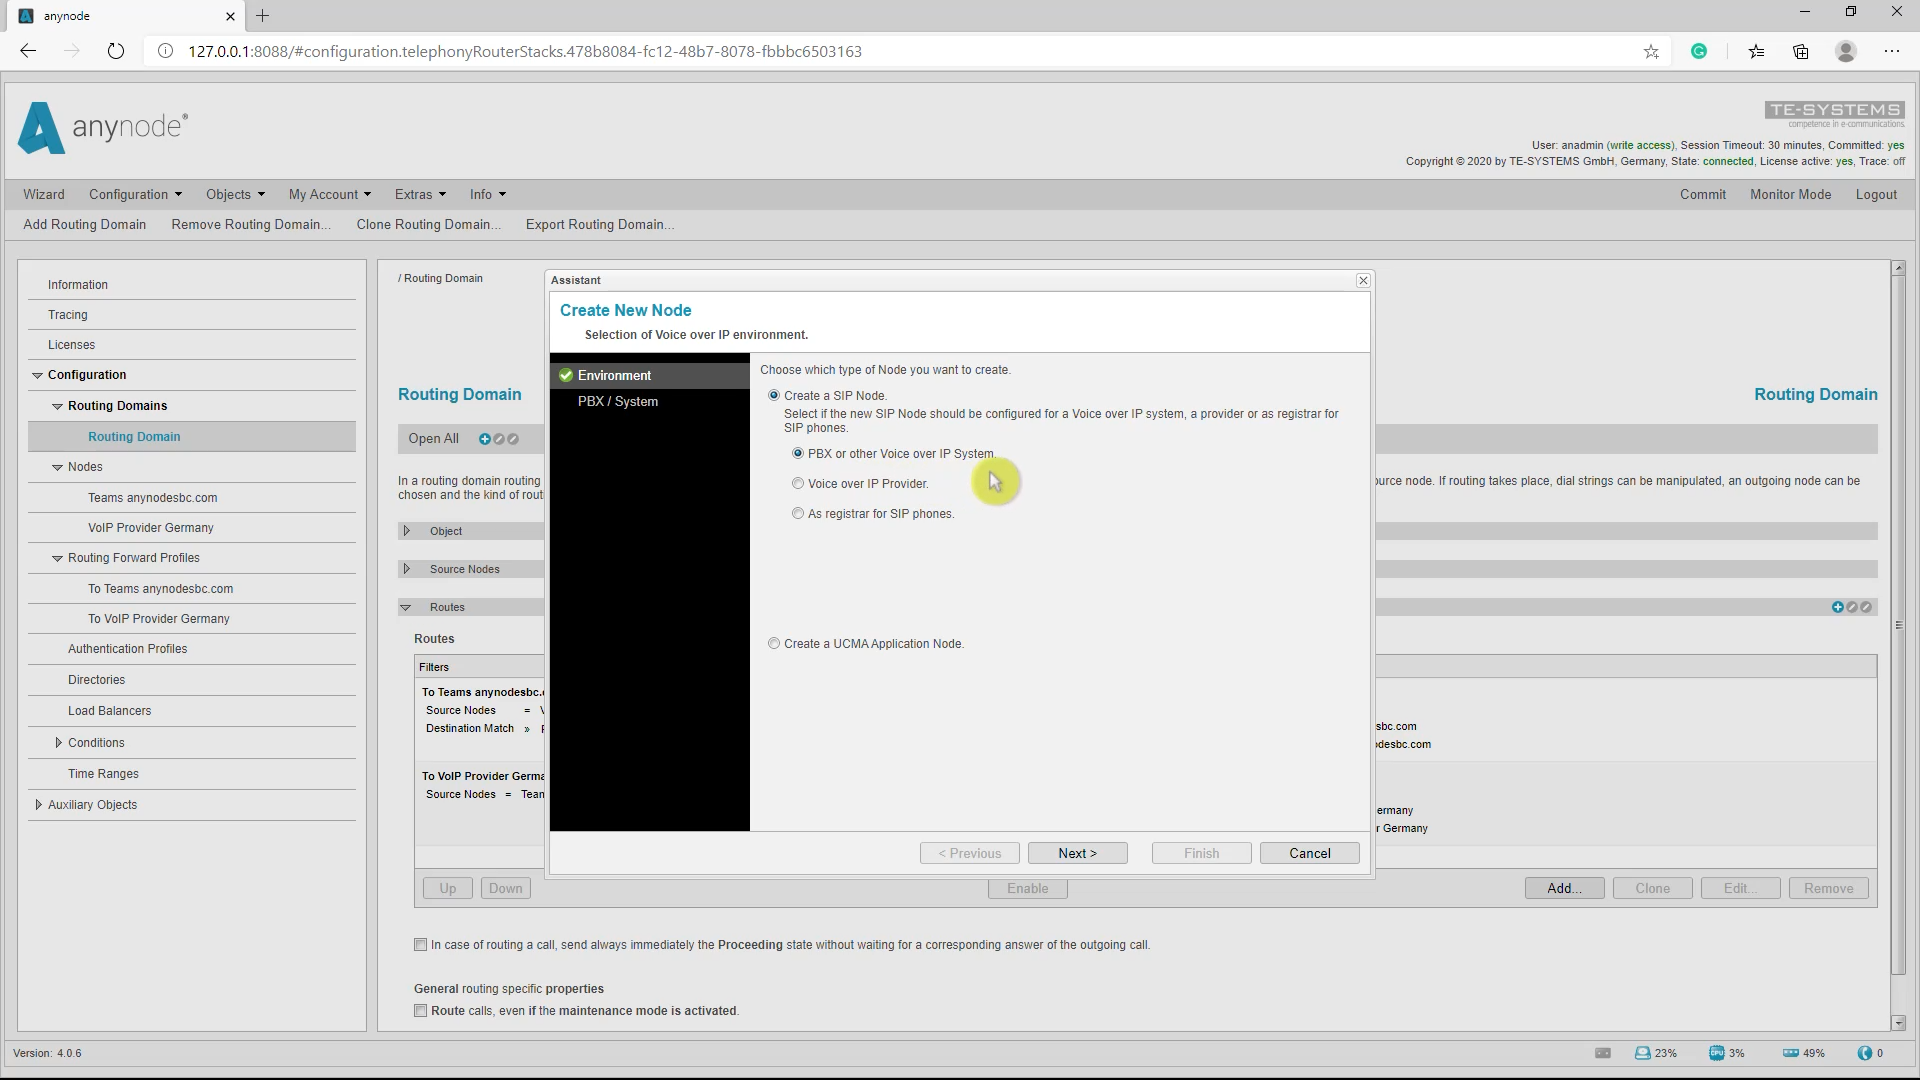
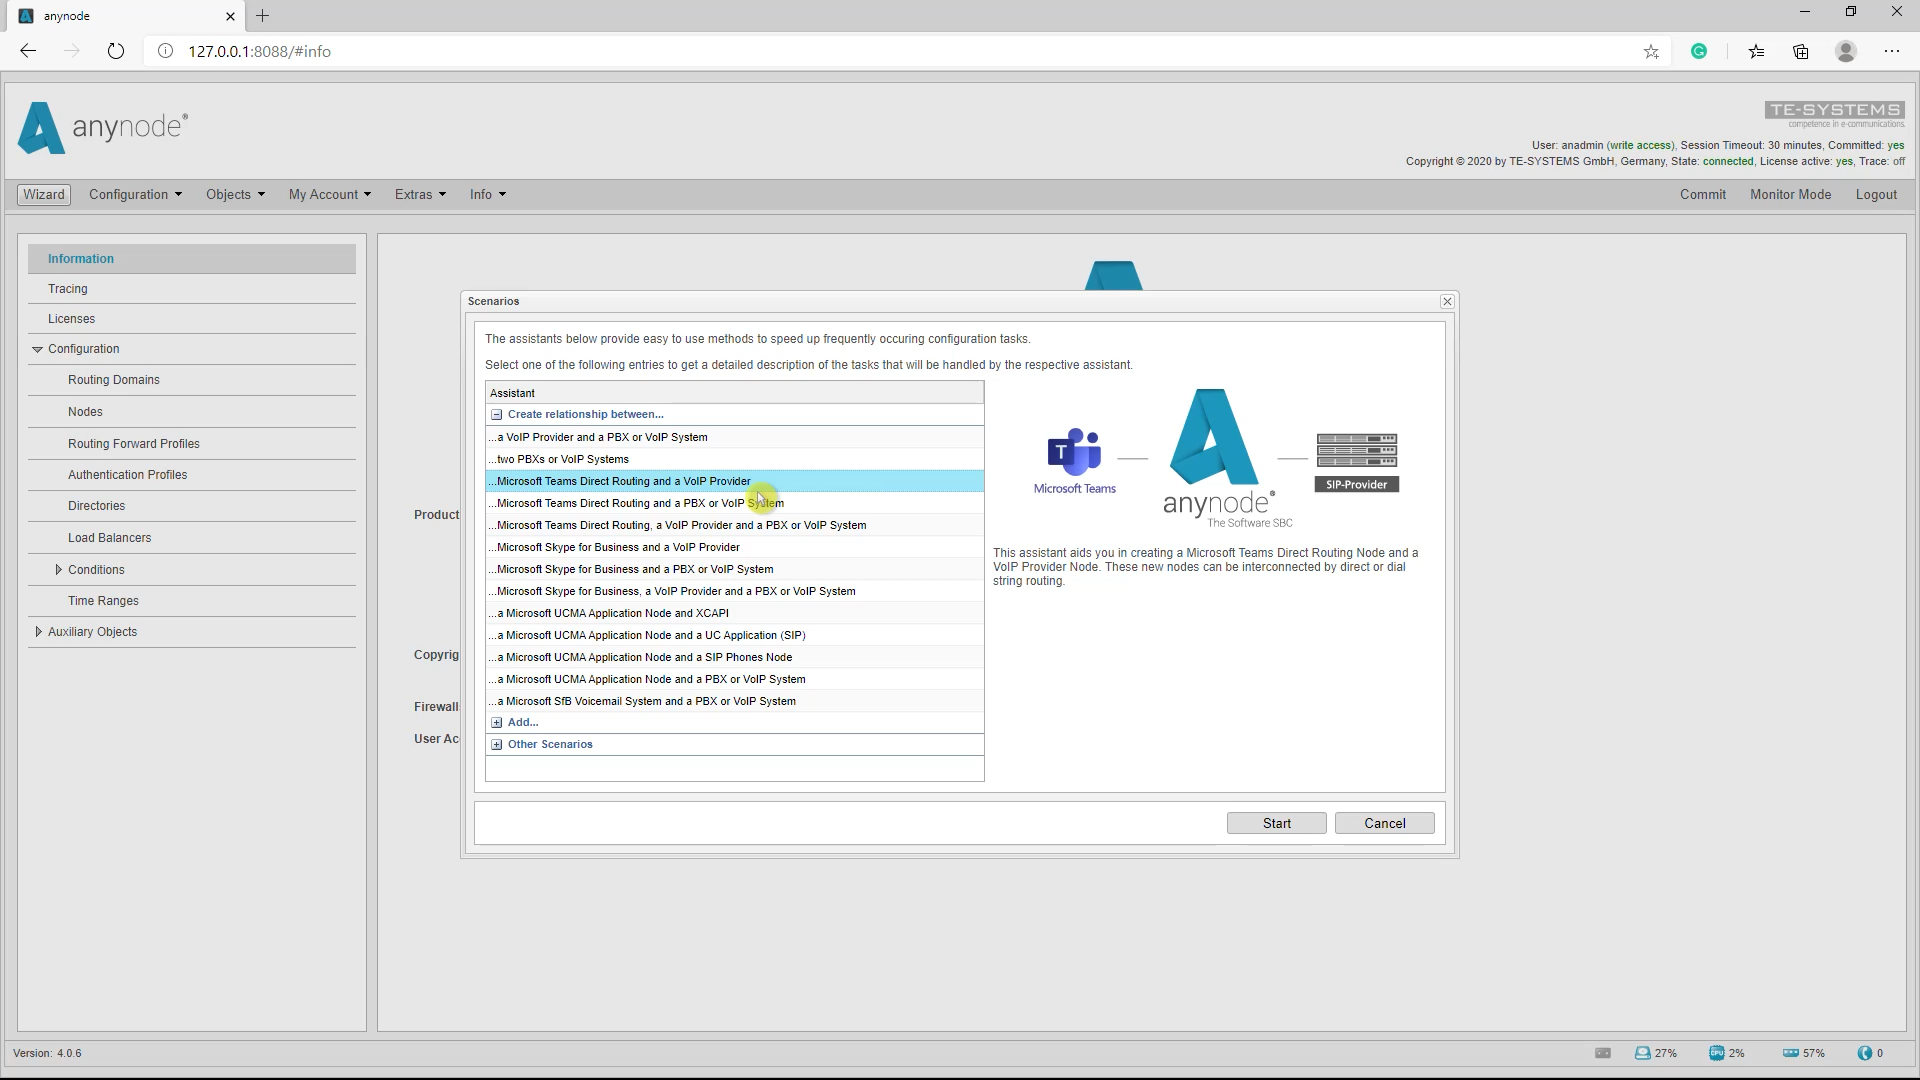
Let’s start with the guided setup in anynode for option 1, where anynode is used as the only SBC. in the company network. The complete setup will be created from scratch through the anynode wizard. In this example, the assistant’s Microsoft Teams Direct Routing and a VoIP Provider relationship will be selected.
Add Nodecan be alternatively used for creating new or additional nodes for an existing Microsoft Teams configuration in anynode. Keep in mind that “Add Node” contains no wizard-based routing setup.
The guided setup through the anynode wizard with wizard-based routing will be described now.
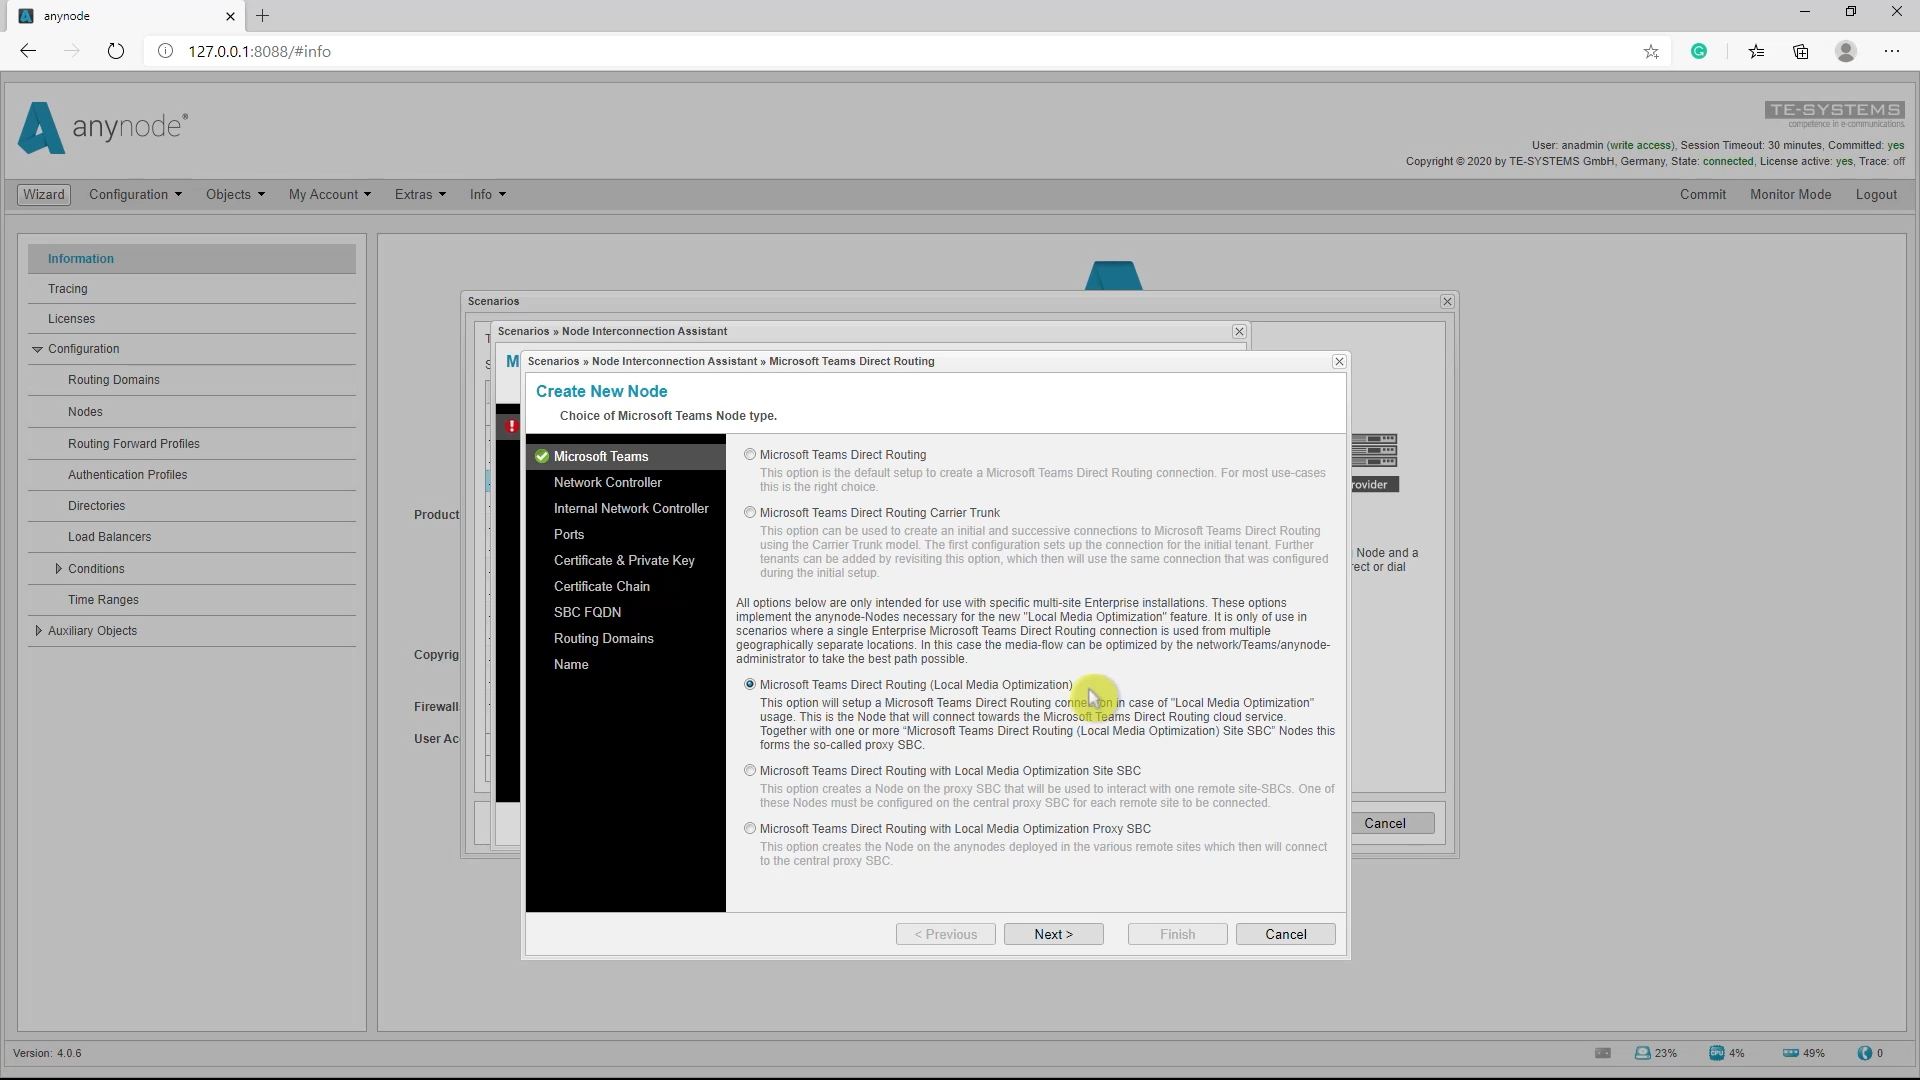
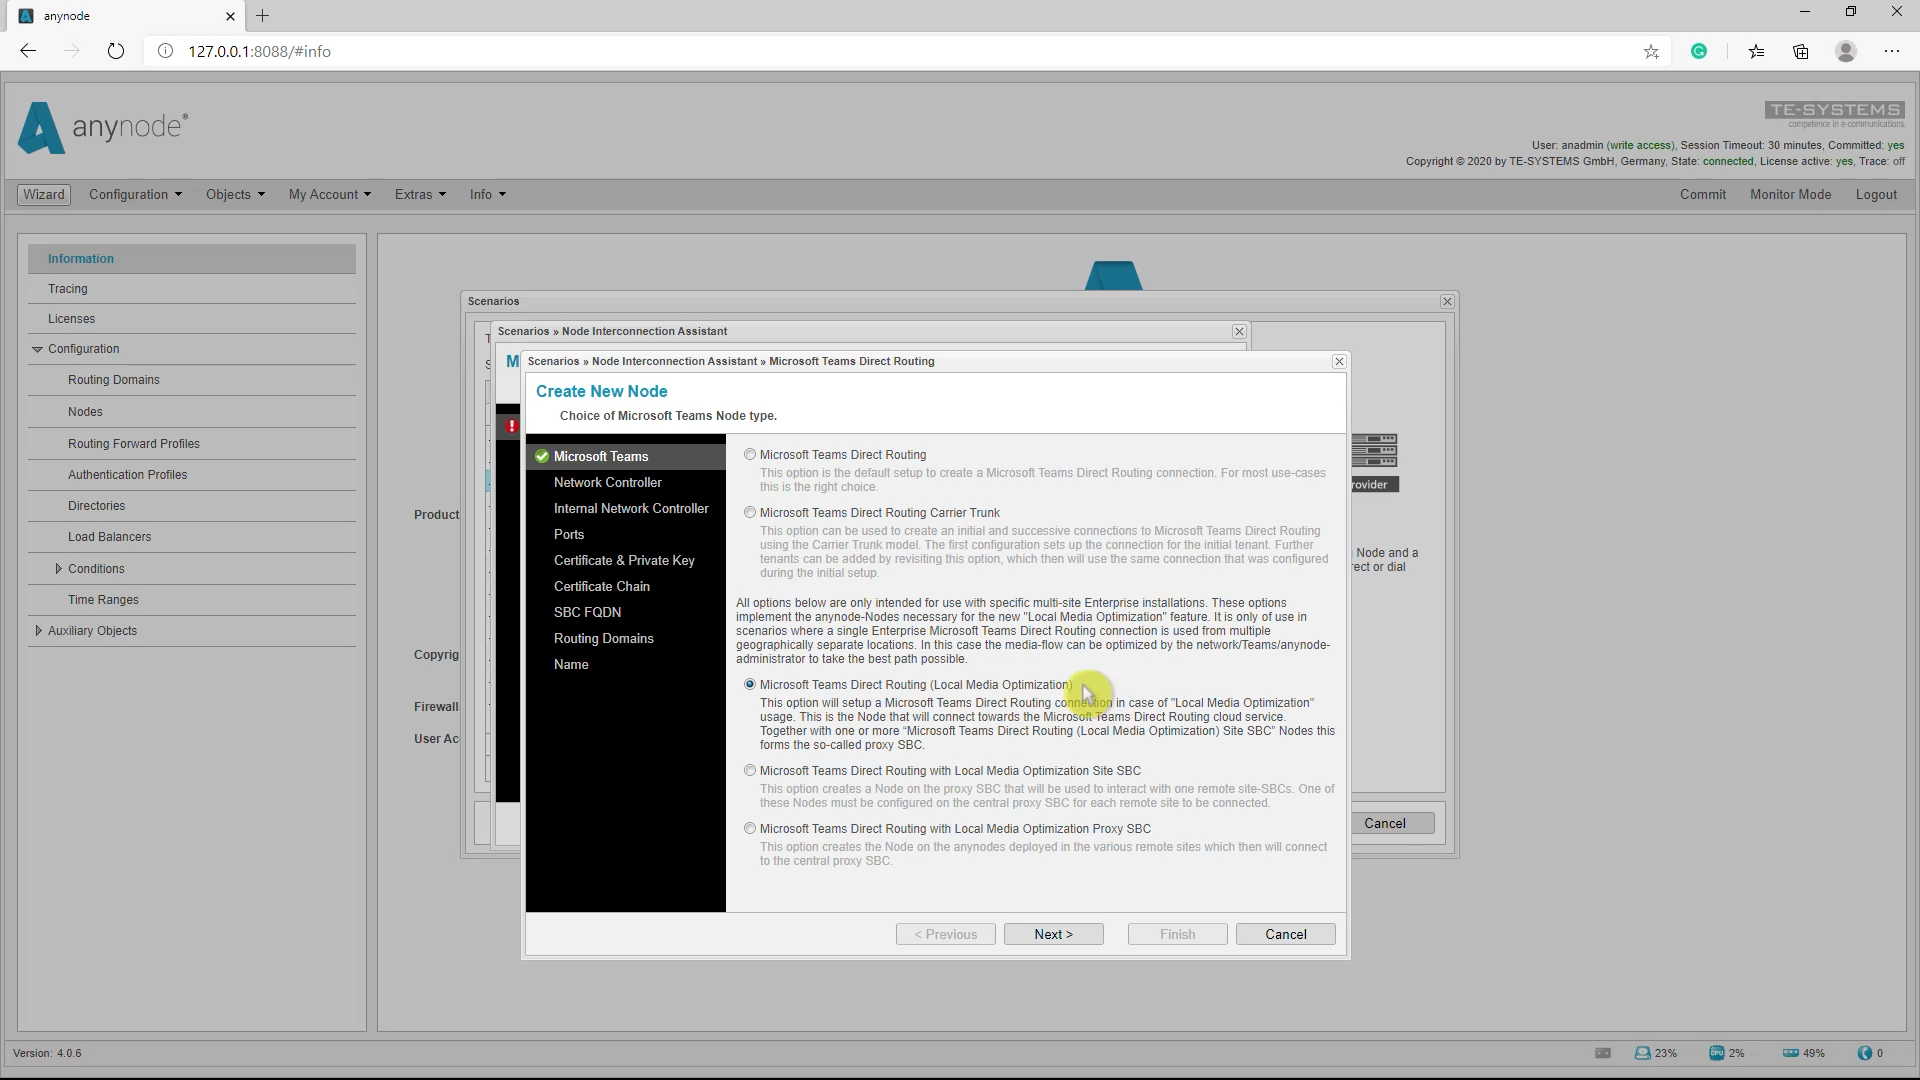
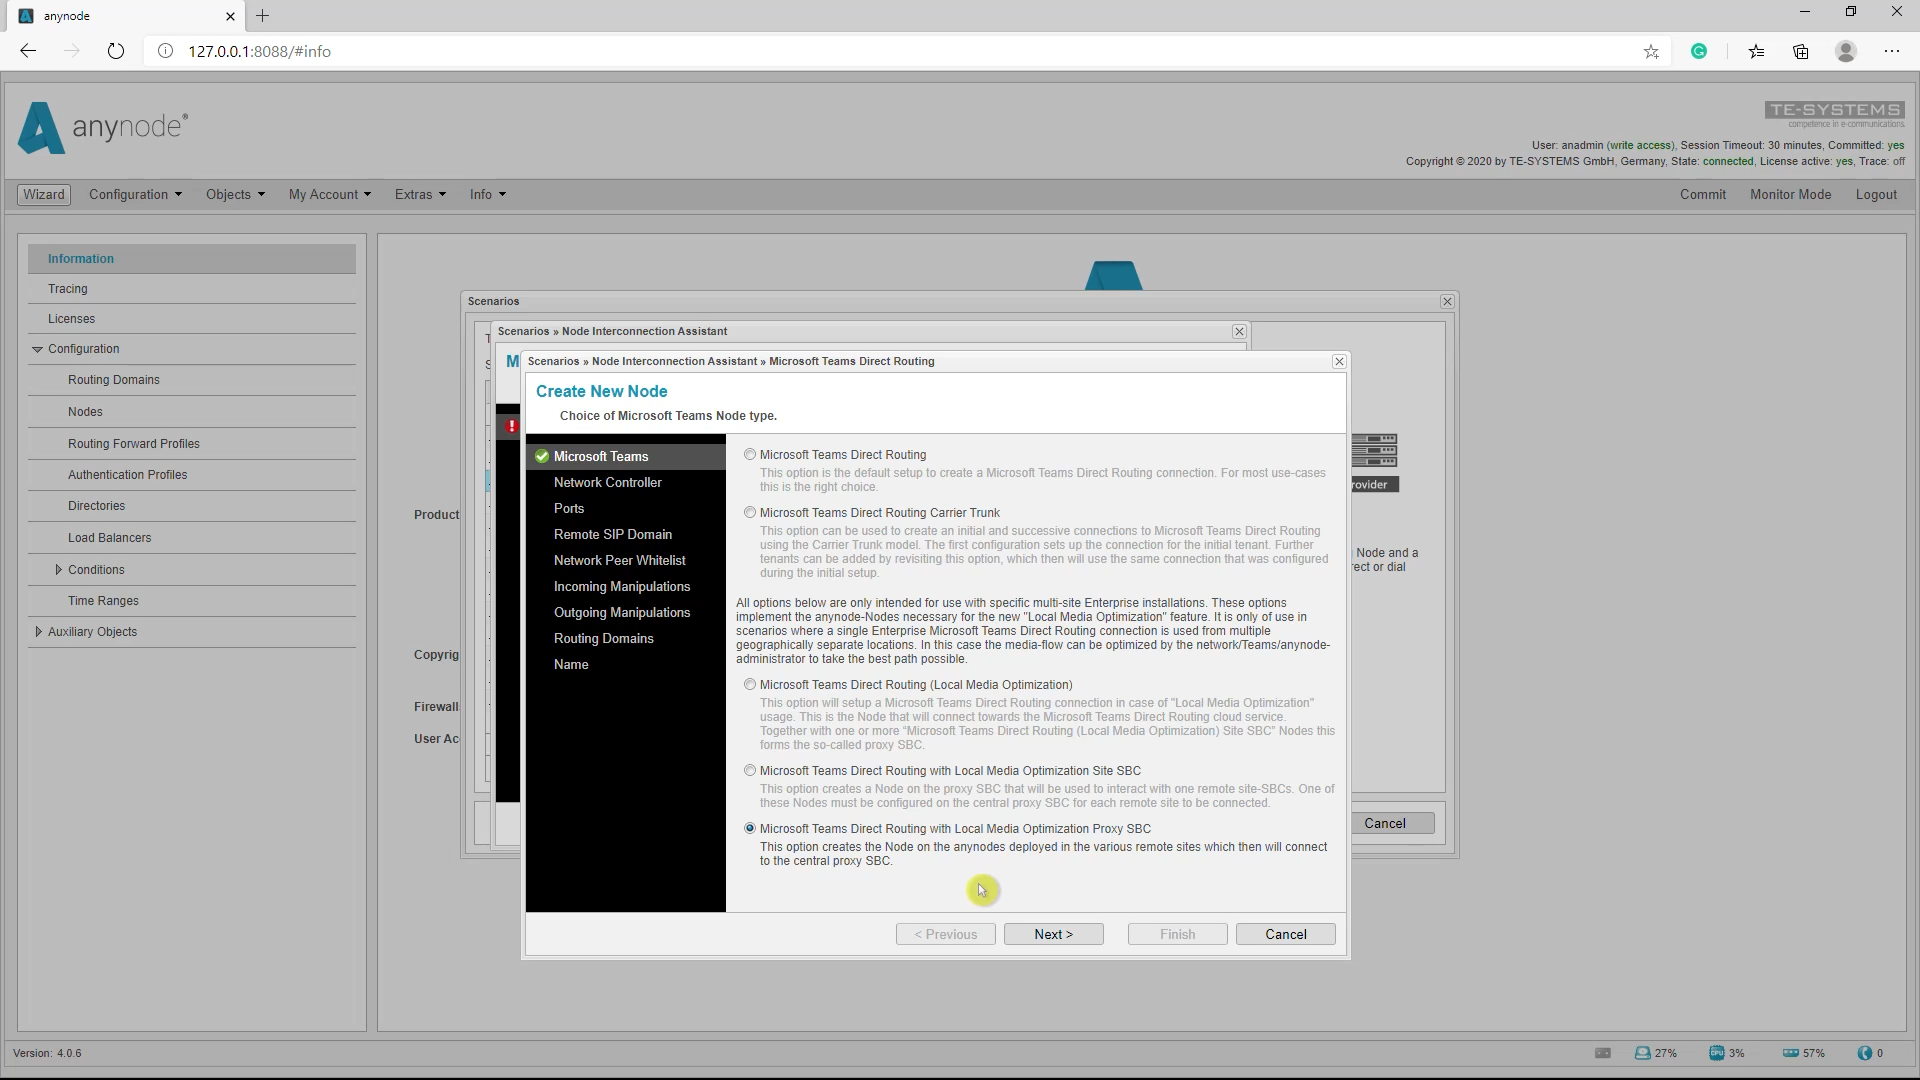
In the Microsoft Teams dialog, select Microsoft Teams Direct Routing (Local Media Optimization).
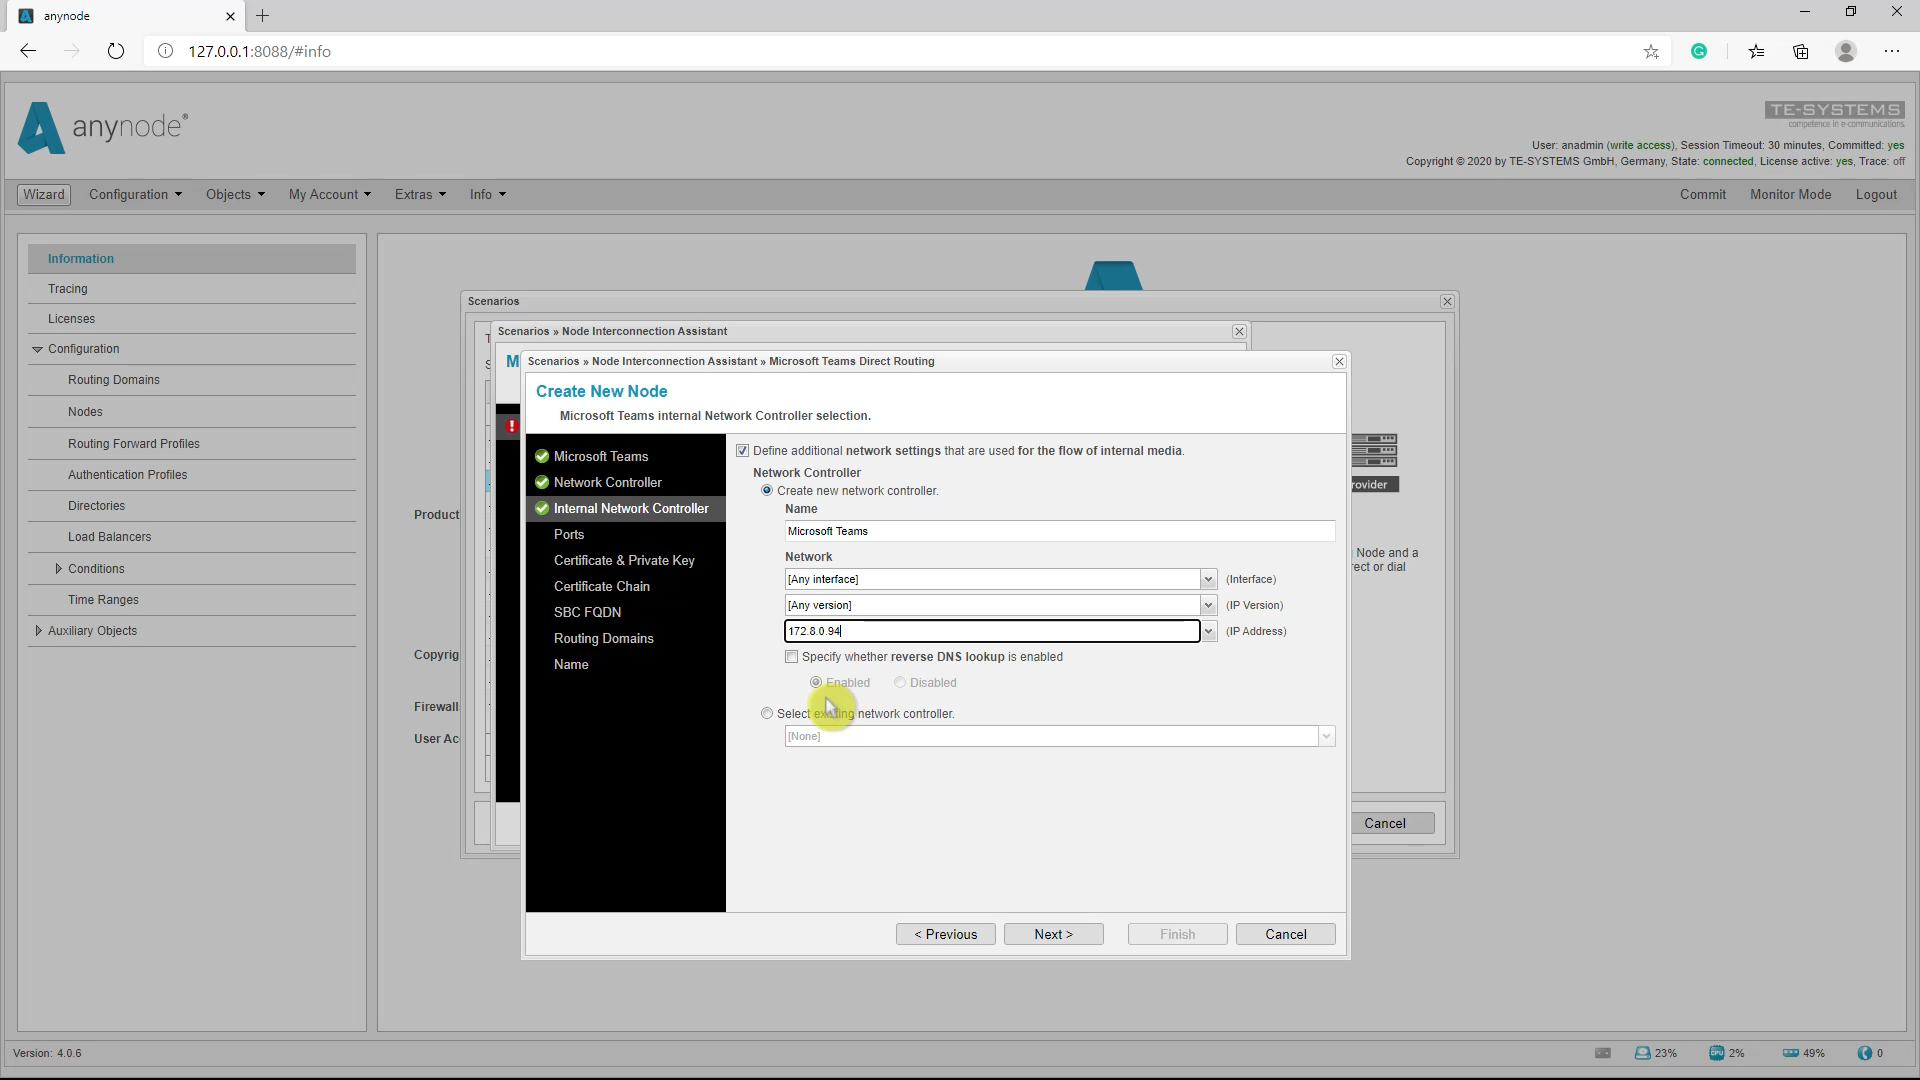
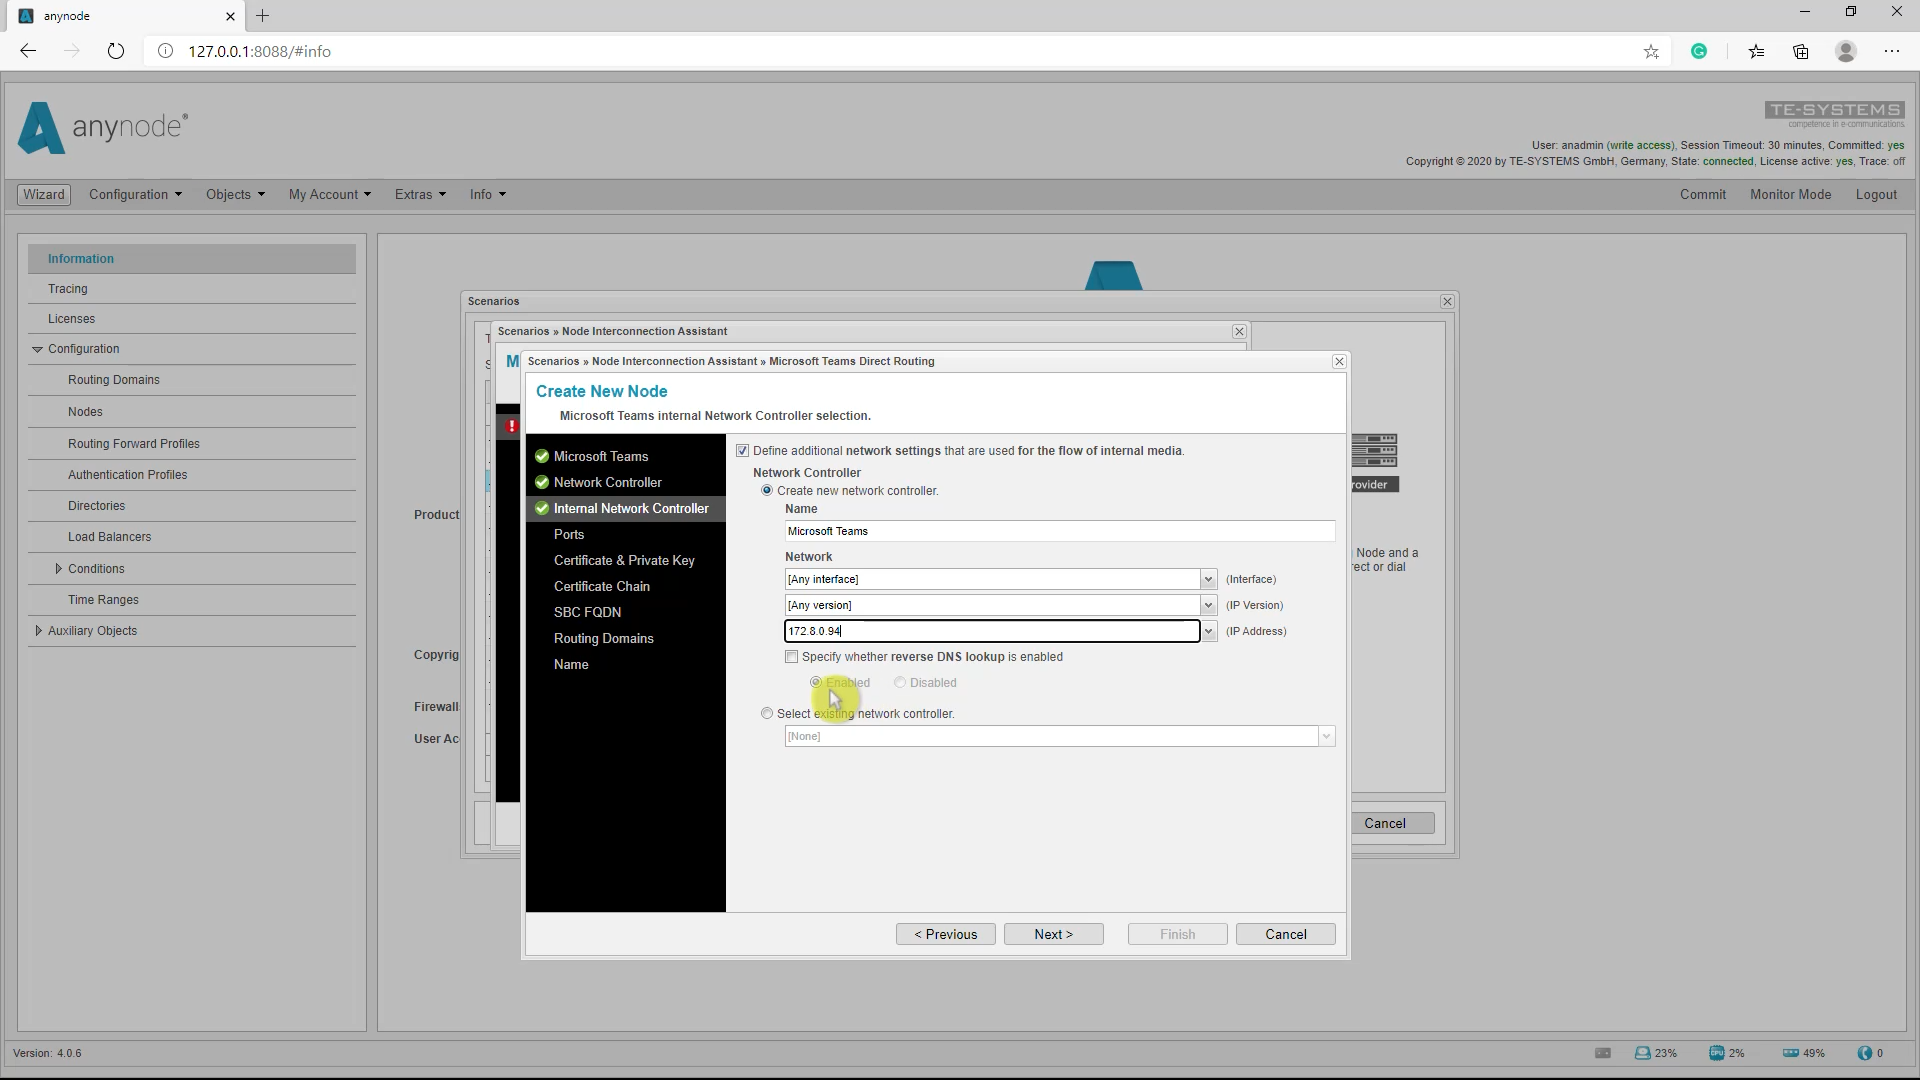
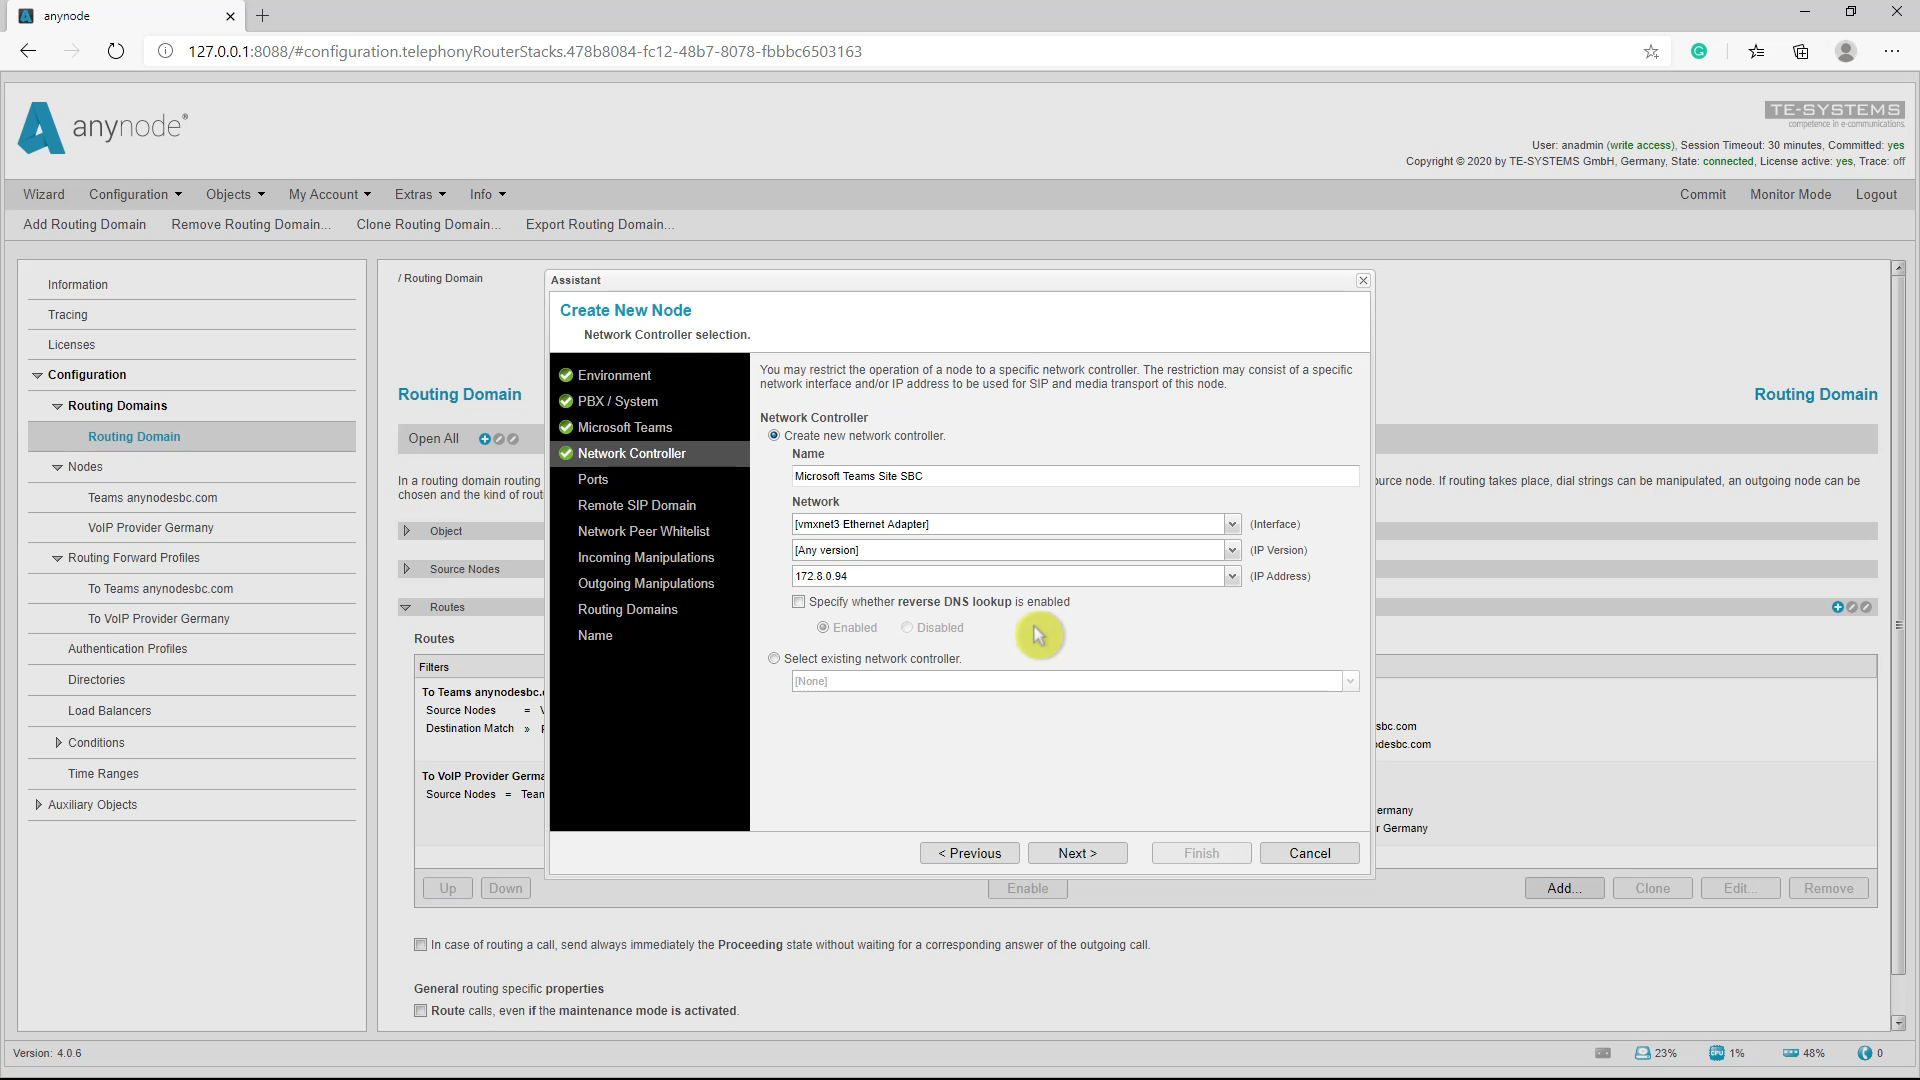
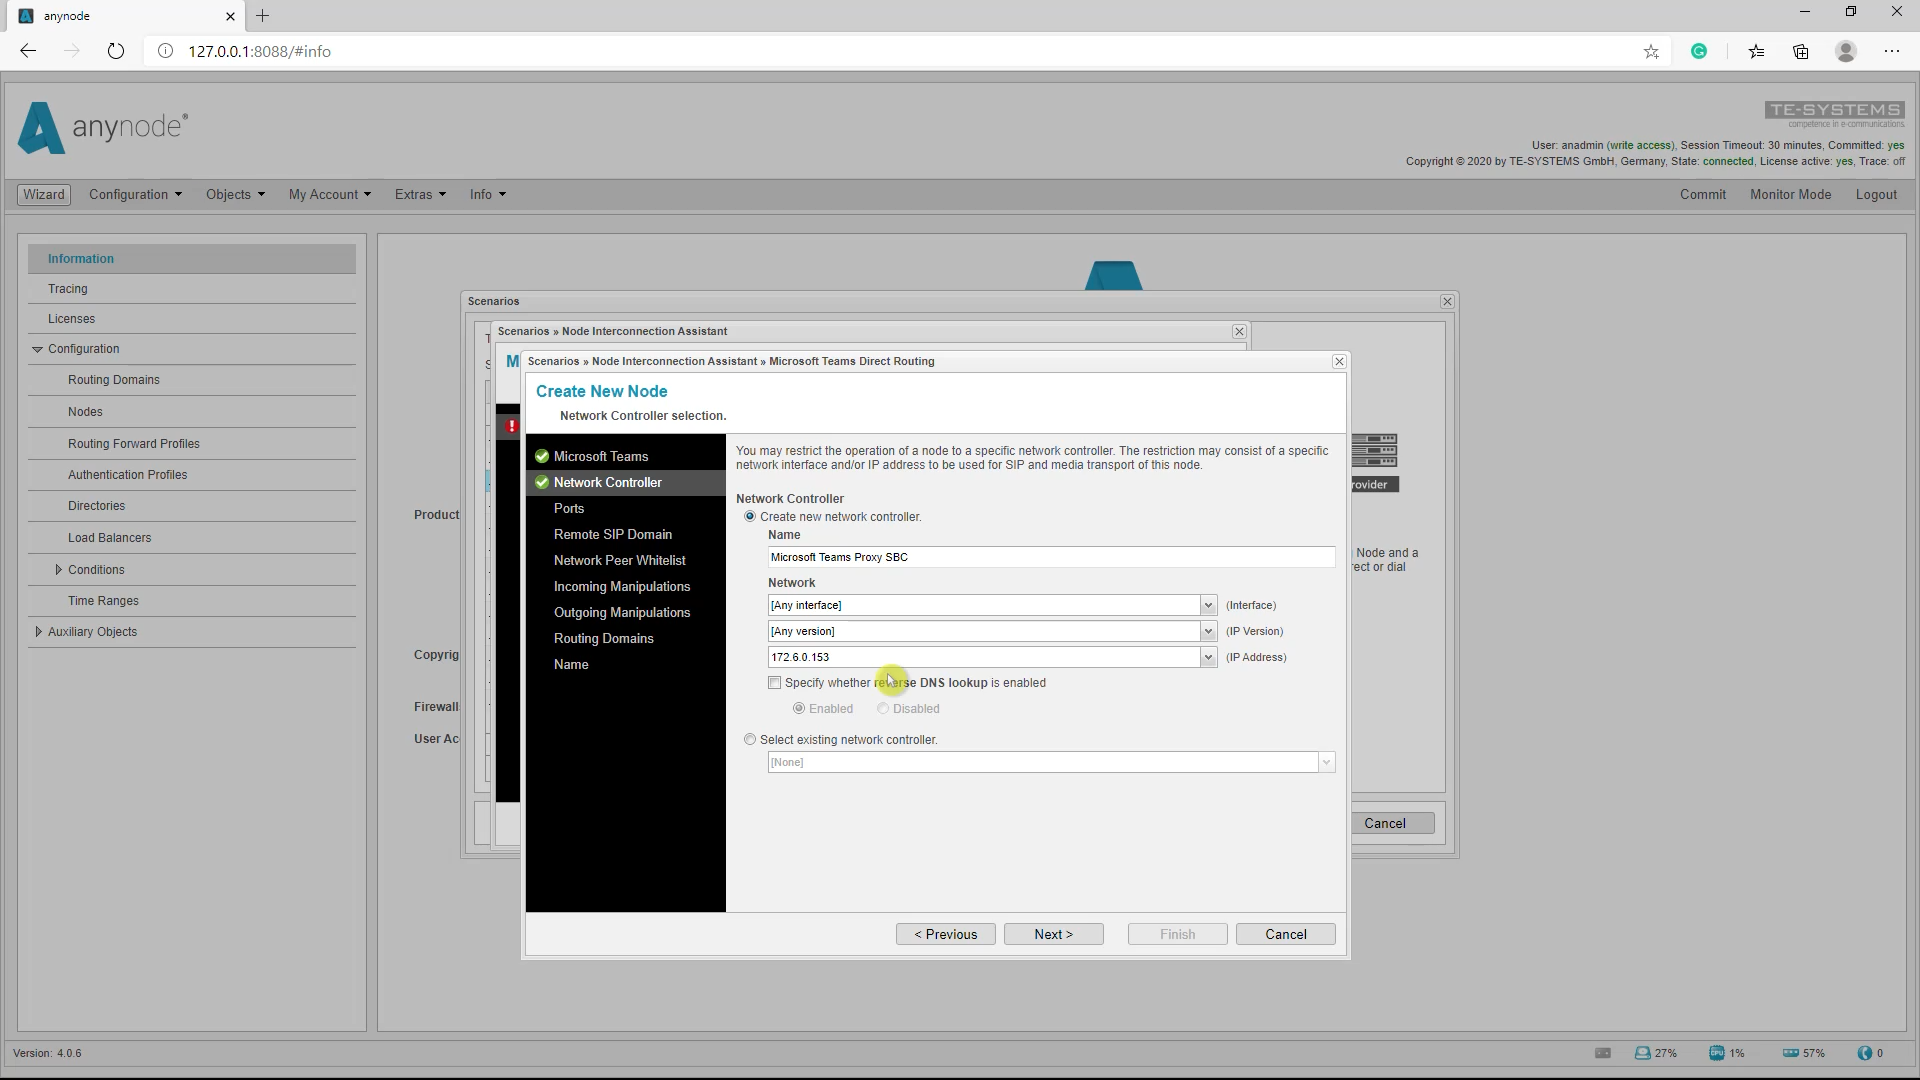
For the Network Controller and Internal Network Controllerdialog, the corresponding public and internal network interfaces must be selected. Ensure that reverse DNS Lookupstays enabled for the public interface as this is a requirement for SIP through TLS connections. The RTP data is sent via the internal network controller if the Microsoft Teams client is in the internal network.
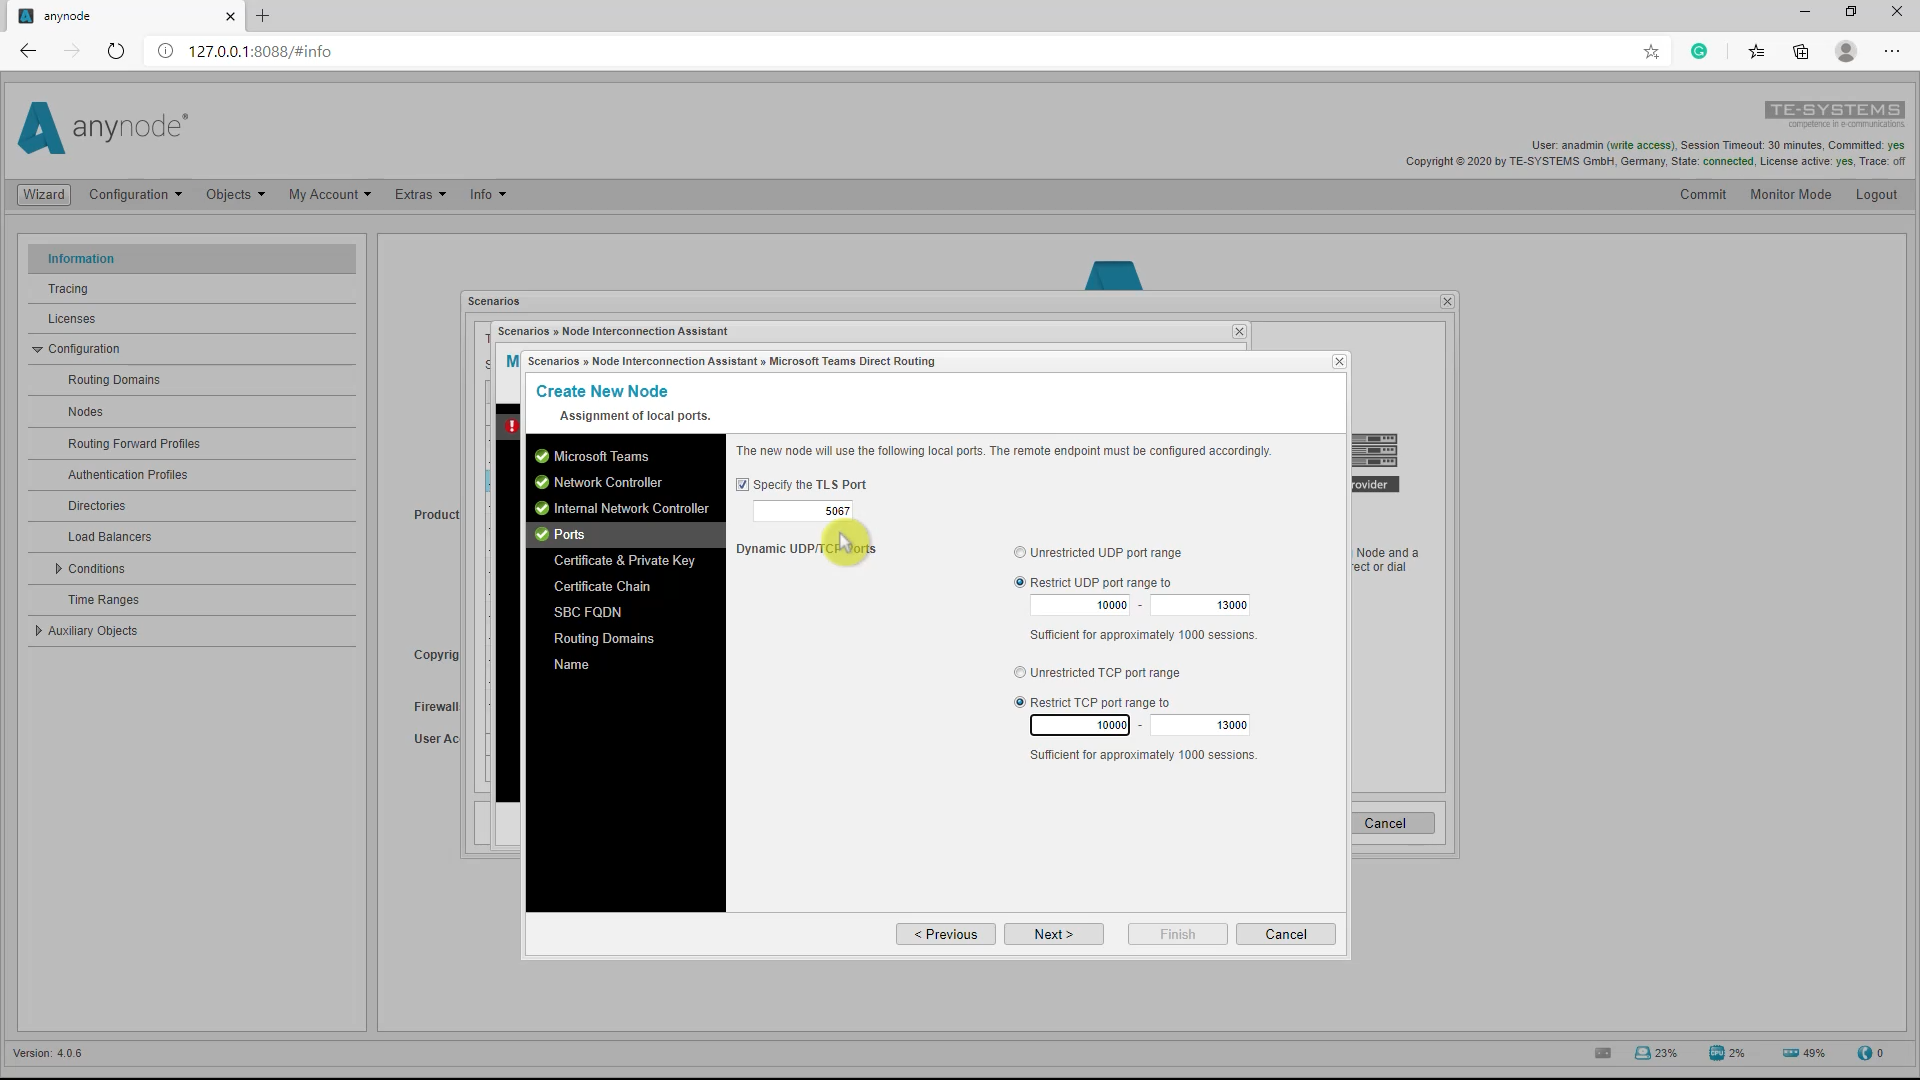
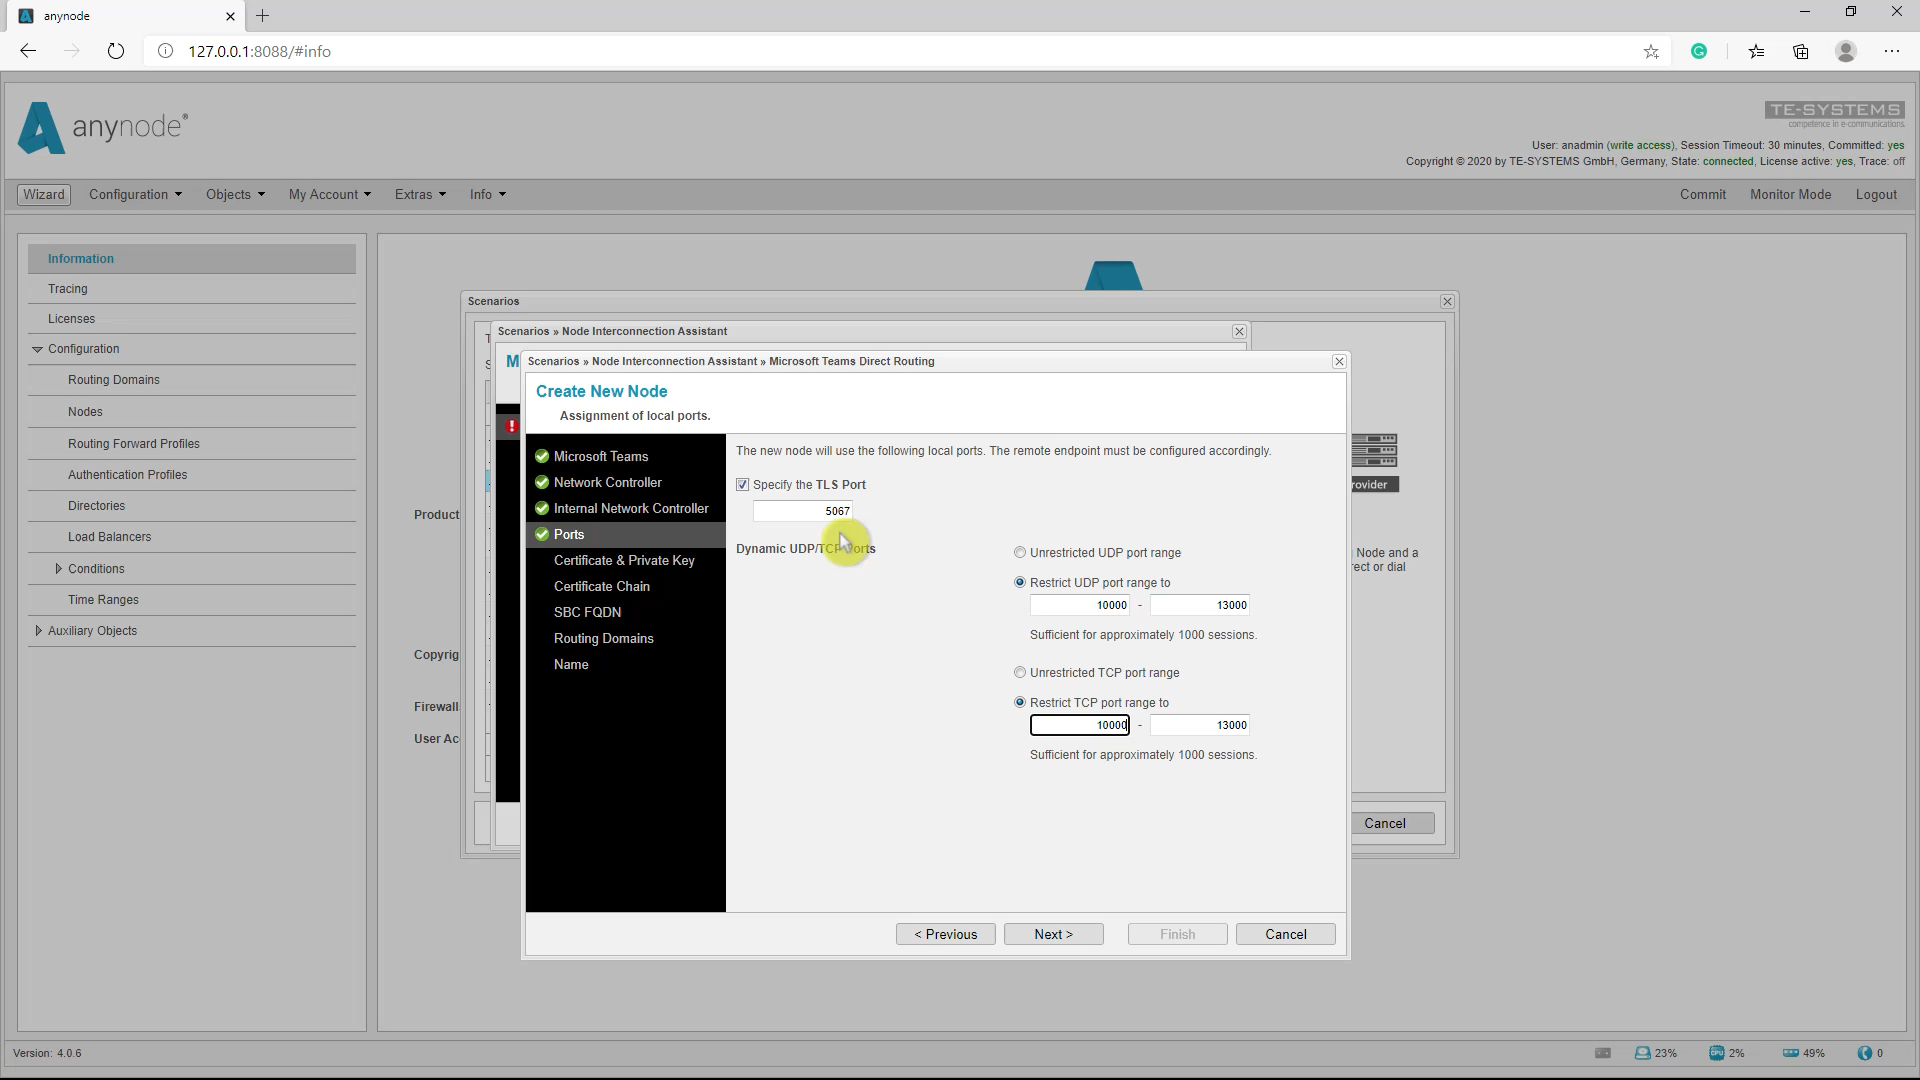
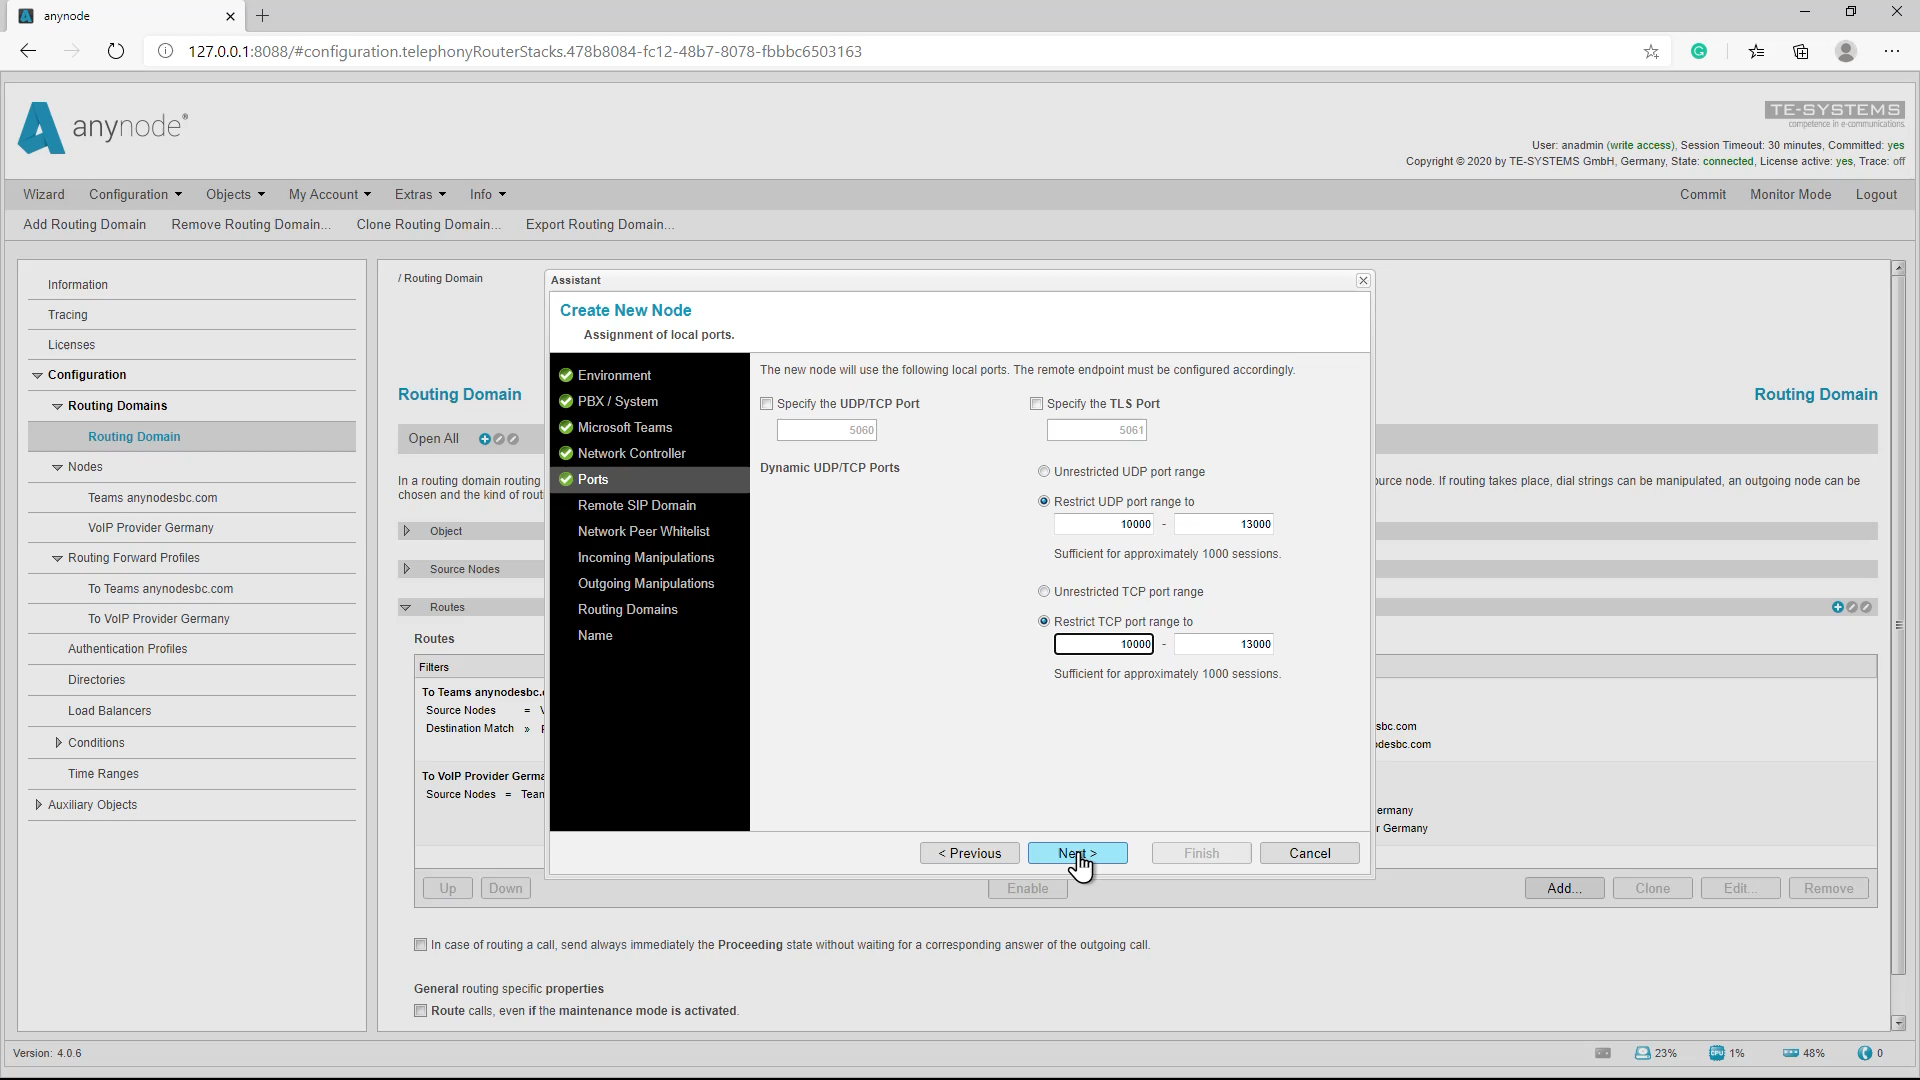
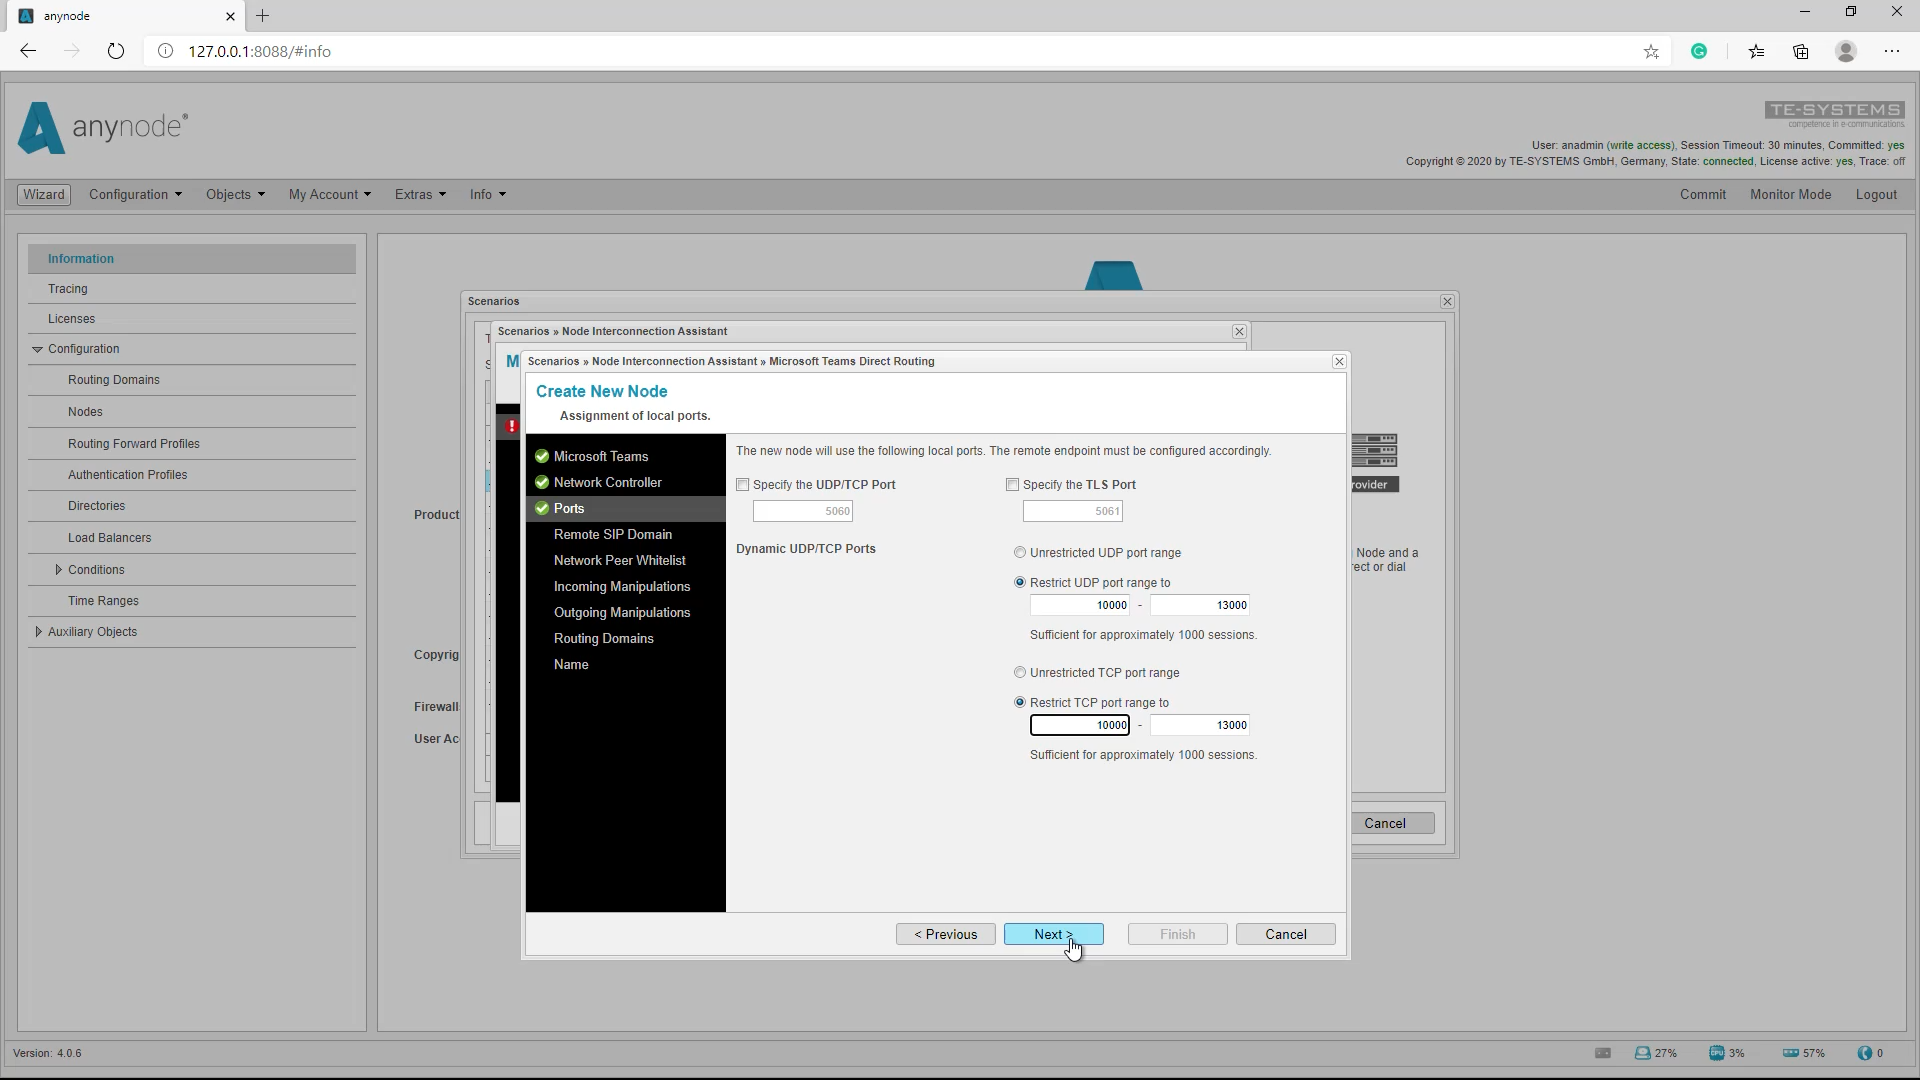
If multiple anynode Network Controllers share the same network interface on the host, make sure that the port ranges are unique to avoid any port conflicts. The Microsoft Teams Direct Routing node is set and uses port 5067.
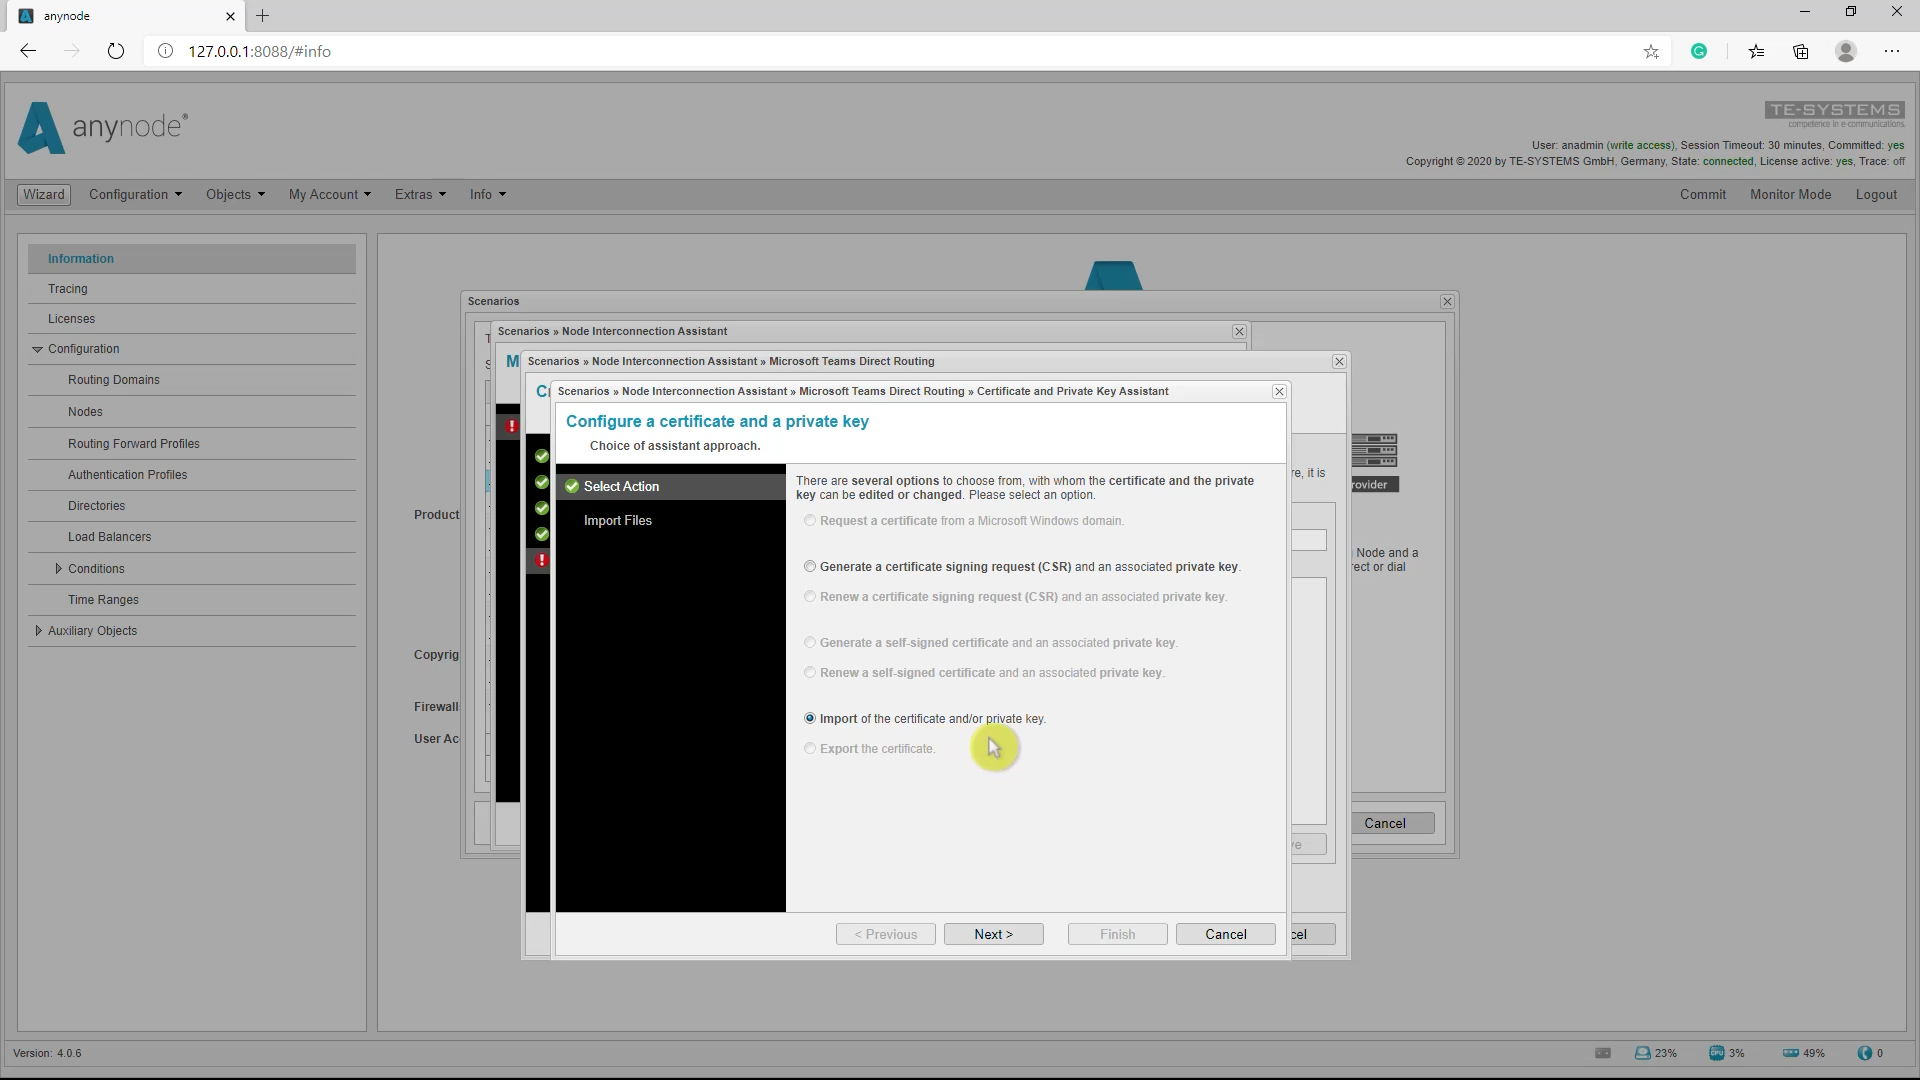
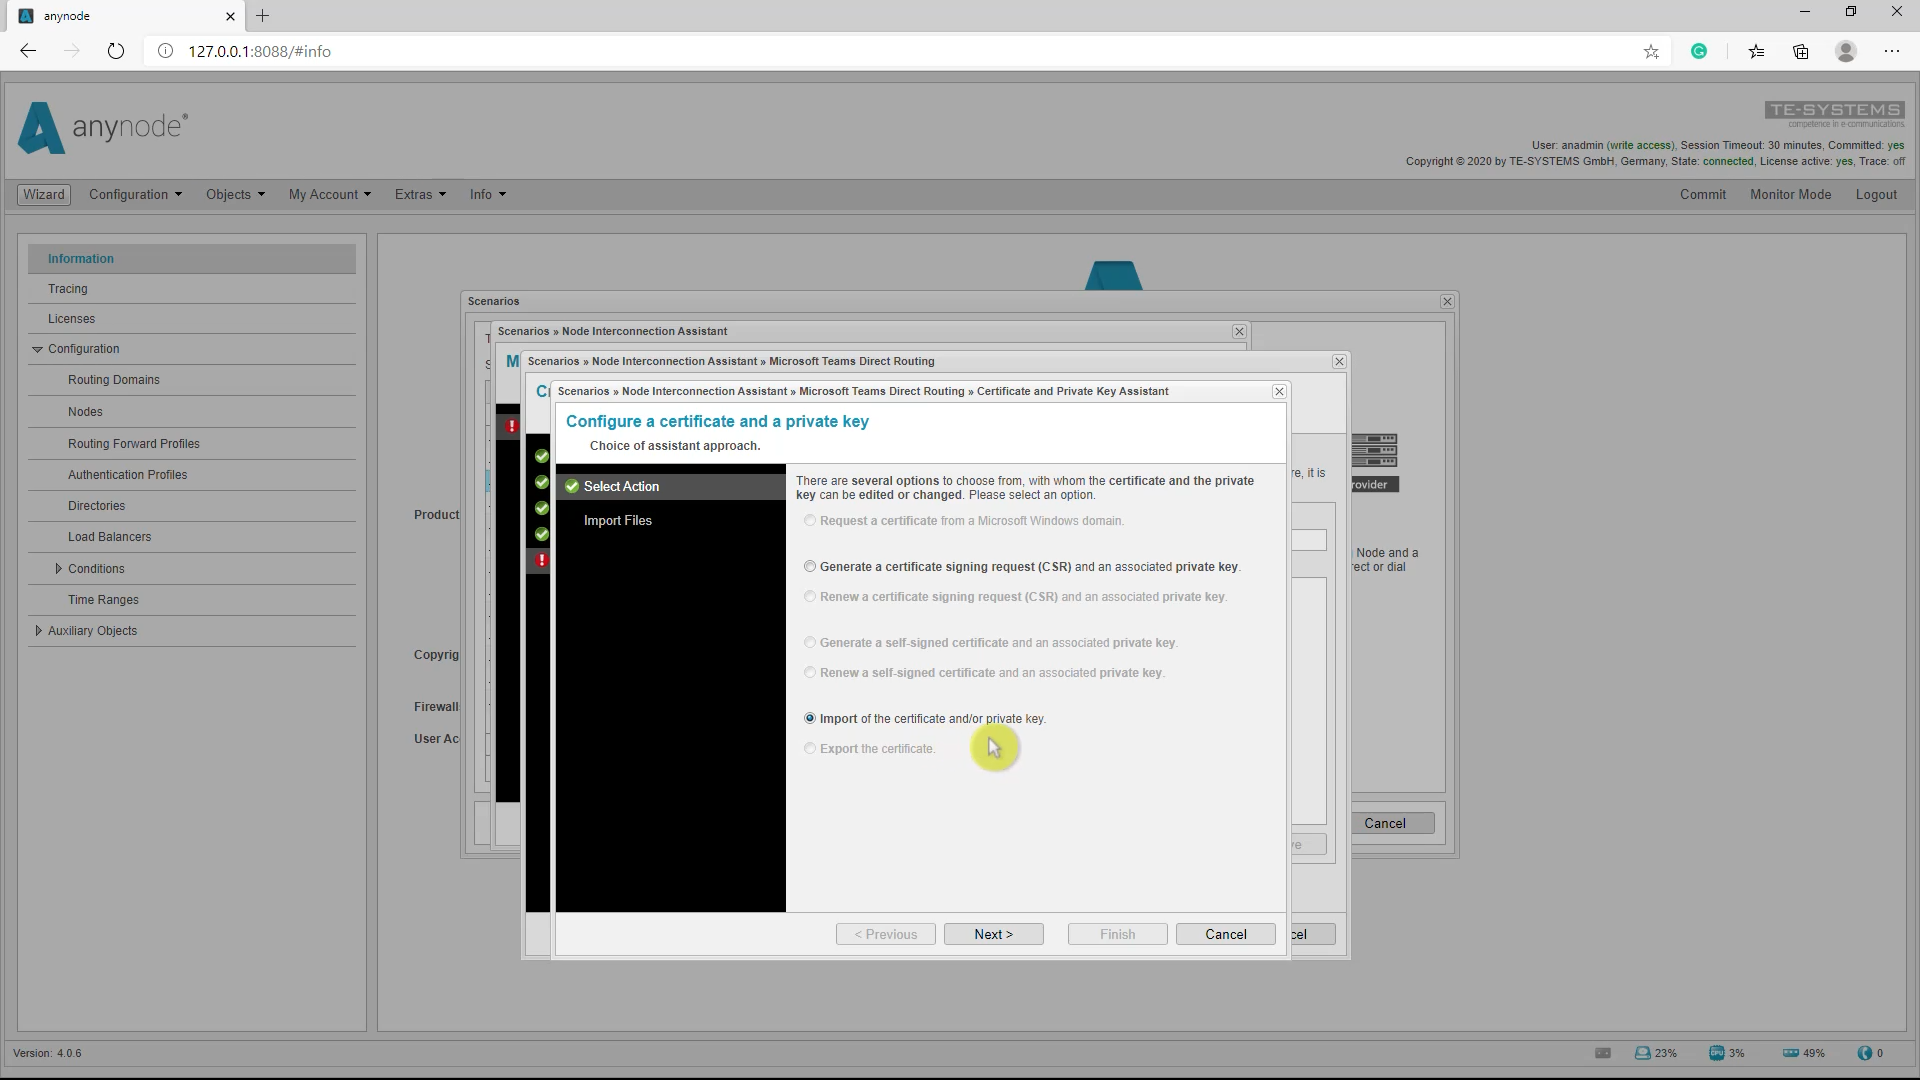
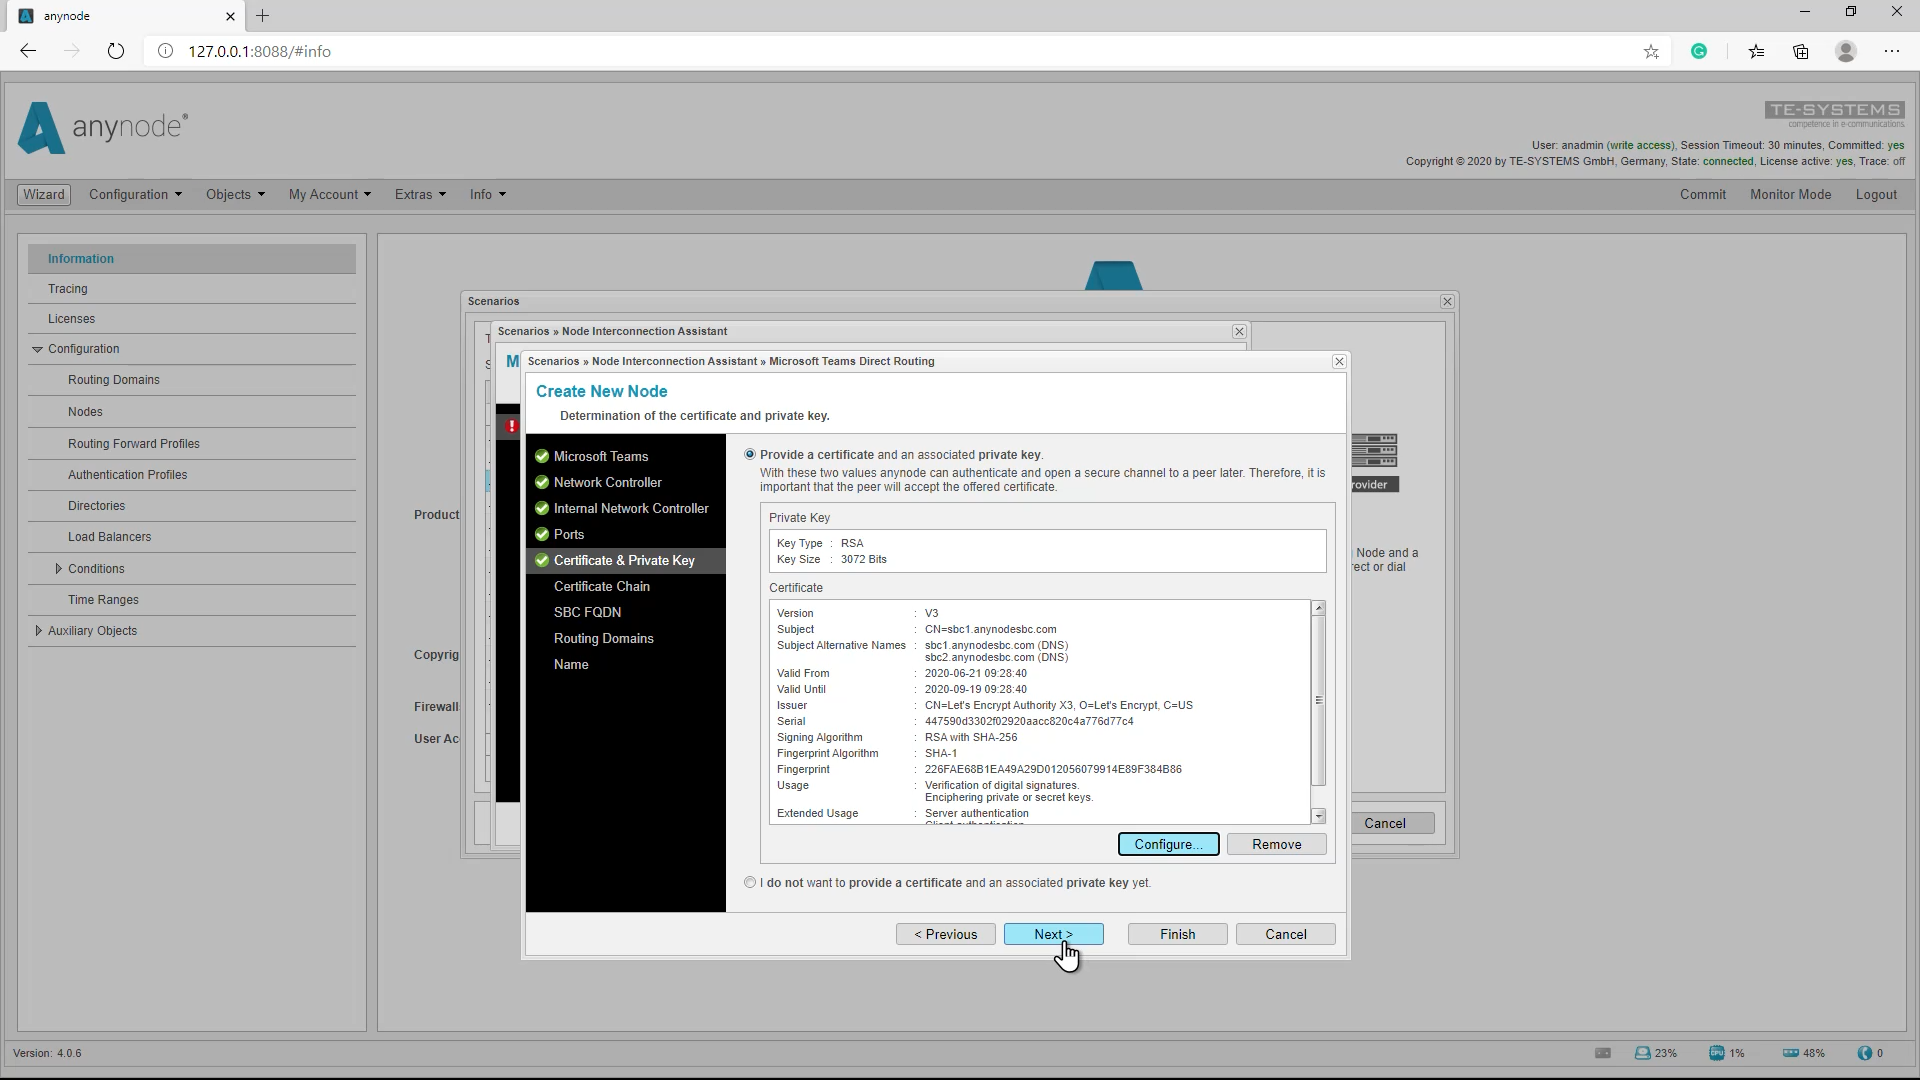
The Certificate and Privacy Key and Certificate Chain are imported and used as shown. Ensure that the certificates include the correct information and all the required FQDN’s as SAN’s (Subject Alternative Names), in this example sbc1.anynodesbc.com.
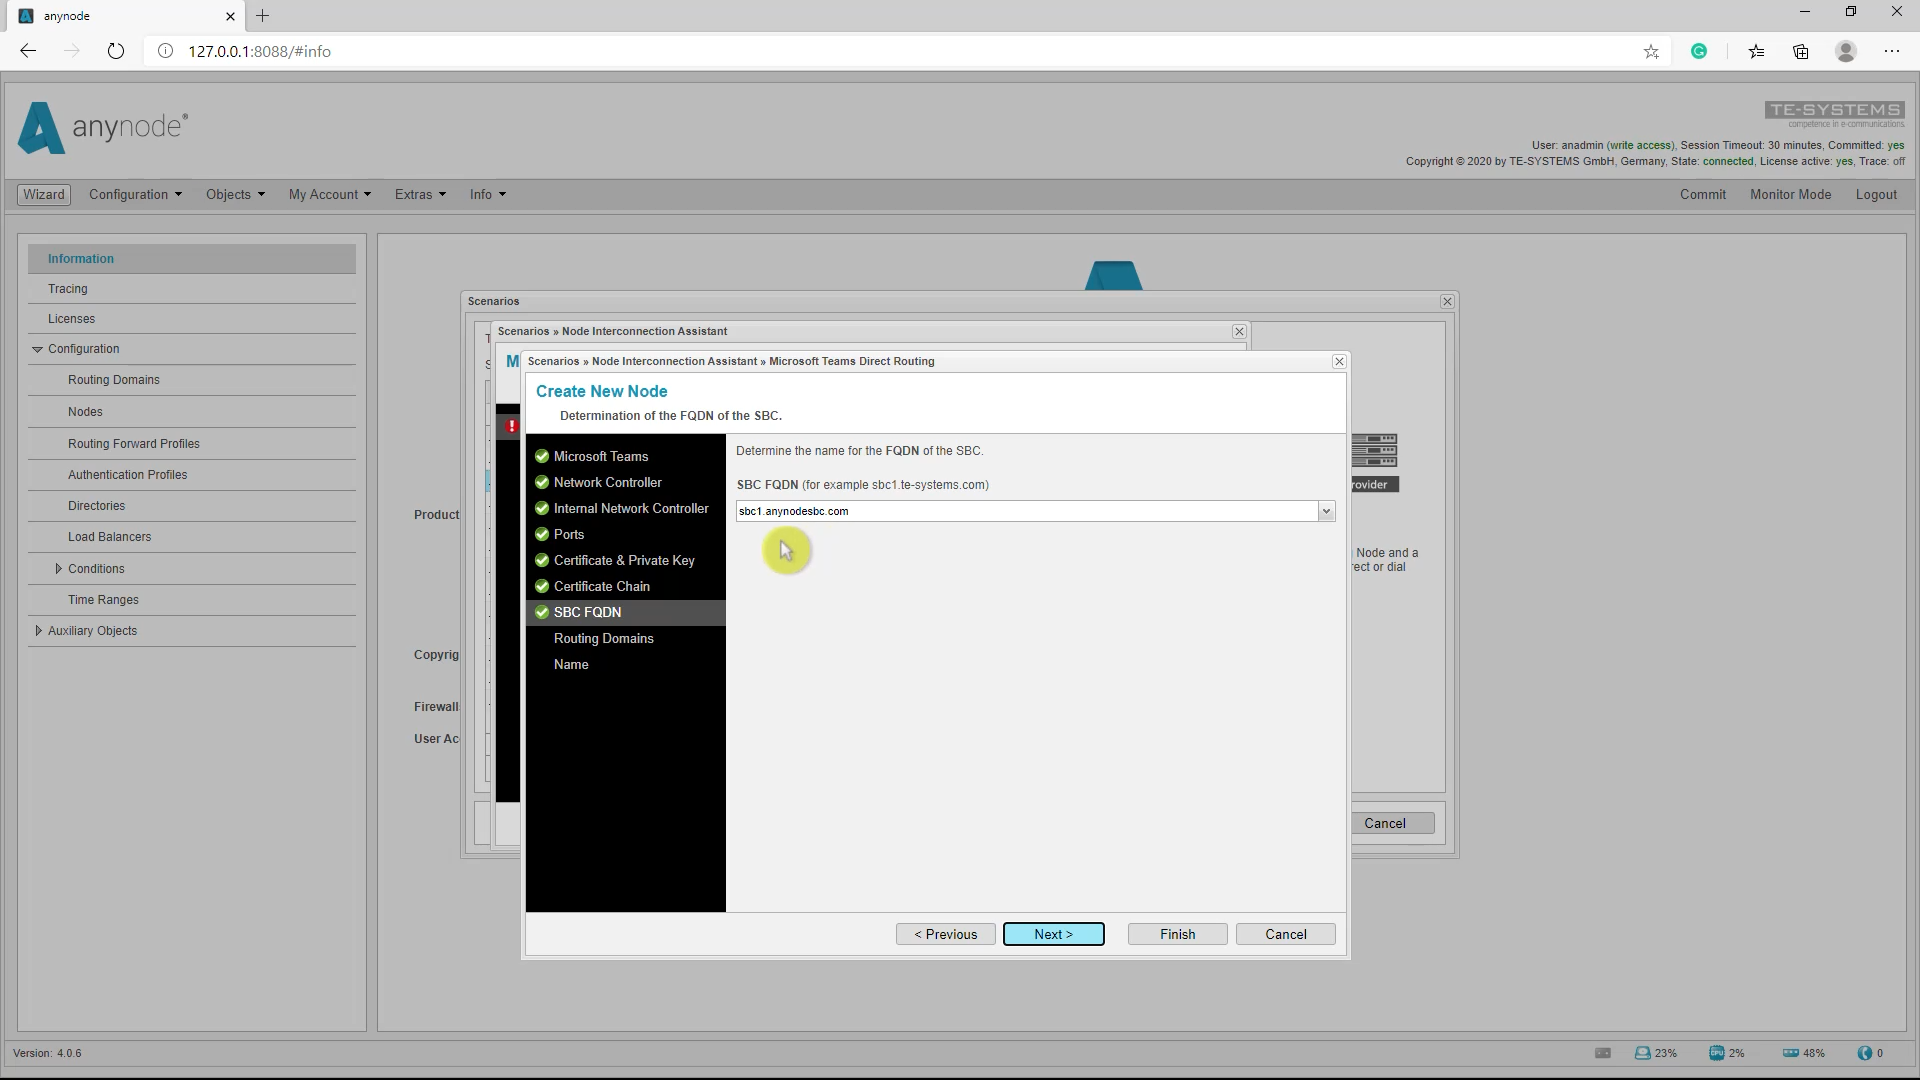
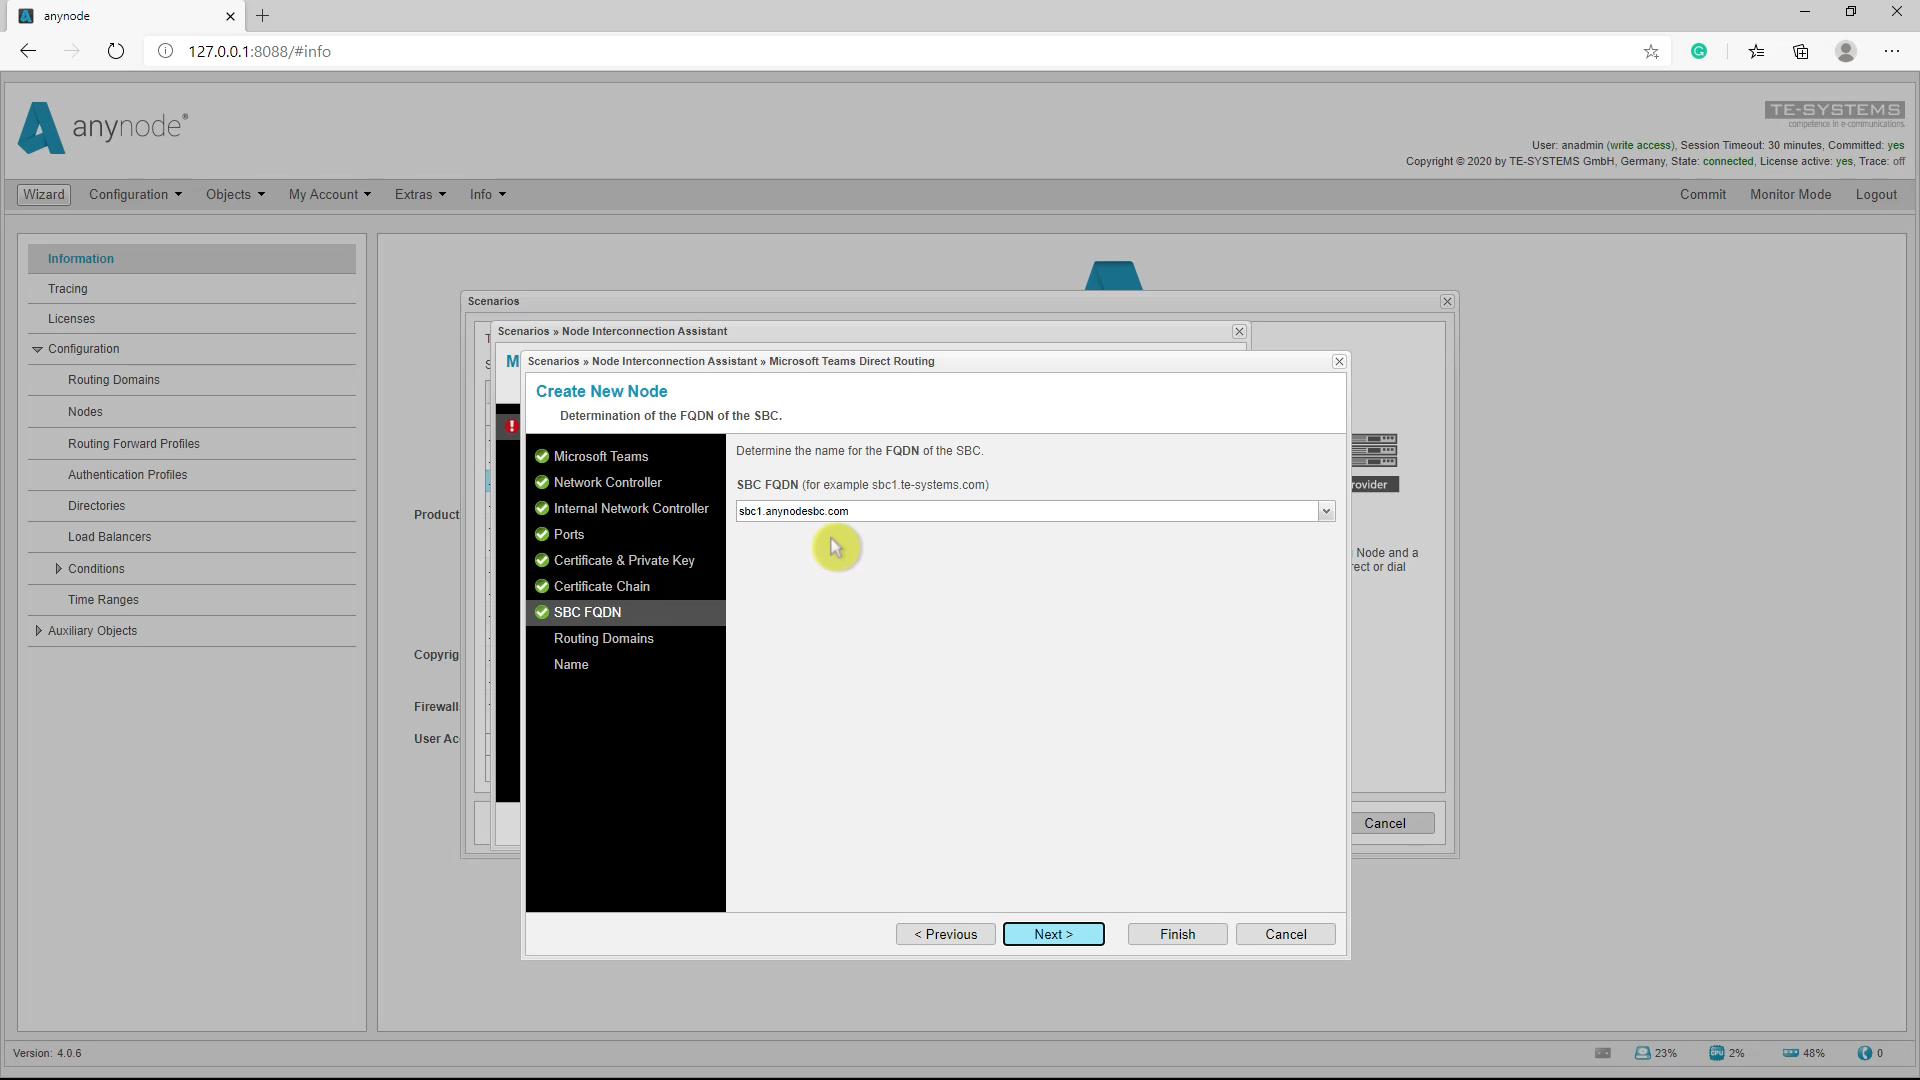
The SBC FQDN must be set. In this example, sbc1.anynodesbc.com is used. The FQDN’s in this dialog are determined from the previously imported certificates. If there are incorrect or missing FQDN’s, go back to the previous assistant configuration and ensure that the correct certificates are used and imported. This SBC FQDN is set in the SIP Transport configuration dialog of the node.
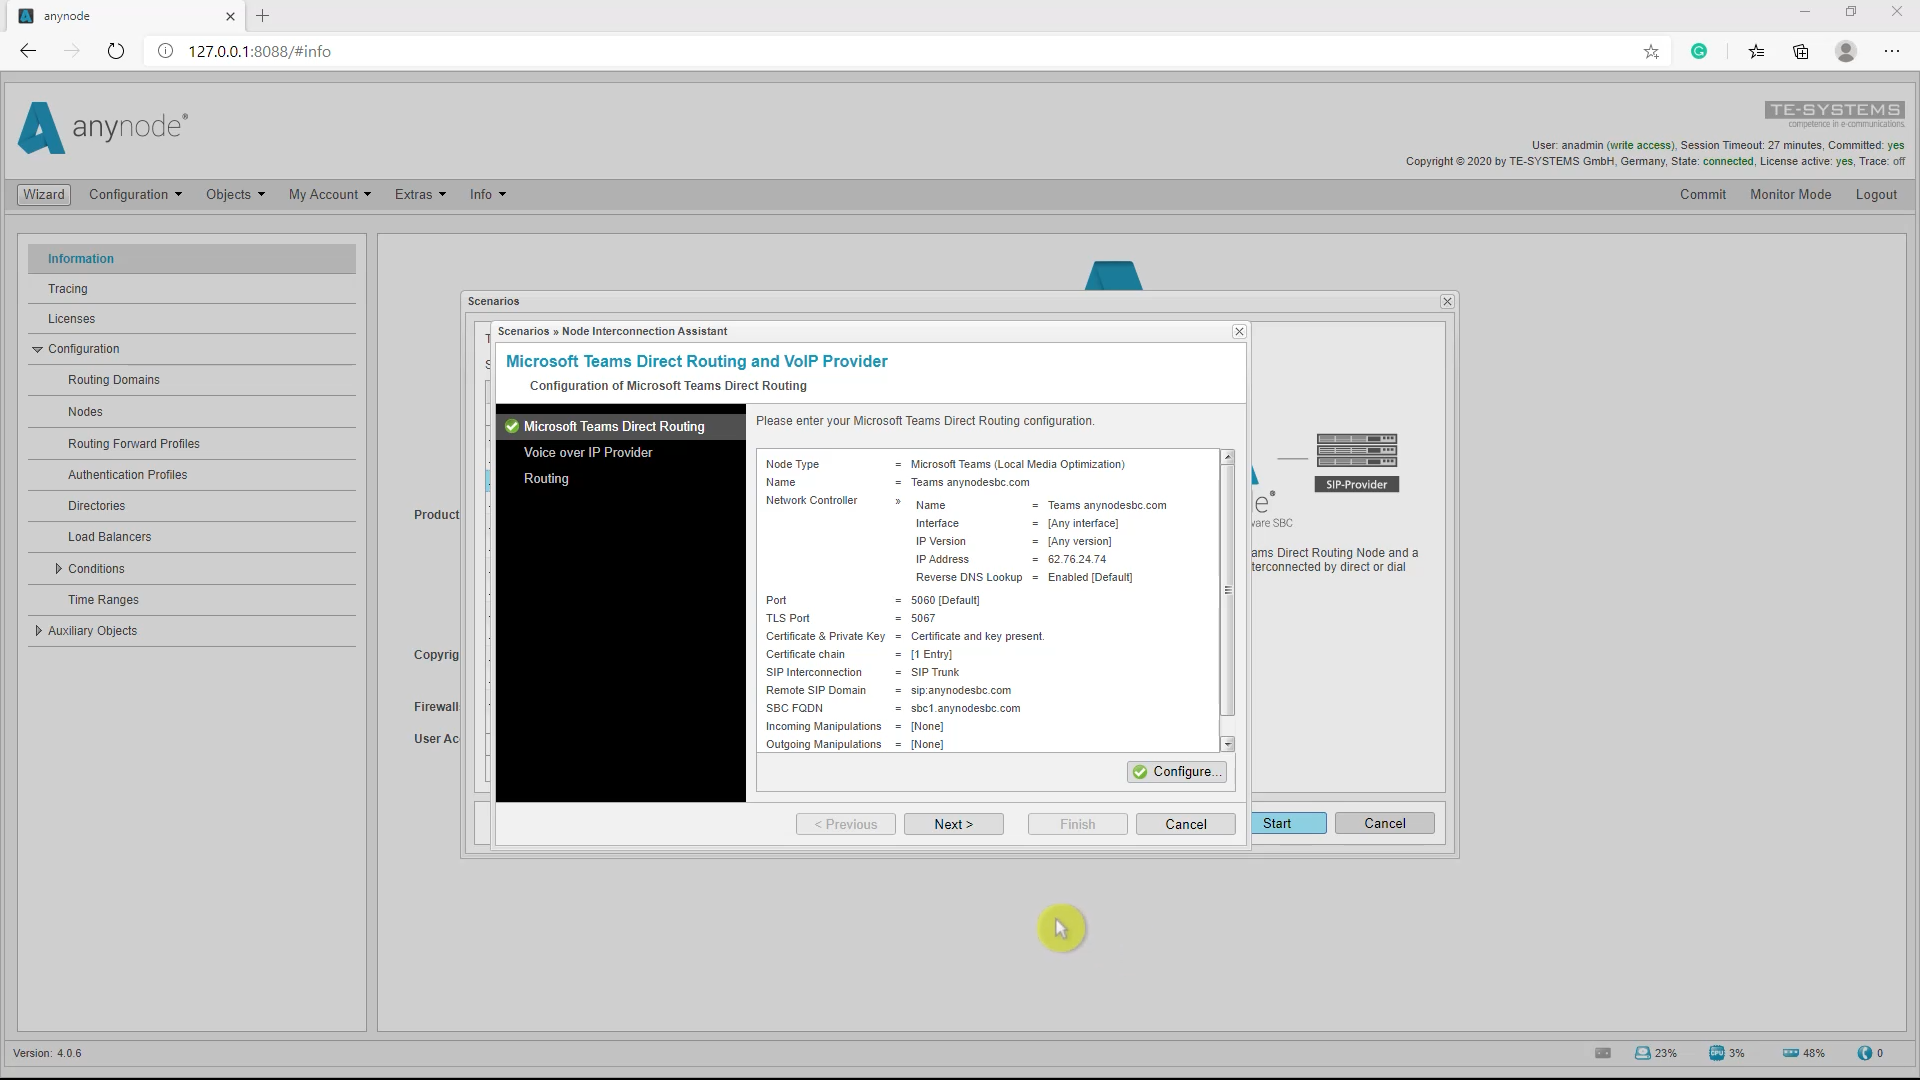
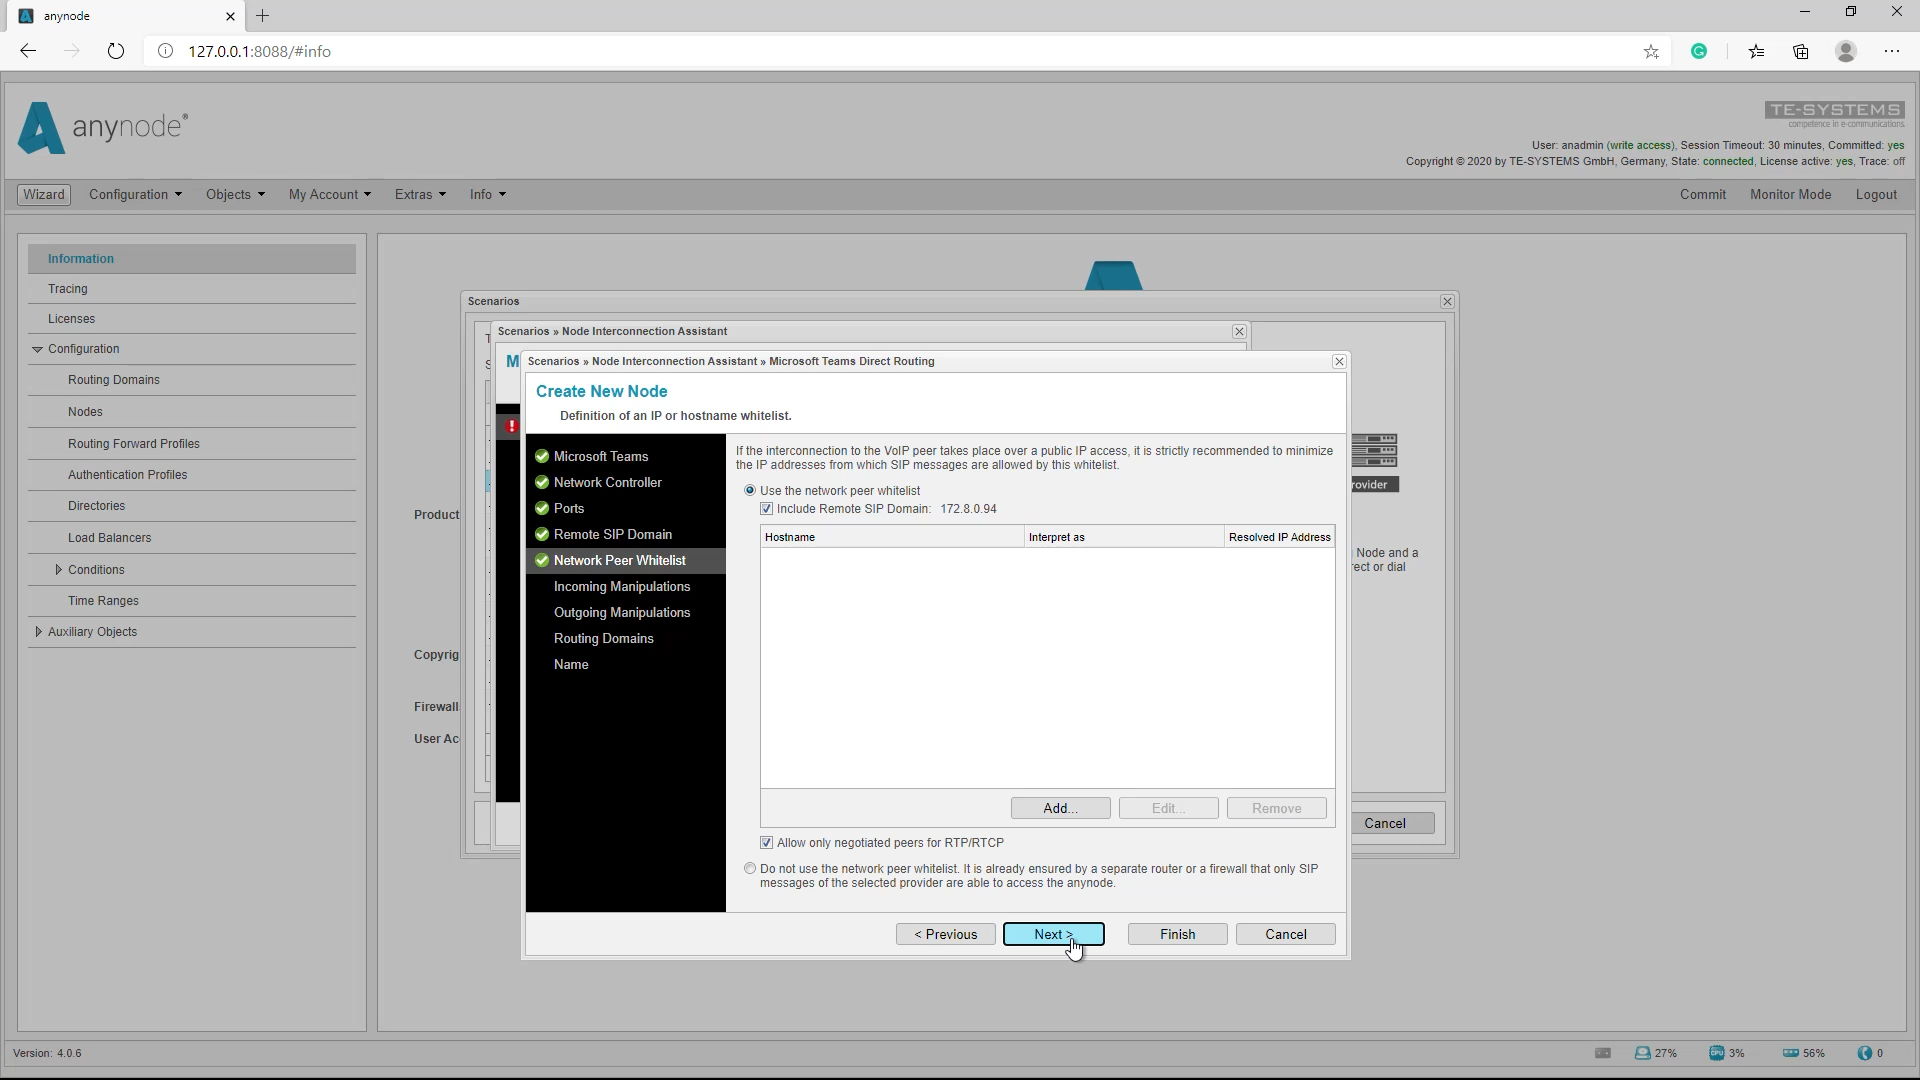
With a new setup, the initial Routing Domain will be set after running through anynode’s wizard. For now, this dialog must be skipped as no routing domain exists. However, for an already present anynode configuration with existing routing domains, you may select the required one now. Next, a default node name is set which is here renamed to Teams anynodesbc.com. Now the Node Interconnection Assistant gives an overview of the already performed configuration. Take note that the Remote SIP Domain is automatically set to anynodesbc.com.
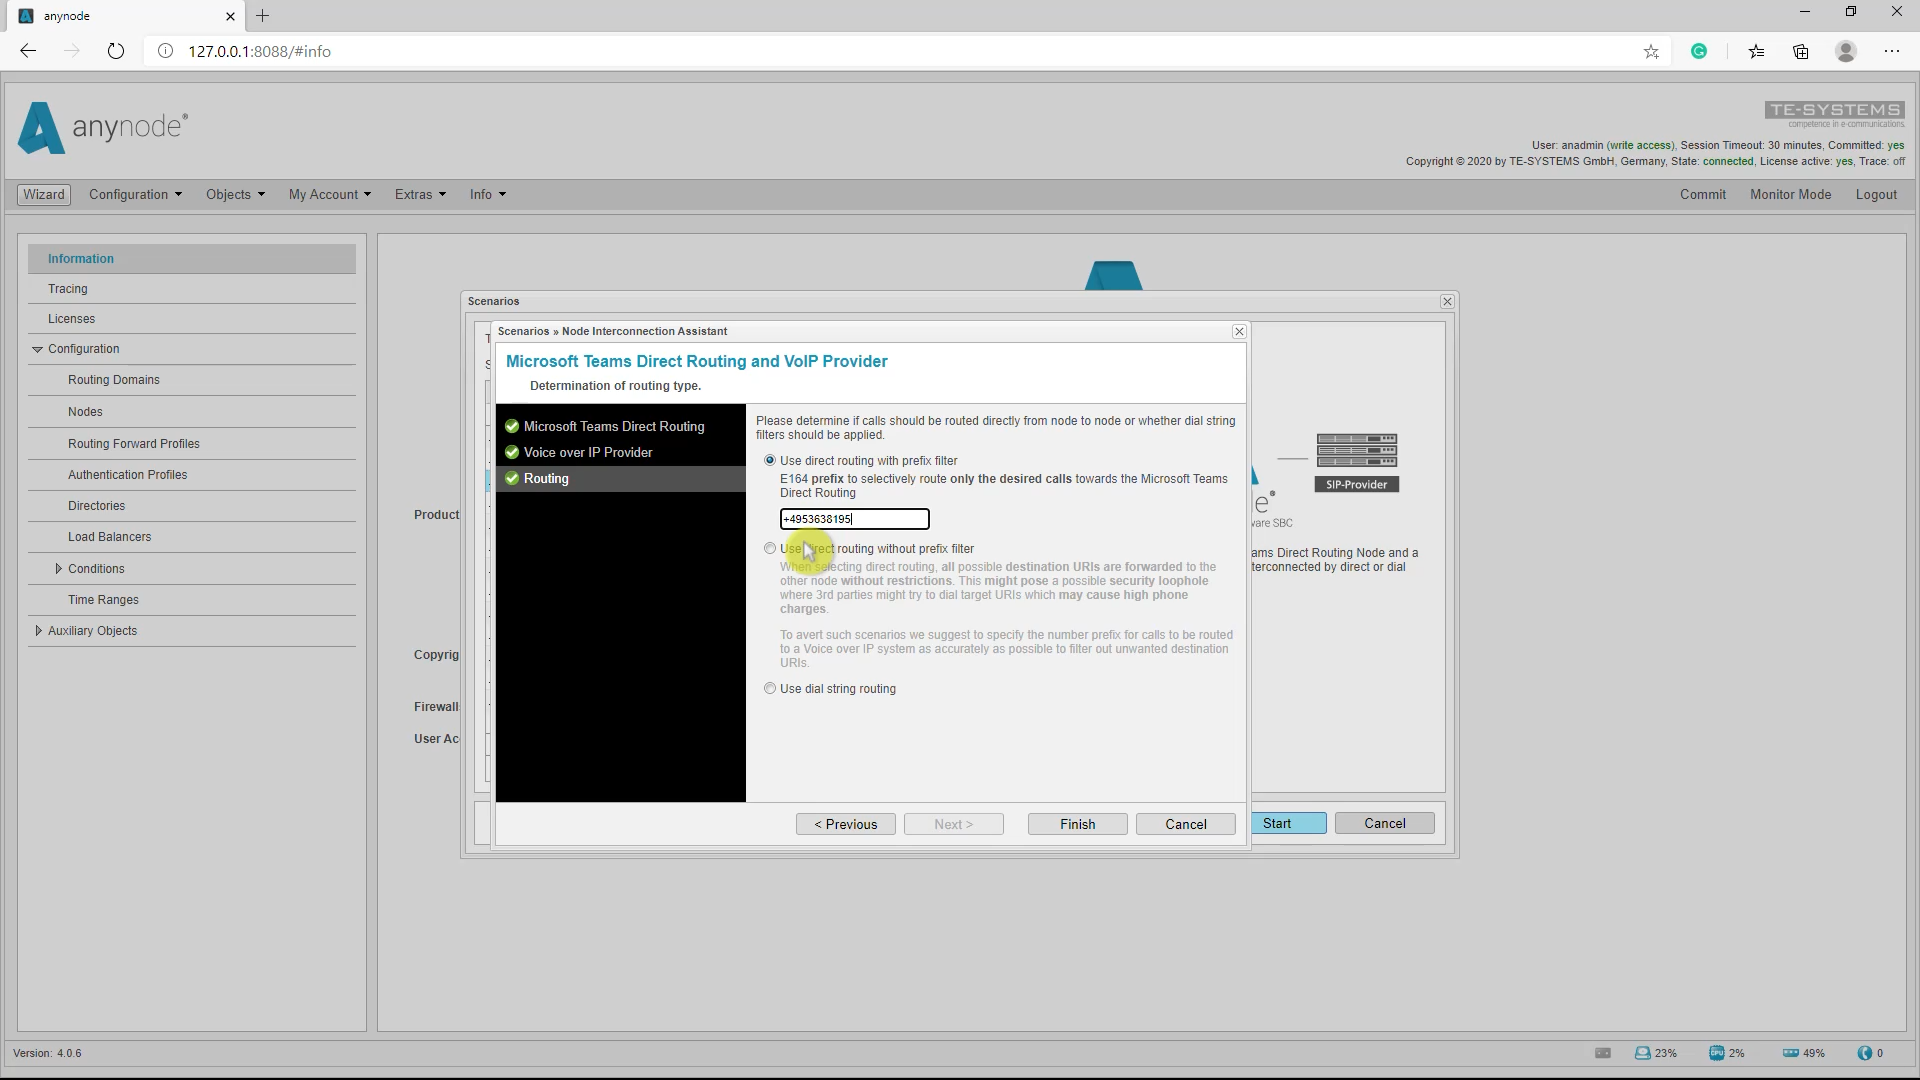
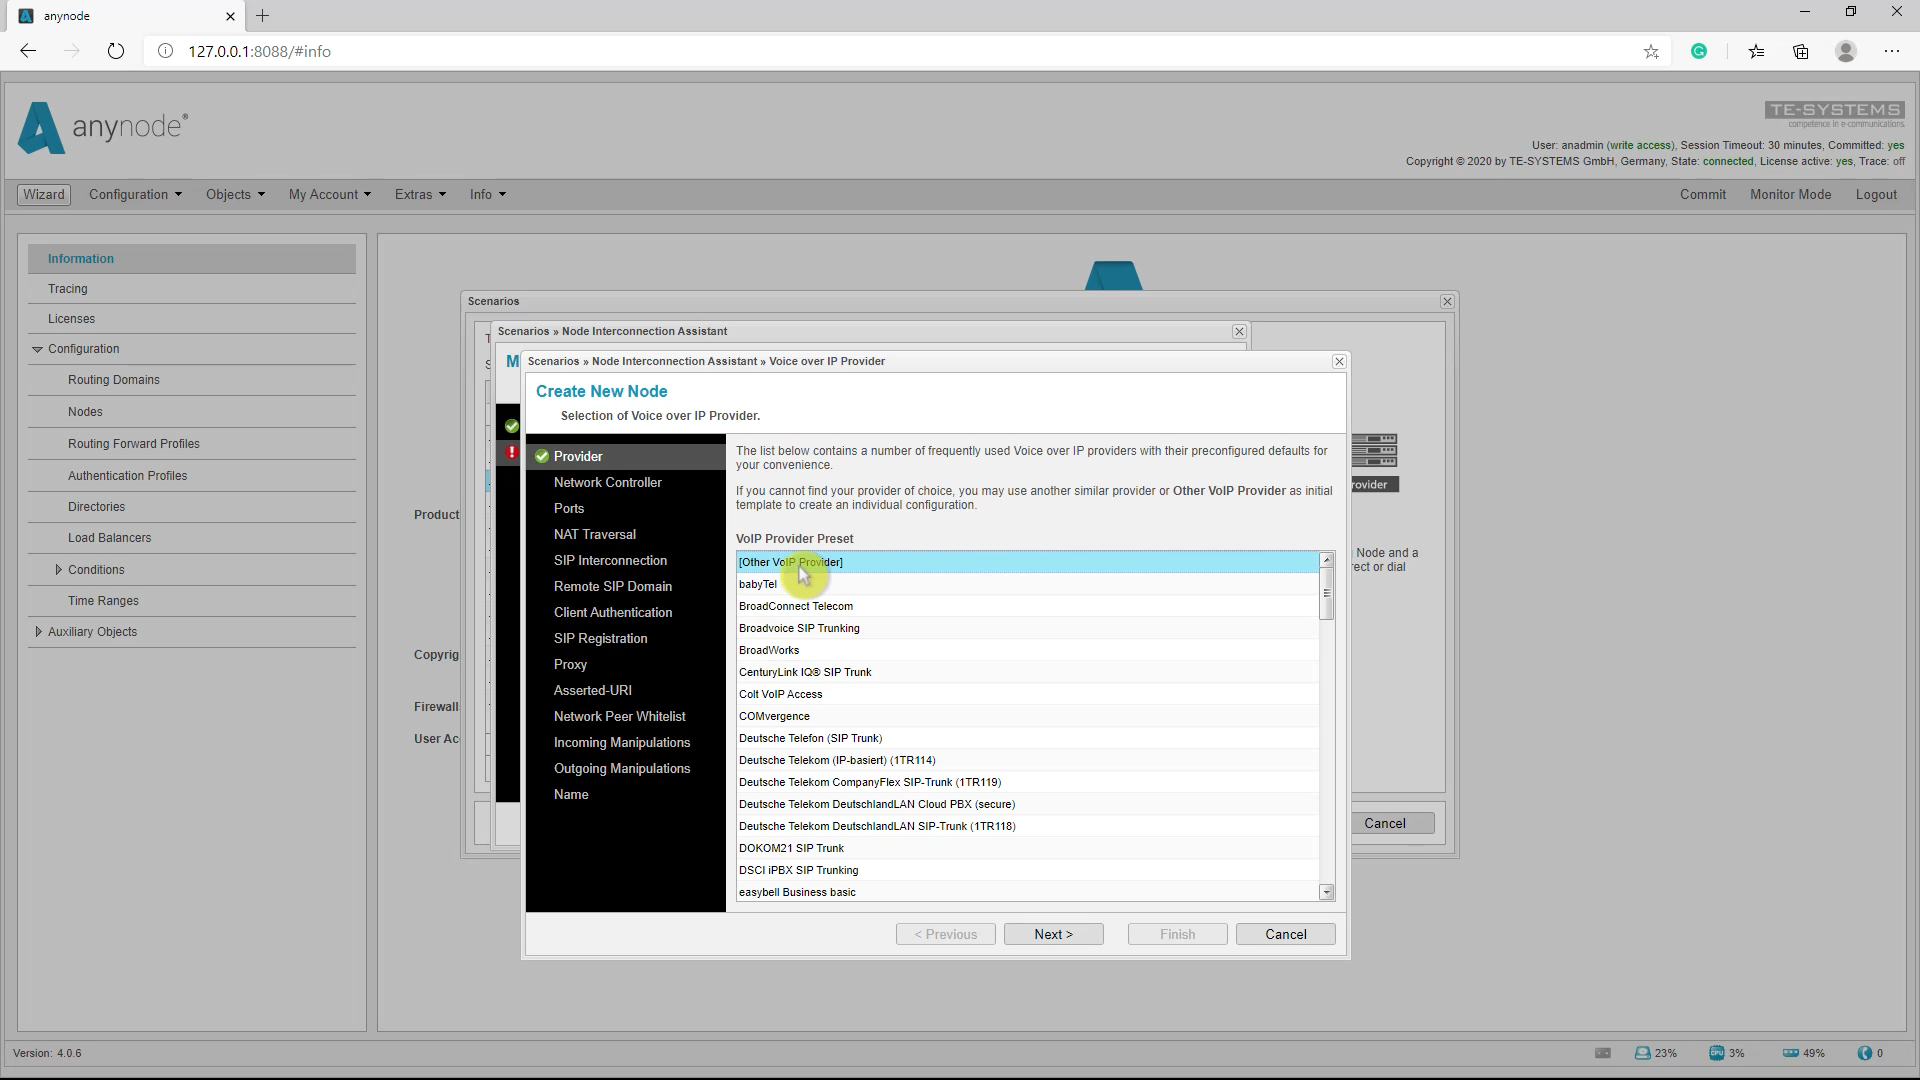
Next, the referring SIP provider node will be configured. Please note that the configuration ofThe Voice over IP Provider node is not shown in detail. The scope of this video tutorial is set to Microsoft Teams with local media optimization. If required, please check our video tutorial Microsoft Teams Direct Routing. If everything is correct, proceed with NEXT to determine the routing behavior for this scenario. For the routing, the recommended Use dial string routingmethod is used. This ensures that the routing is restricted to a specific dial string.
Check anynode trace for option 1
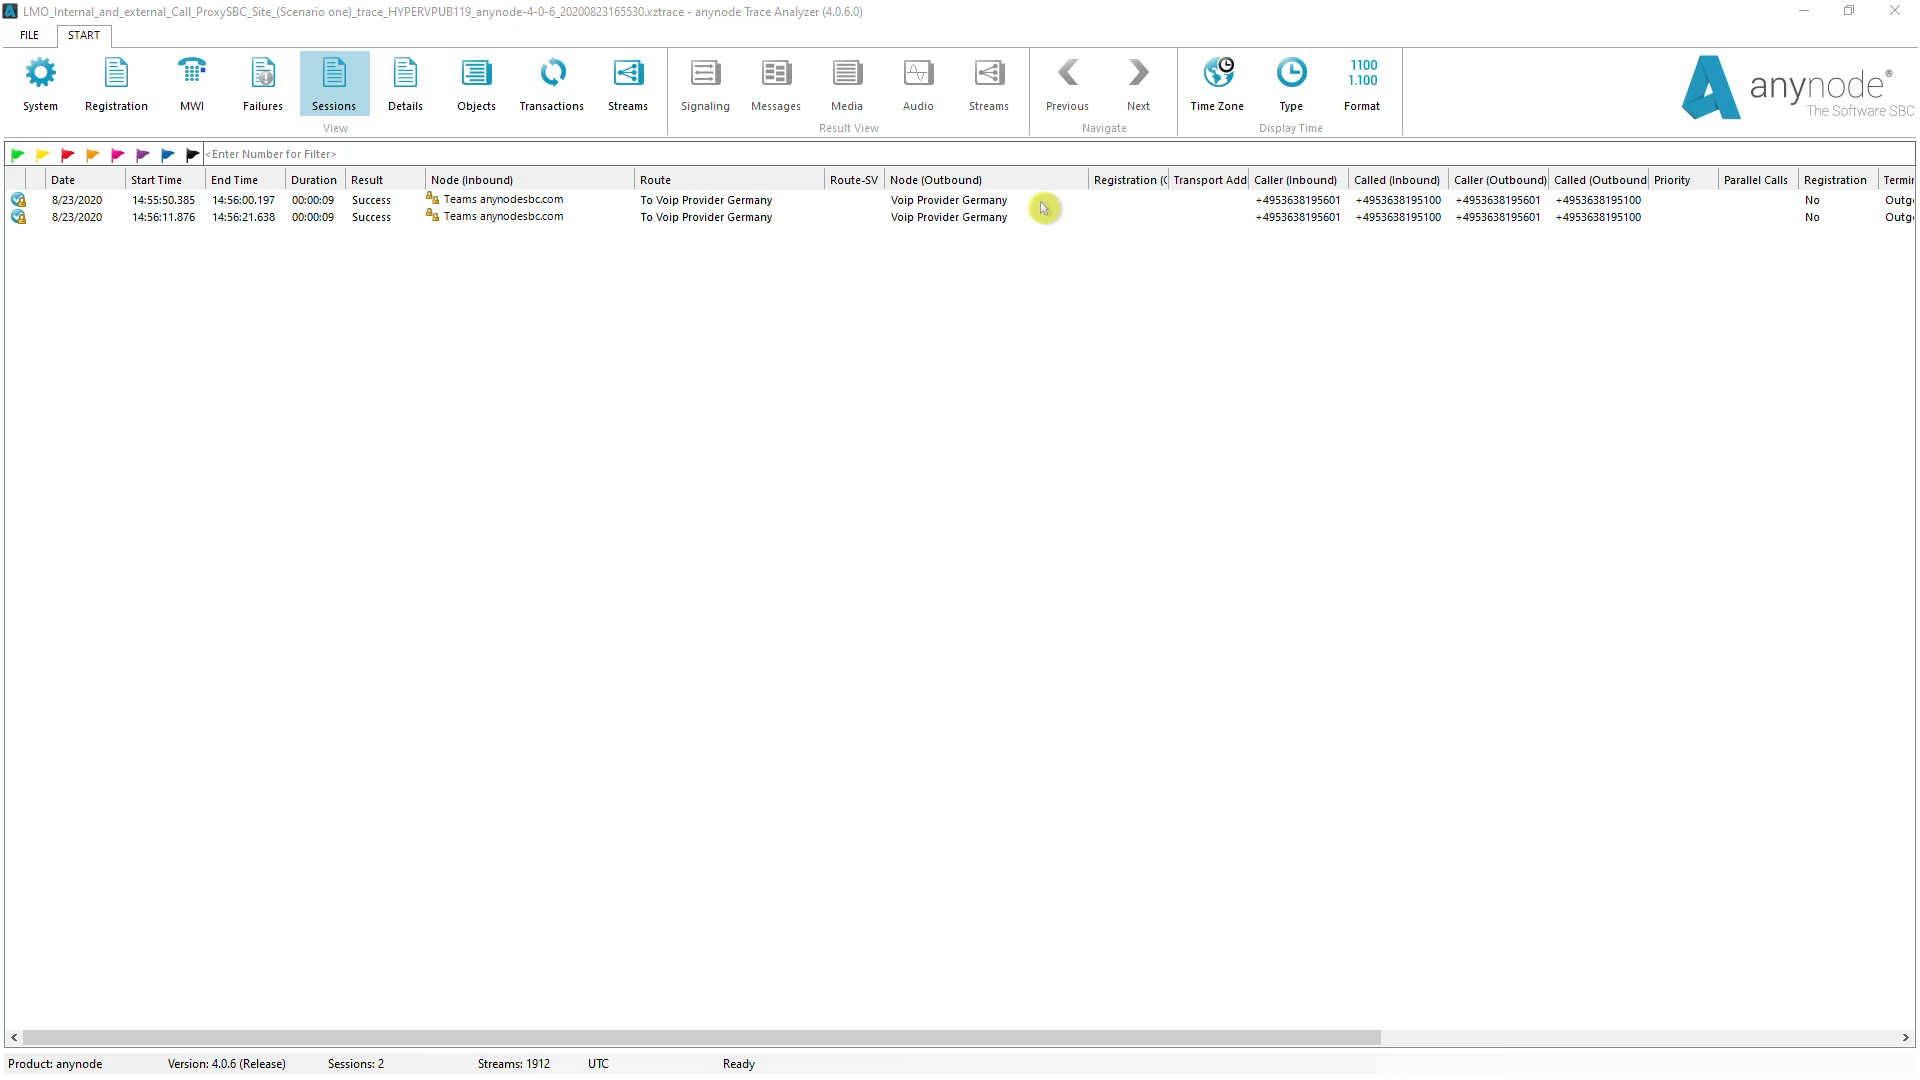
A look at a recorded trace file with the anynode trace analyzer gives us a clear insight into the data streams.
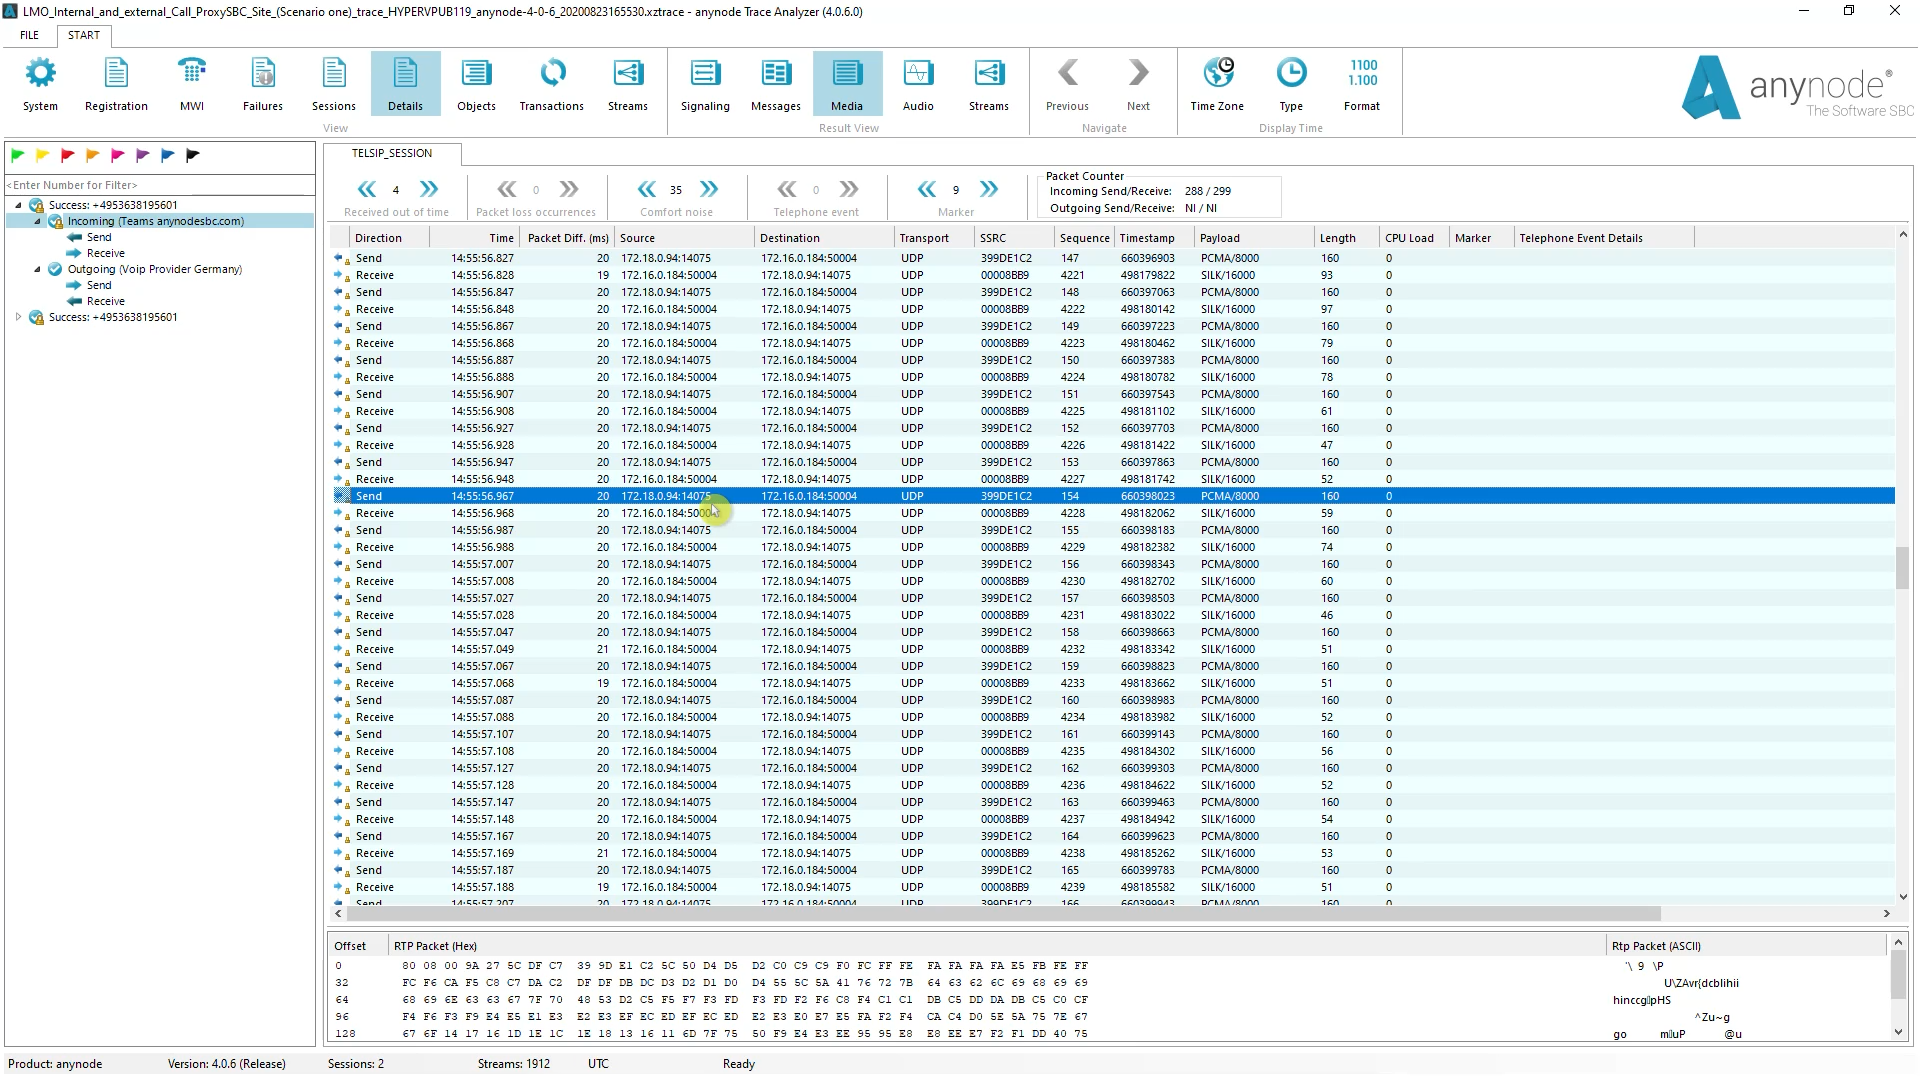
Here we see 2 calls that we have just made as a test. Thefirst call is from a user who is in thecompany network with a Microsoft Teams client. The second call is from a user who is outside the company networkwith his Microsoft Teams client.
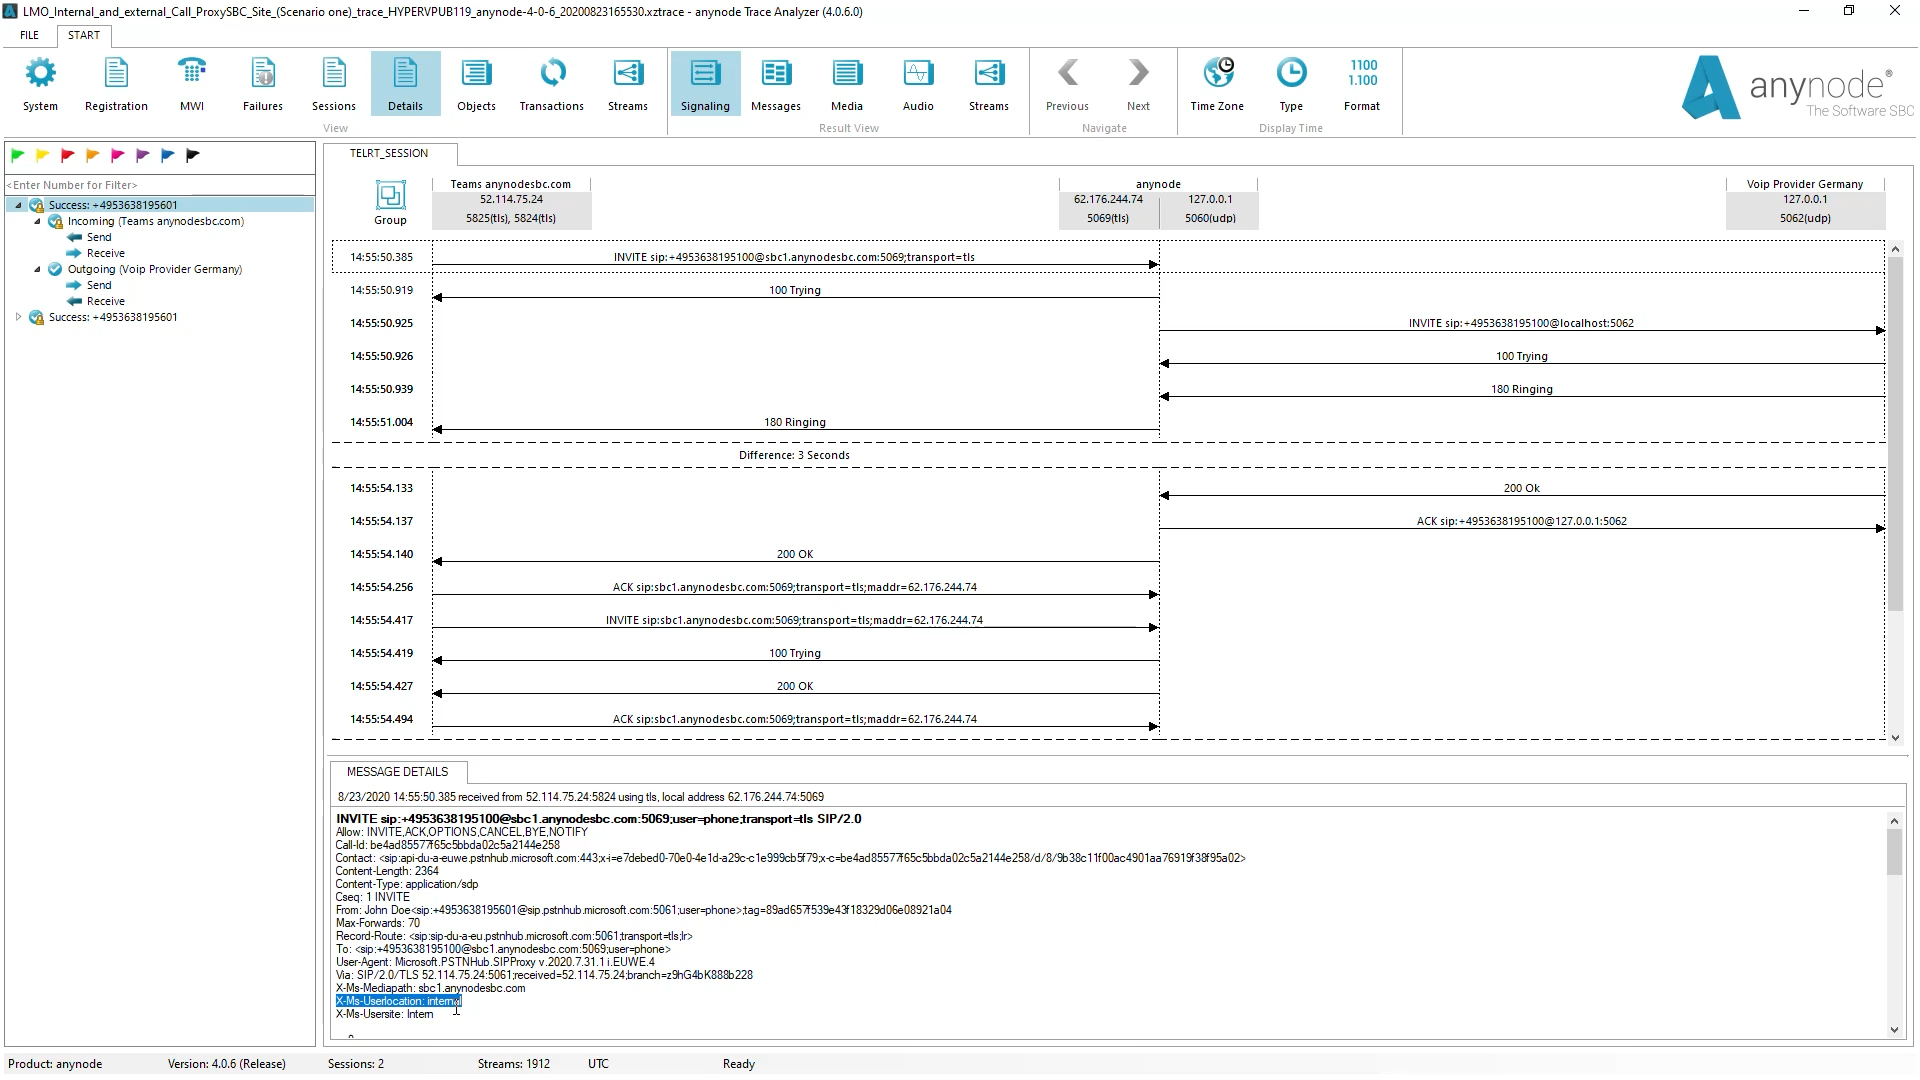
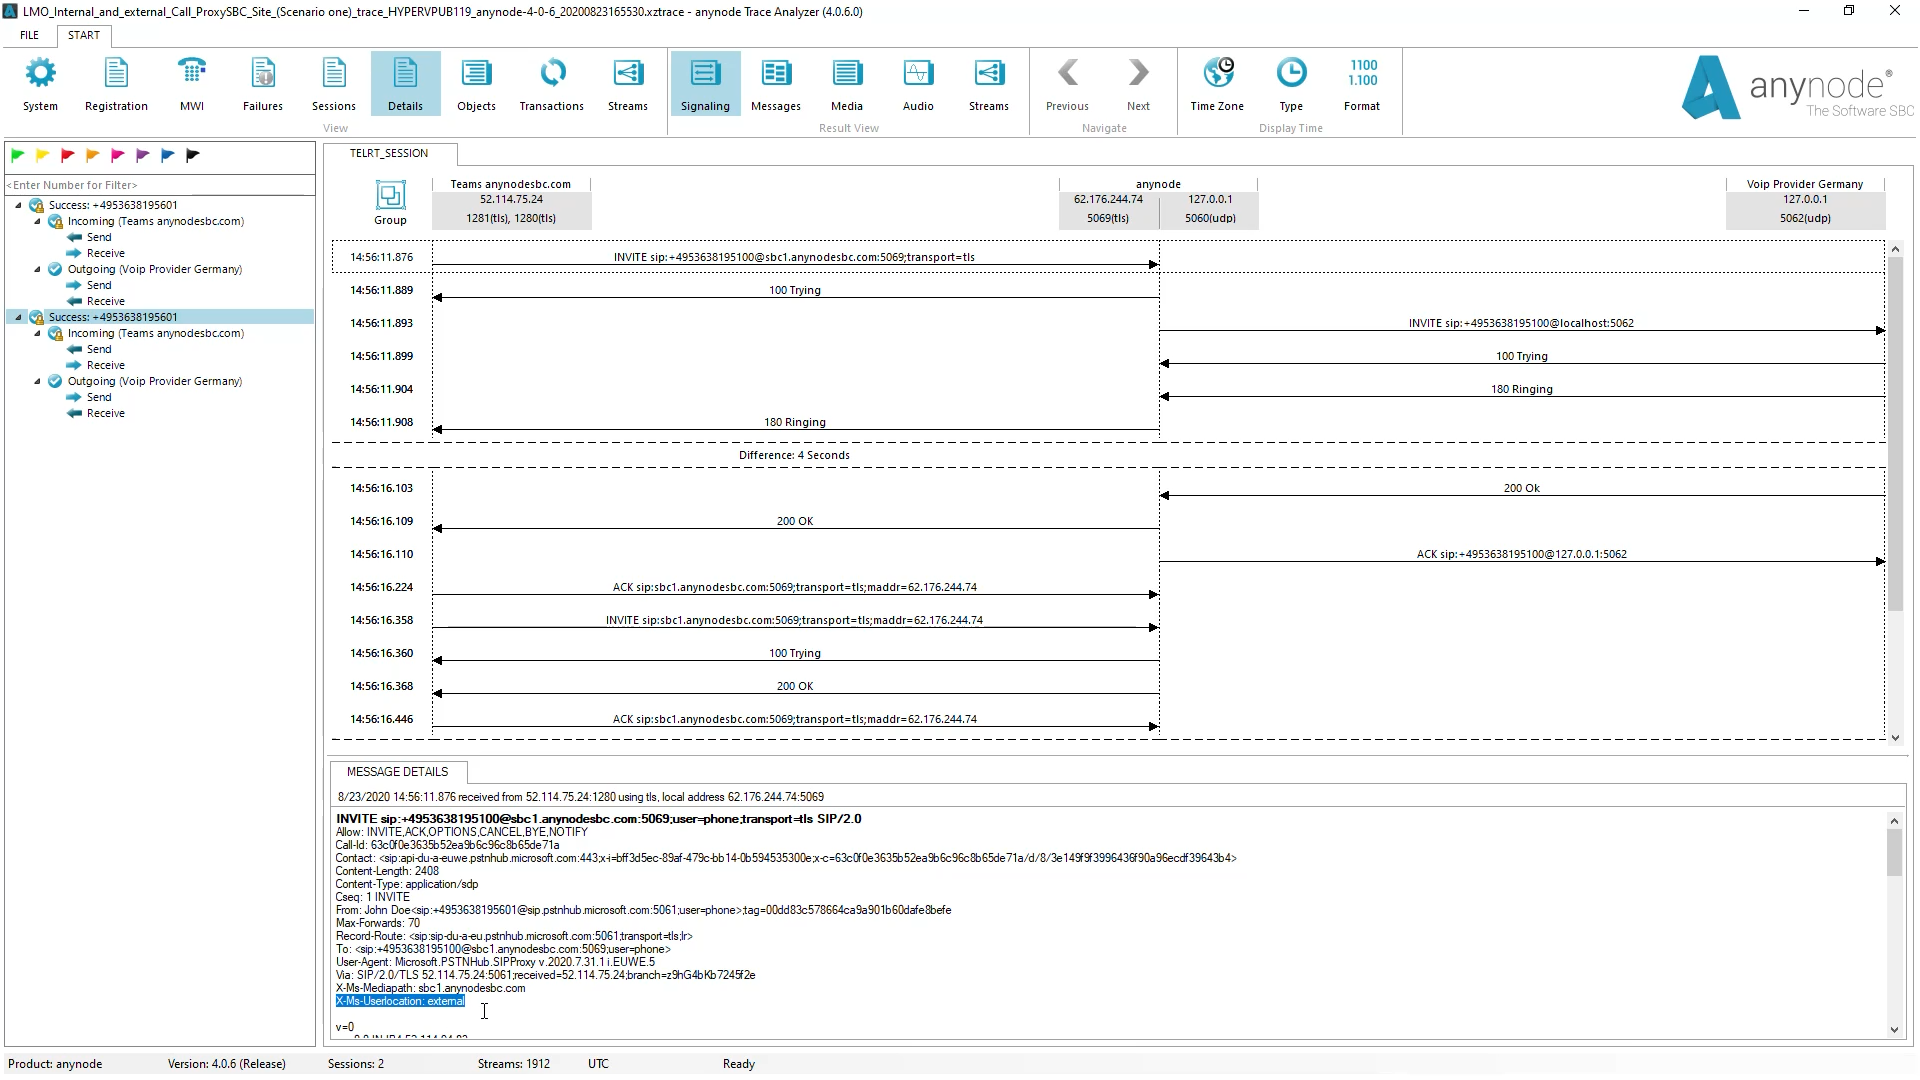
Now let’s take a closer look at the first call. You can already see the incoming invite from the Teams client, here in this first SIP message: “User Location” “internal”.
We now look at how the media flowed. We look at the media that went back and forth from the Teams client. We can see here that the anynode works with its local interface. All media data come from this IP address and are sent directly to the Teams client, which is located in the company network at this IP address. The data stream remains local and is optimized.
Now let’s look at thesecond call. In this, the participant uses his external Teams client from his mobile phone. Here we also look at the invite. At this point, we can determine that it was the external participant.
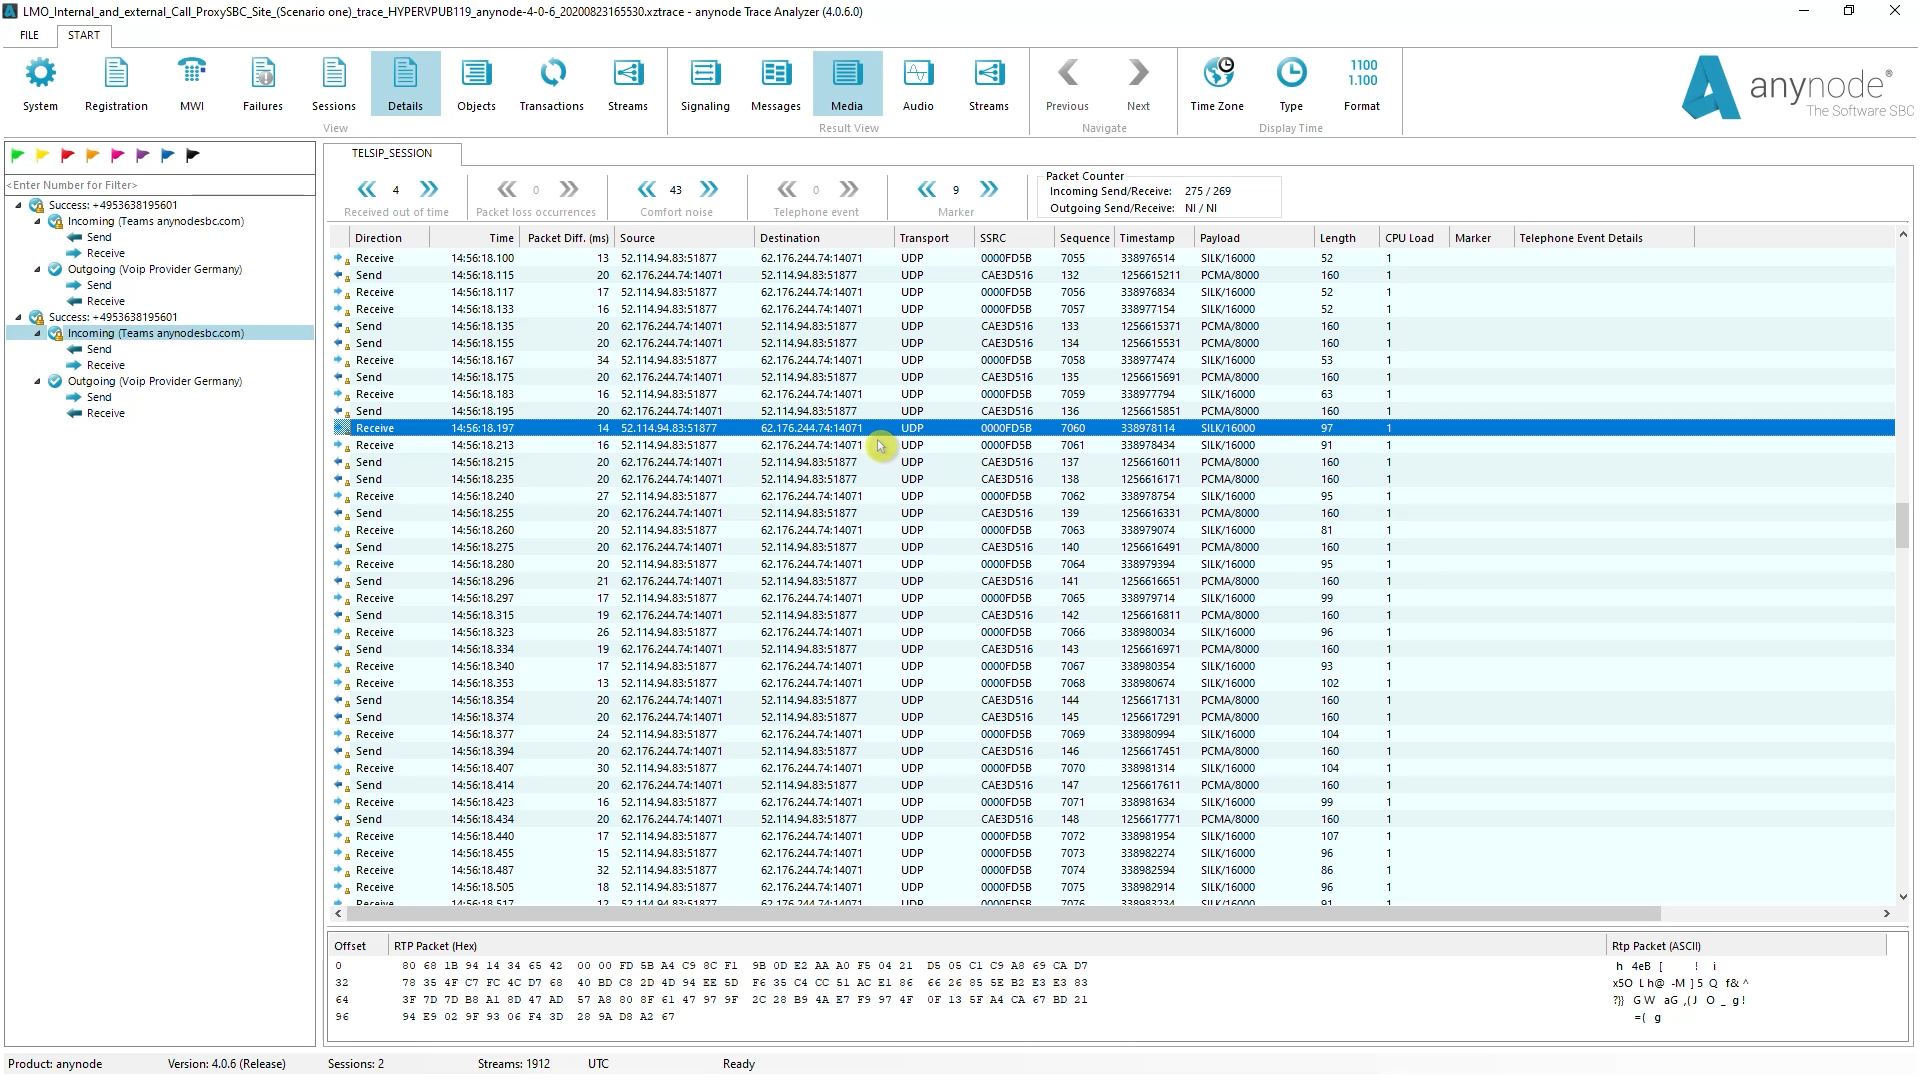
In the corresponding media data, we can see here that anynode is using the external interface and all of this is sent to the Microsoft relay. We also get the data from there. The Microsoft relay then goes to the external Teams client on the mobile phone.
Configuration with Proxy SBC with a Site SBC (option 2)
Now were are going to configure anynode for option 2: anynode is used as Proxy SBC with a Site SBC in the company network.
The complete setup will be created from scratch through the anynode wizard.
In this example, the assistant’s Microsoft Teams Direct Routing and a VoIP Providerrelationship will be selected. Add Node can be alternatively used for creating new or additional nodes for an existing Microsoft Teams configuration in anynode. Keep in mind that“Add Node” contains no wizard-based routing setup.
The guided setup through the anynode wizard with wizard-based routing will be described now. In the Microsoft Teams dialog, select Microsoft Teams Direct Routing (Local Media Optimization) for the Proxy SBC location of the tenant.
For theNetwork Controller and Internal NetworkController dialog, the corresponding public and internal network interfaces must be selected. Ensure that reverse DNS Lookupstays enabled for the public interface as this is a requirement for SIP through TLS connections. The RTP data sent via the internal network controller if the Microsoft Teams client is in the internal network.
If multiple anynode Network Controllers share the same network interface on the host, make sure that the port ranges are unique to avoid any port conflicts. The Microsoft Teams Direct Routing node is set and uses port 5067.
The Certificate and Privacy Key and Certificate Chain are imported and used as shown.
Ensure that the certificates include the correct information and all the required FQDN’s as SAN’s(Subject Alternative Names), in this example sbc1.anynodesbc.com.
The SBC FQDN must be set. In this example sbc1.anynodesbc.comis used. The FQDN’s in this dialog are determined from the previously imported certificates. If there are incorrect or missing FQDN’s, go back to the previous assistant configuration and ensure that the correct certificates are used and imported. This SBC FQDN is set in the SIP Transport configuration dialog of the node.
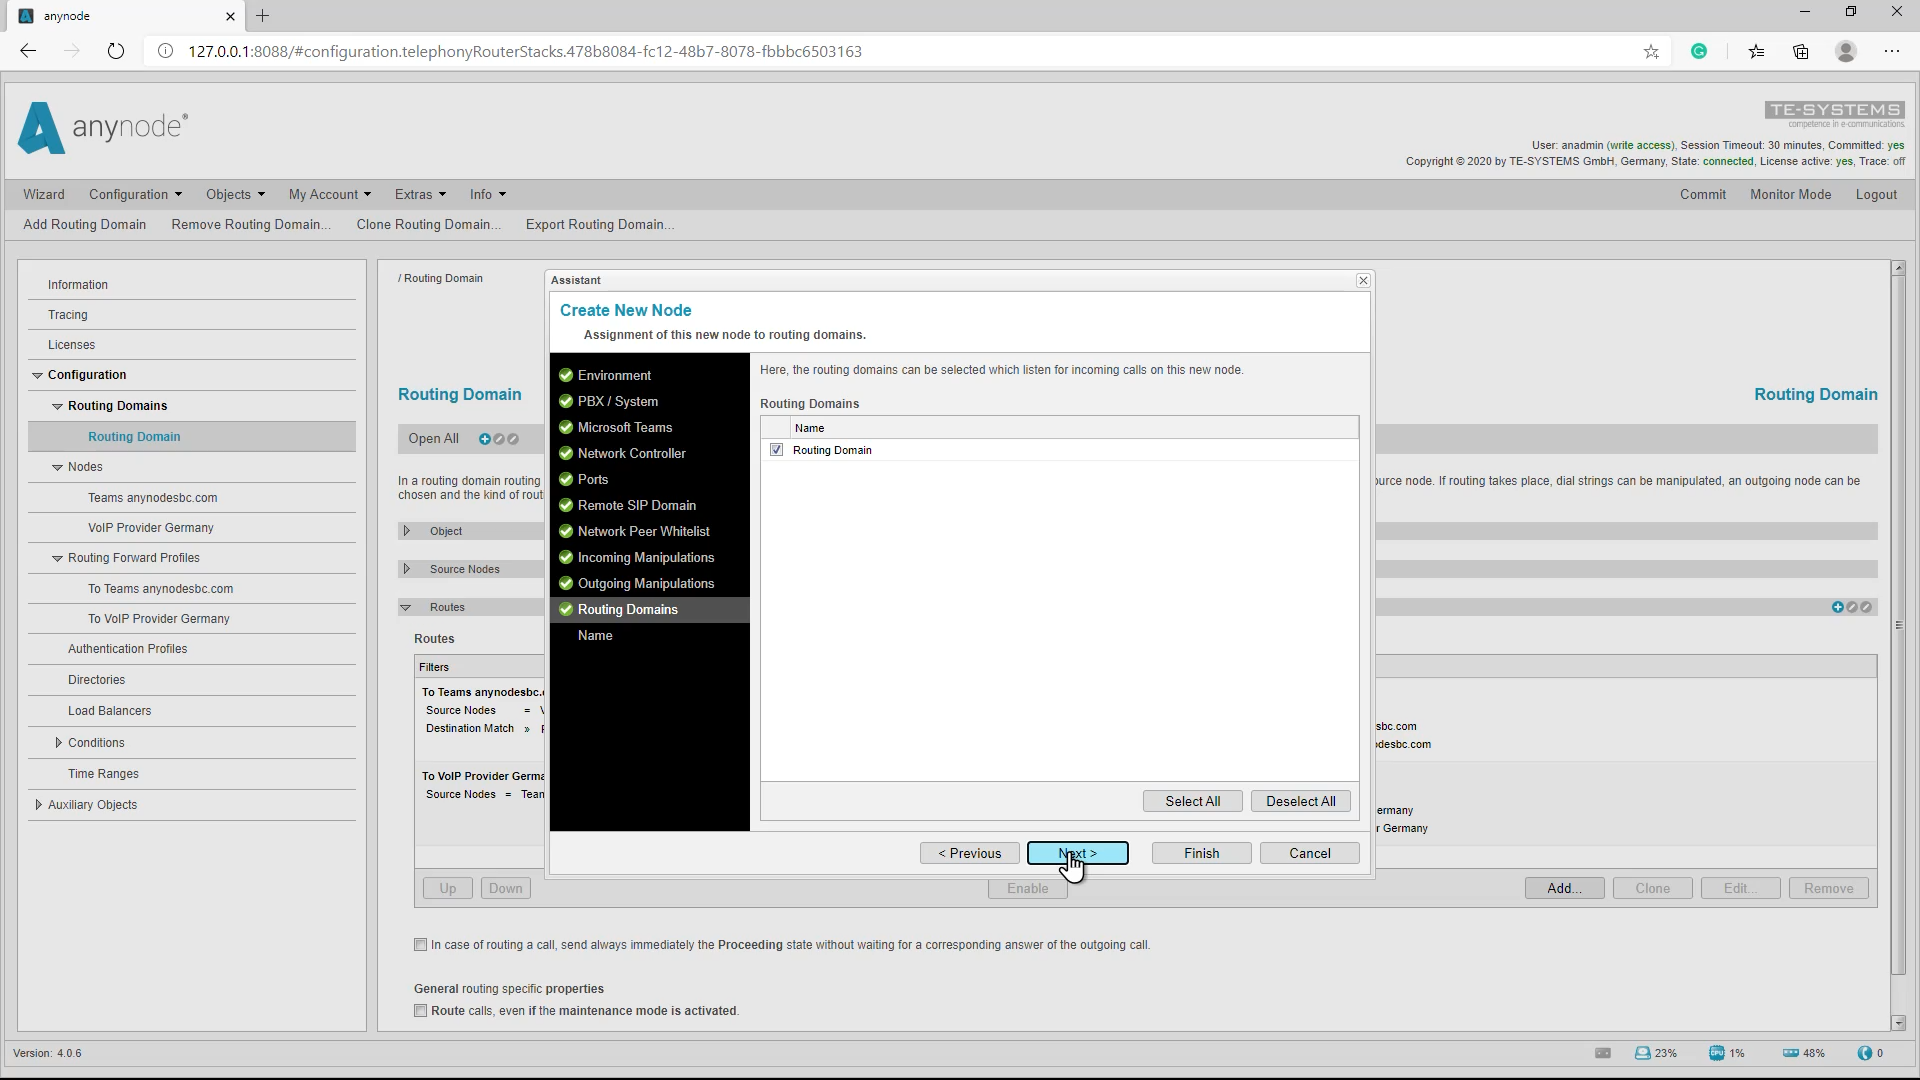
With a new setup, the initial Routing Domain will be set after running through anynode’s wizard. For now, this dialog must be skipped as no routing domain exists. However, for an already present anynode configuration with existing routing domains, you may select the required one now. Next, a default node name is set which is here renamed to Teams anynodesbc.com
Now the Node Interconnection Assistant gives an overview of the already performed configuration. Take note that the Remote SIP Domain is automatically set to anynodesbc.com.
Next, the referring SIP provider node of the anynode Proxy SBC site will be configured.
Please note that the configuration of The Voice over IP Provider nodes for the Proxy and Site SBC are not shown in detail. The scope of this video tutorial is set to Microsoft Teams with local media optimization. If required, please check our video tutorial Microsoft Teams Direct Routing.
If everything is correct, proceed with NEXT to determine the routing behavior for this scenario.
We proceed with the Microsoft Teams Direct Routing configurations.
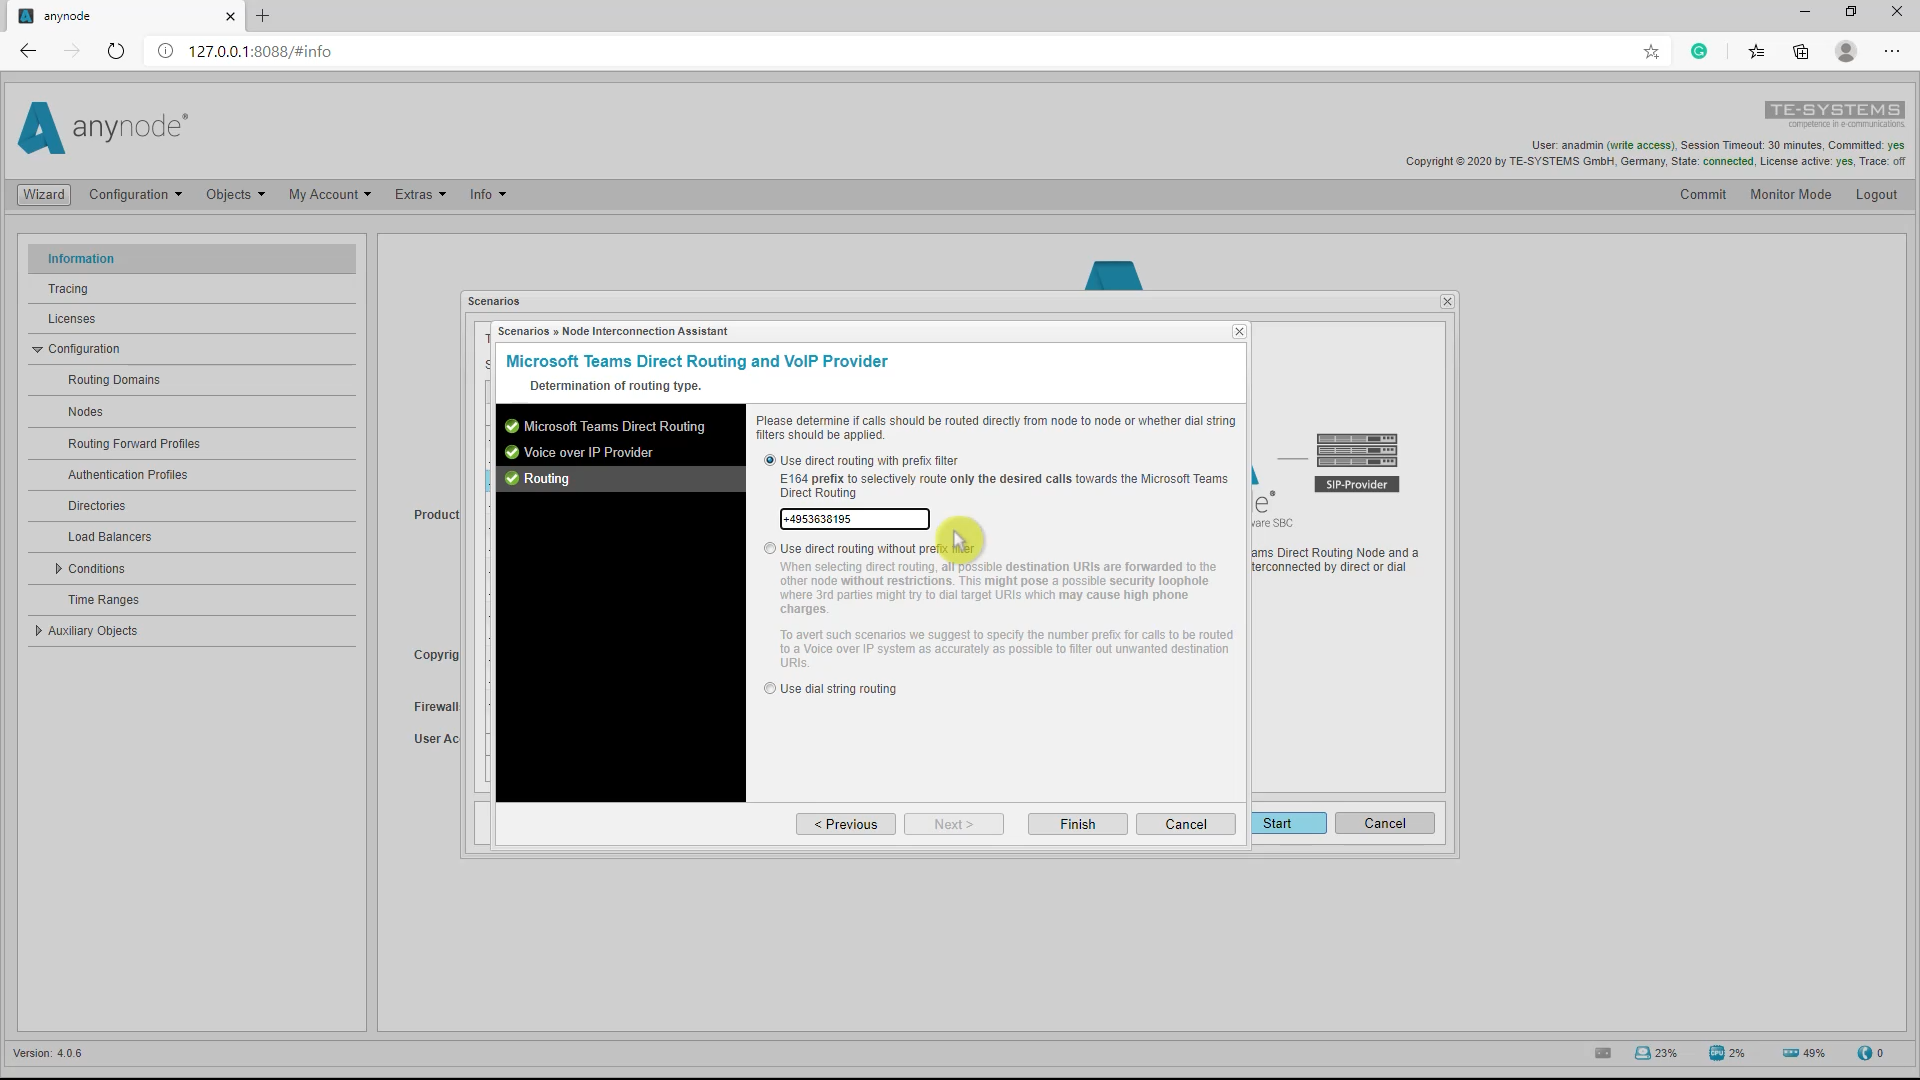
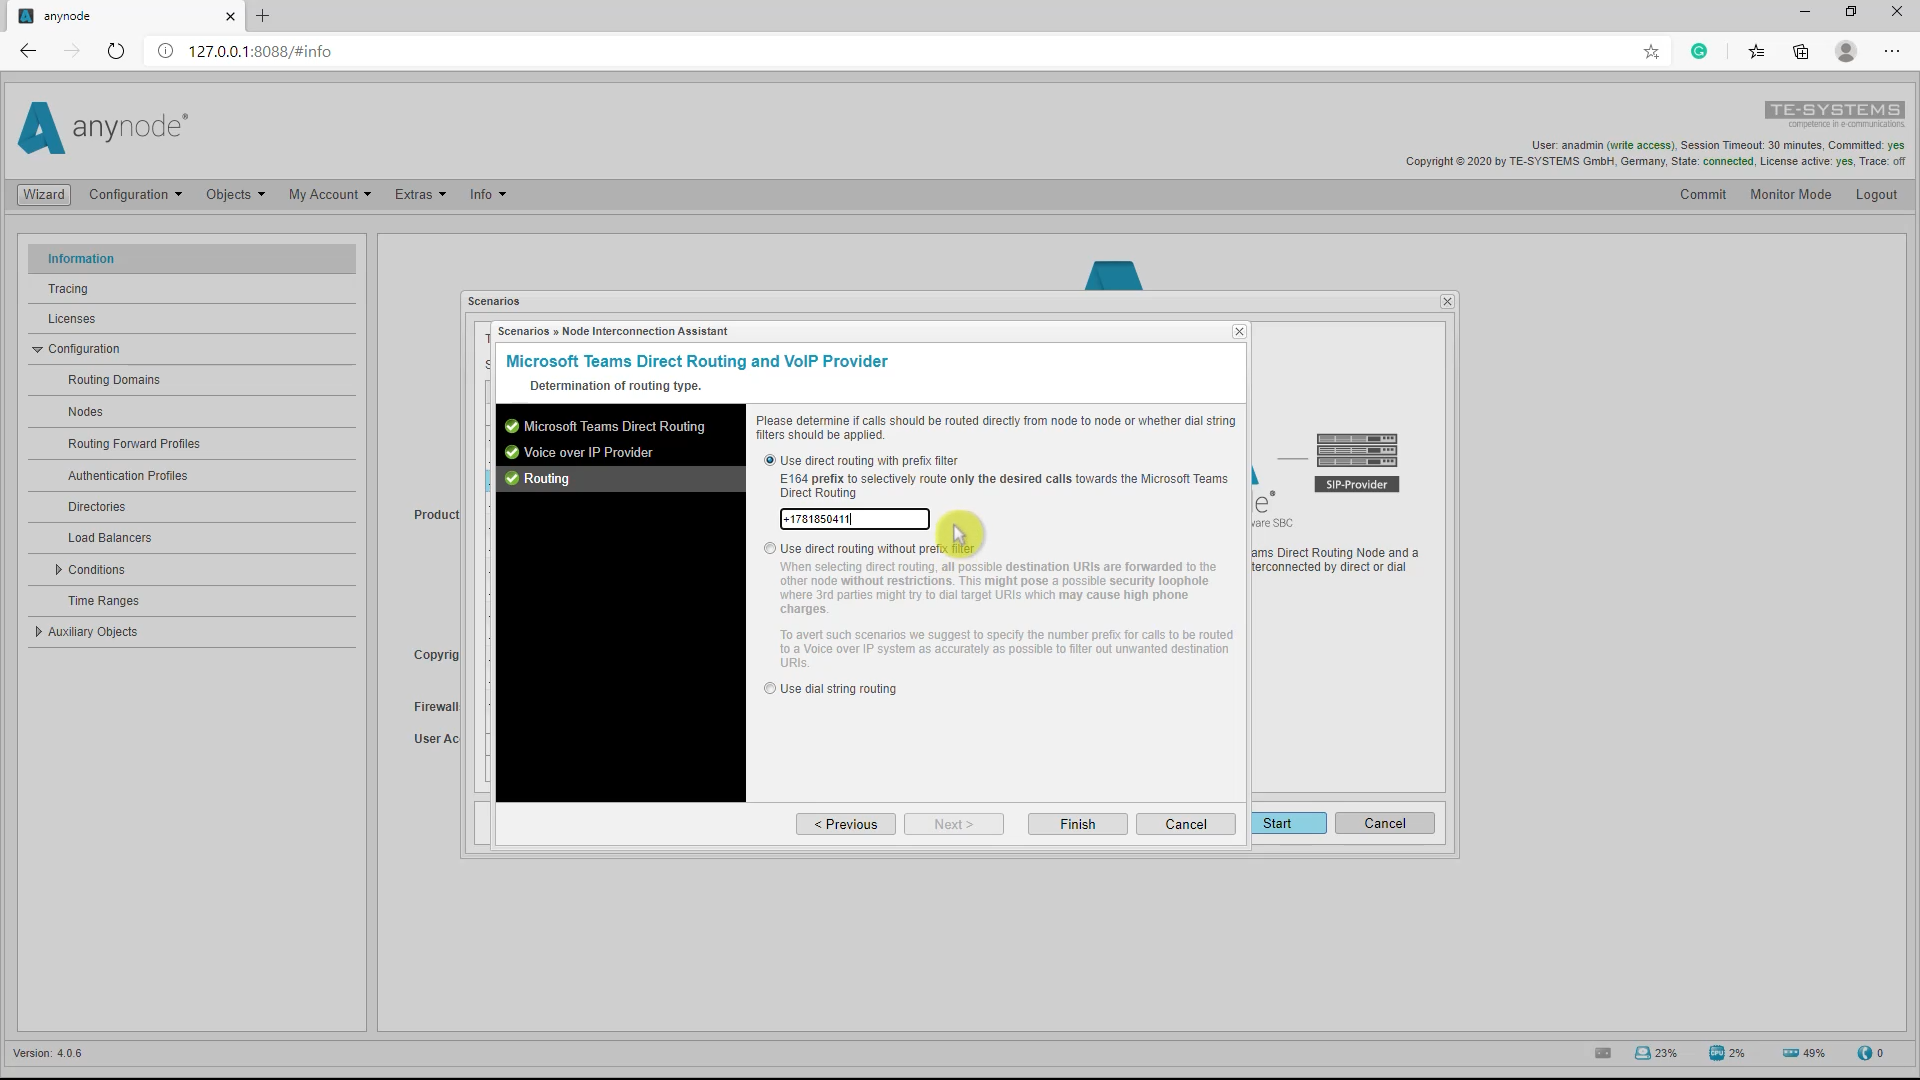
For the routing, the recommended Use dial string routing with prefix filter method is used. This ensures that the routing is restricted to a specific dial string.
The configuration overview of anynode’s Proxy SBC site is shown. The next configuration step is setting up the Site SBC node which will be described now.
Site SBC Node for Proxy SBC
The next step for theanynode Proxy SBC configurationis setting up the Node for the Site SBC. The additional node can be added viaAddNode.
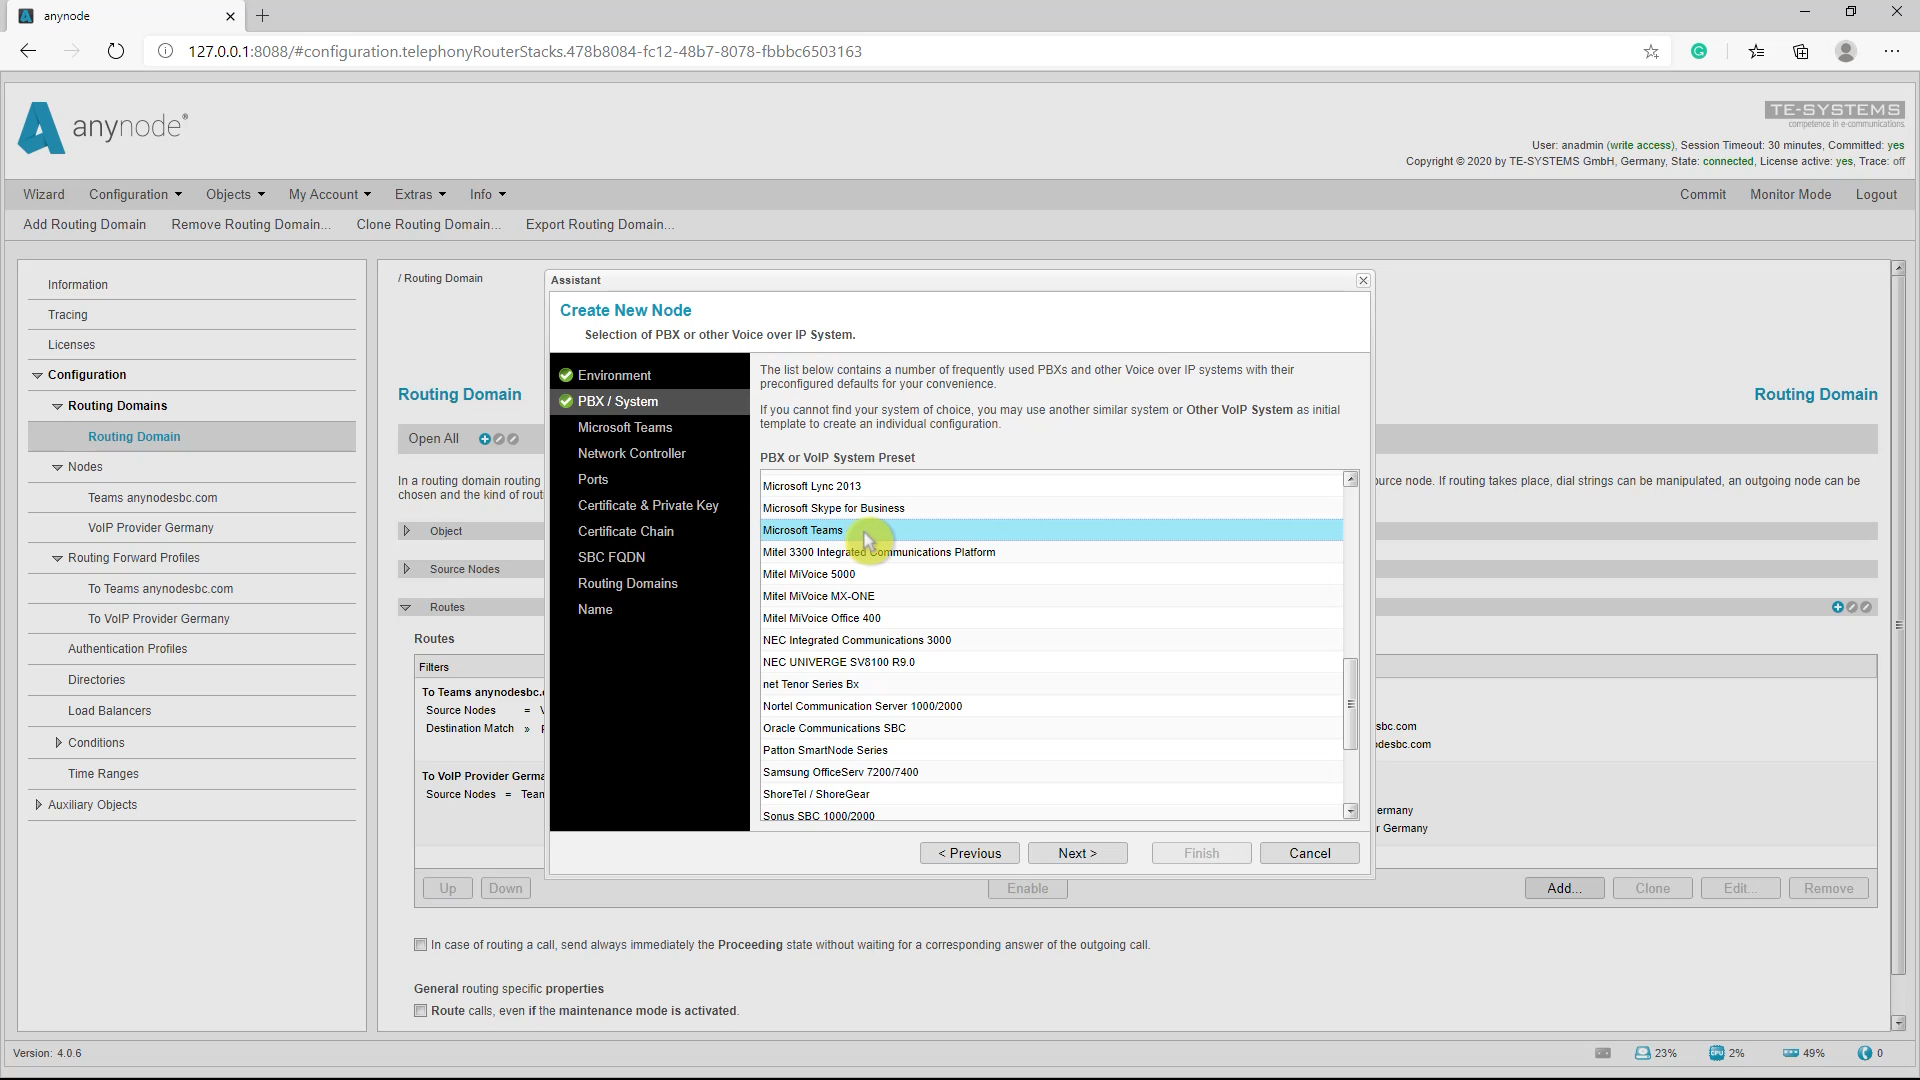
Again the Microsoft Teams entry must be selected.
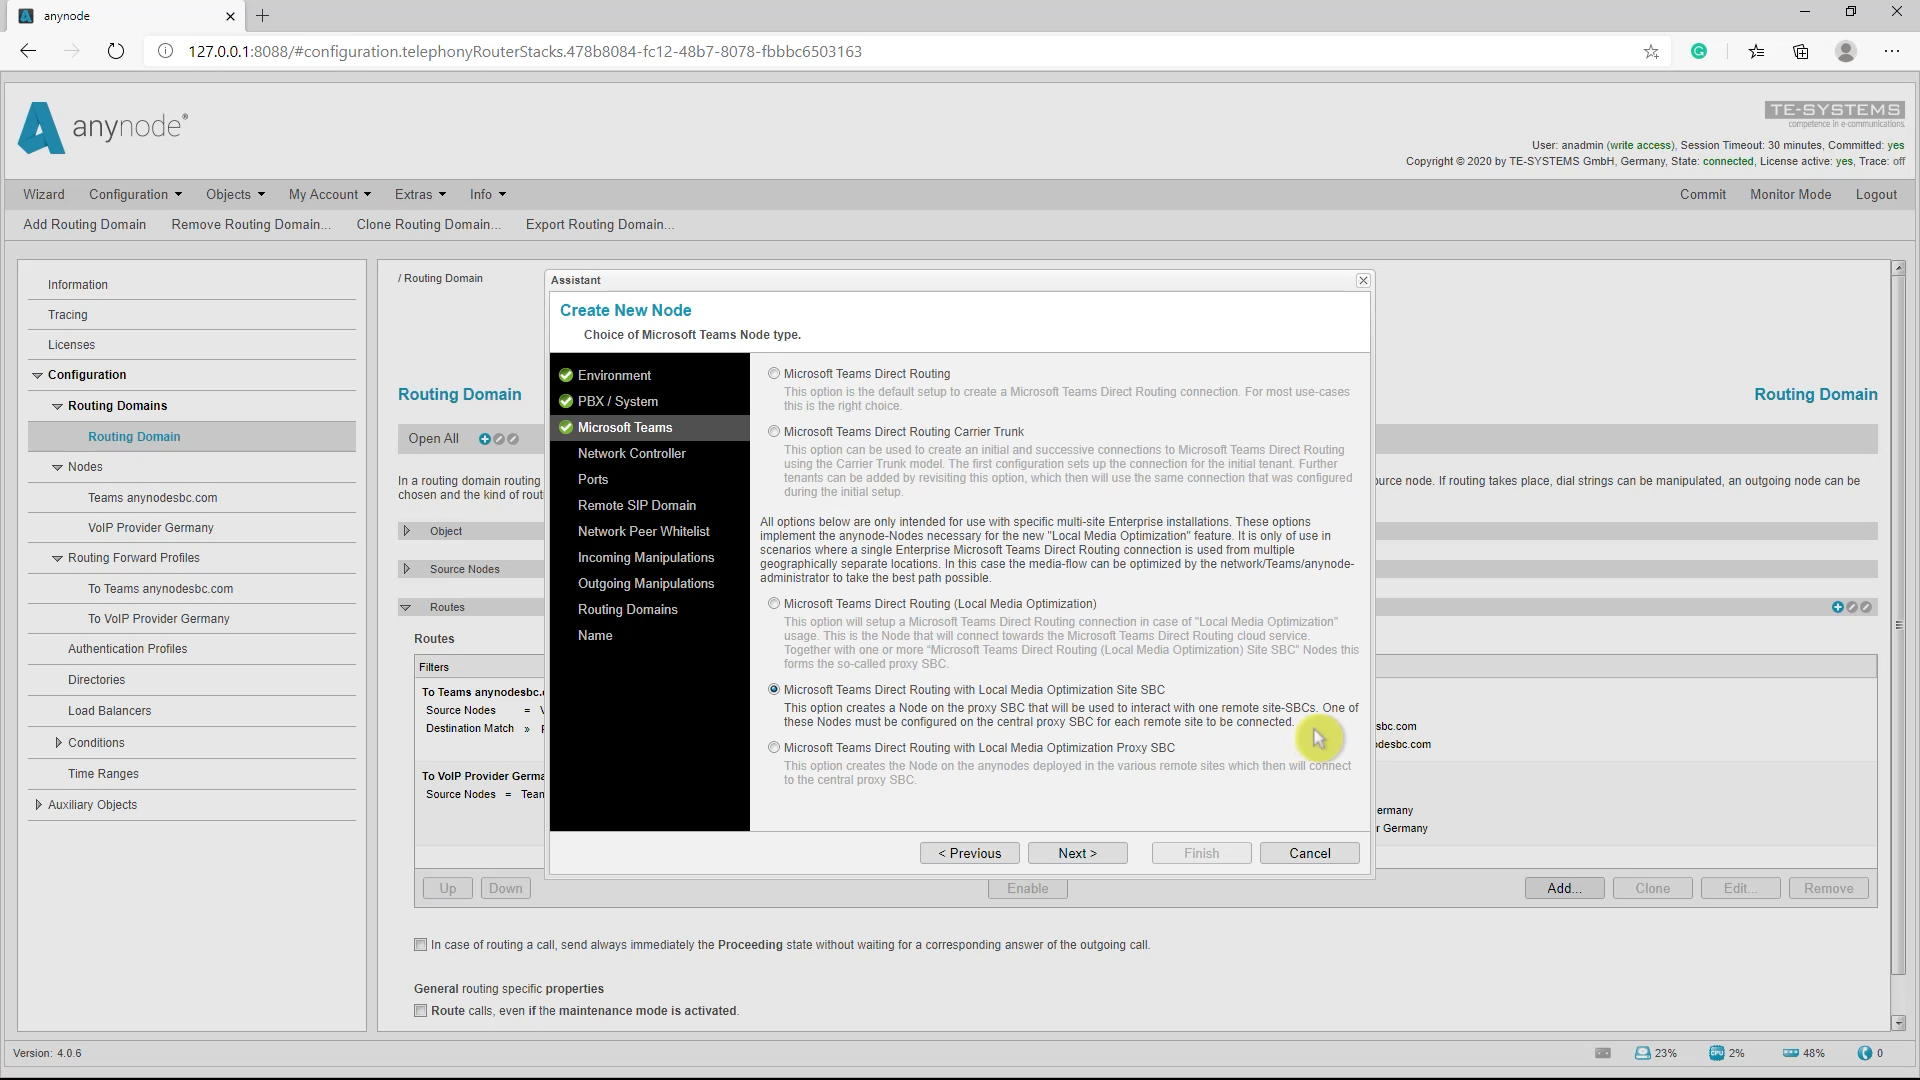
In the Microsoft Teams dialog, select Microsoft Teams Direct Routing with Local Media Optimization Site SBCas node type.
For the network controller, select the internal interface that is used for the interaction between the anynode Proxy and Site SBC locations.
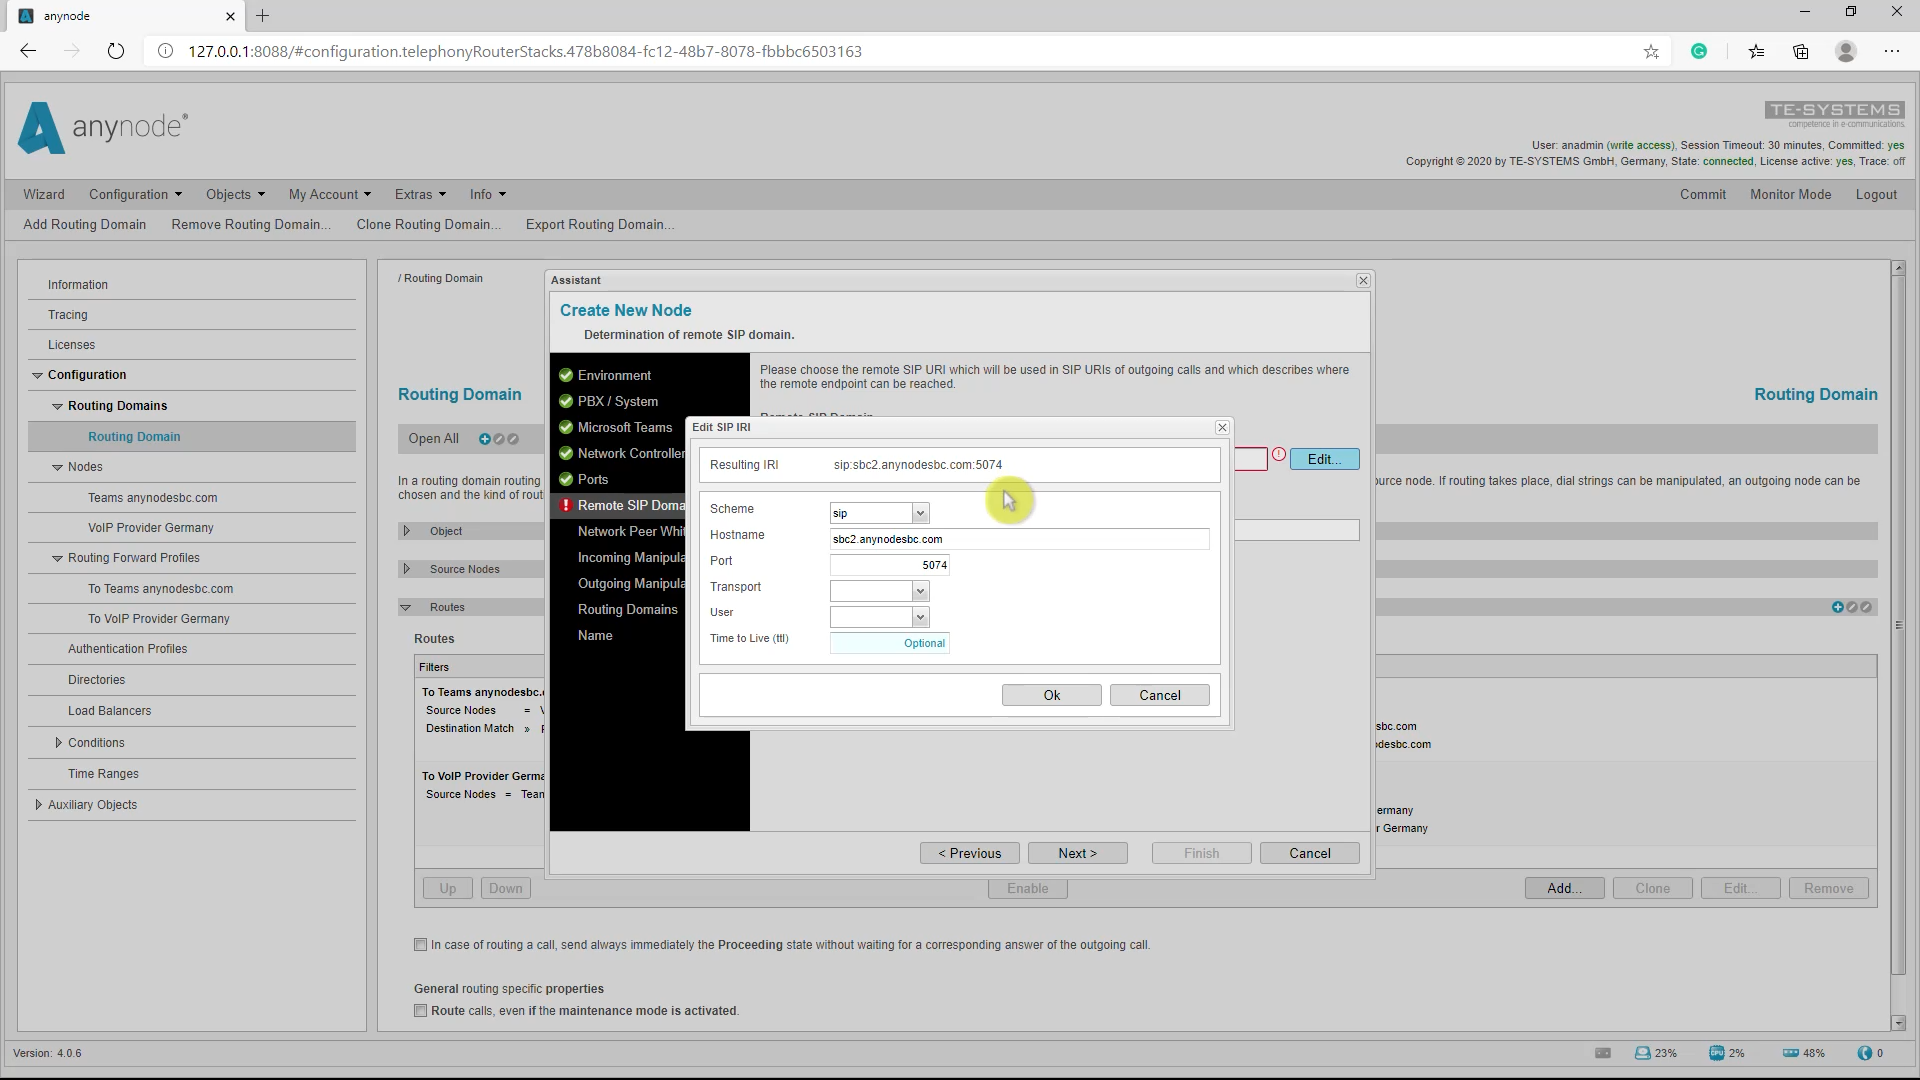
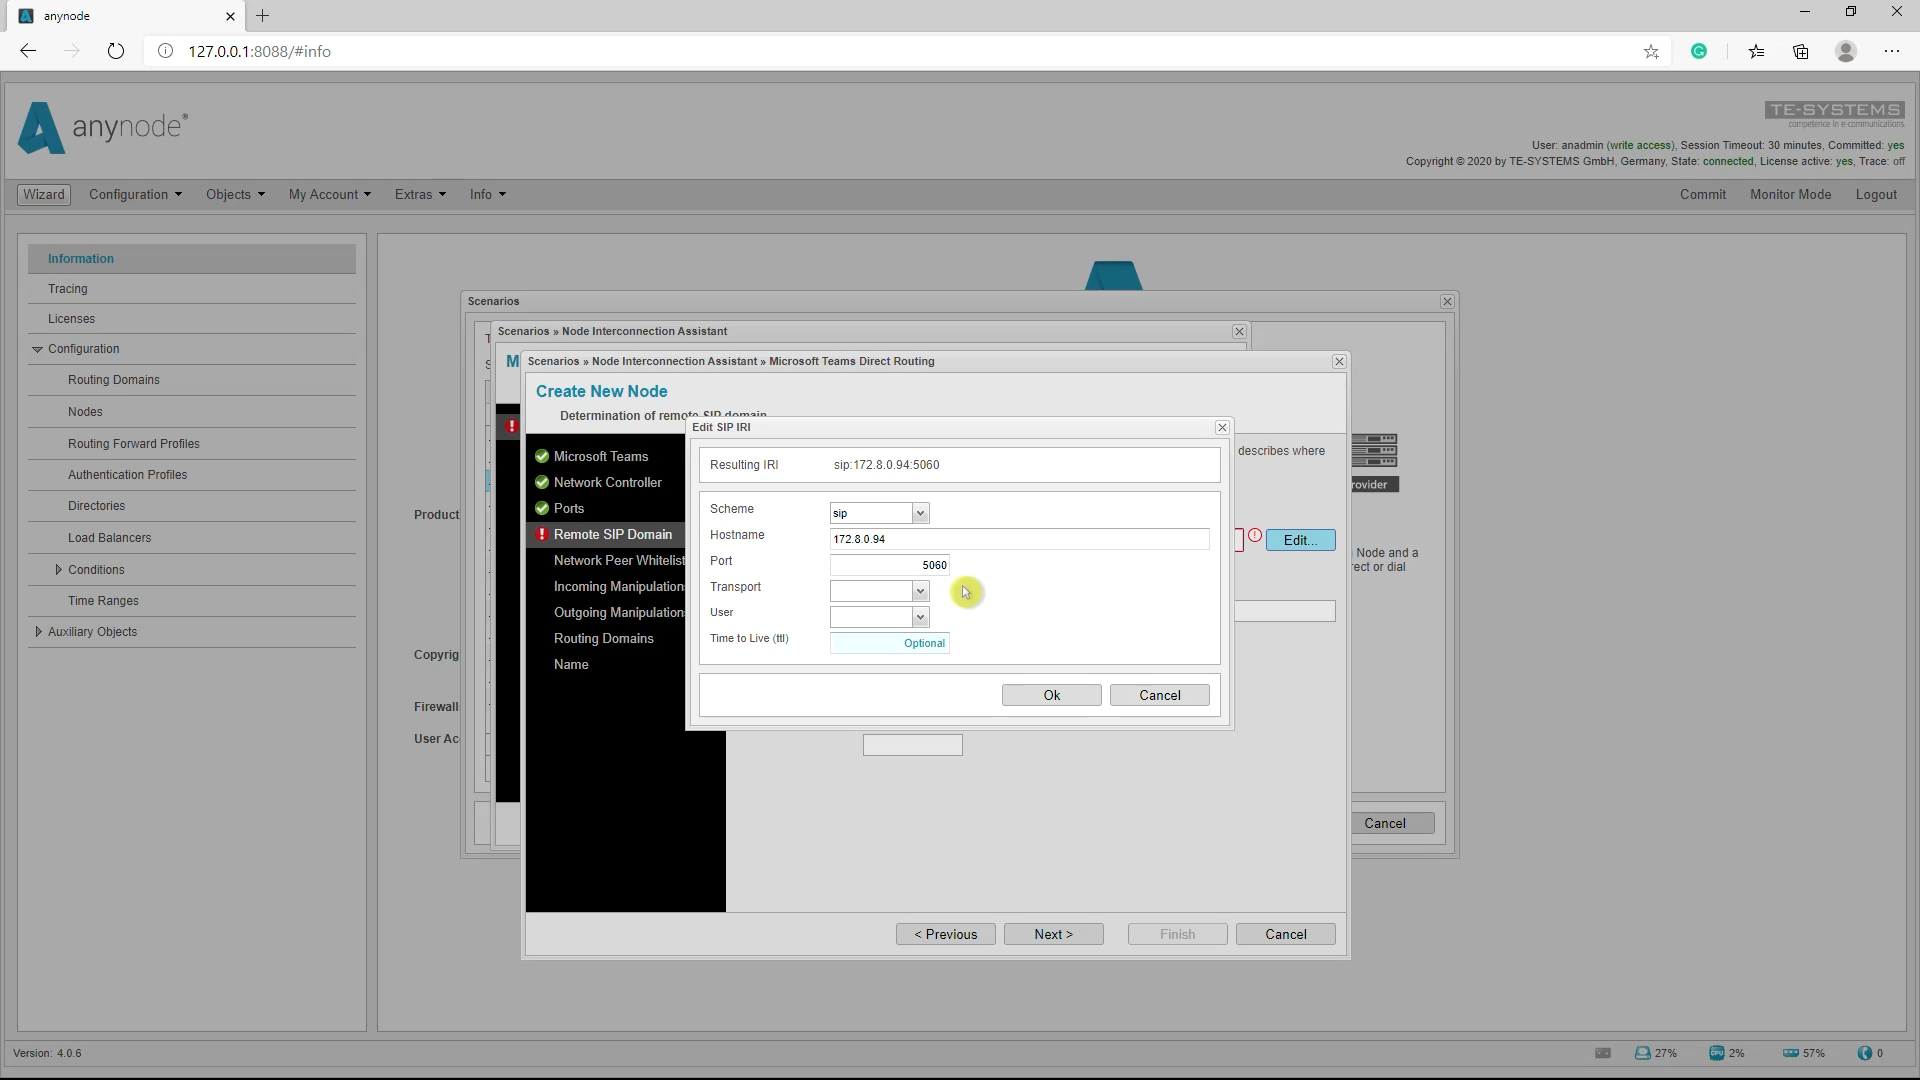
Next, set the required ports. Set the remote domain of the Site SBC. The remote SIP Domain doesn’t have to be necessarily the FQDN.
Next, set the required ports. Set the remote domain of the Site SBC. The remote SIP Domain doesn’t have to be necessarily the FQDN.
No incoming and outgoing dial string manipulations are required in this example. If required, please check our video tutorial “Basics Routing and Manipulations”.
The Routing Domain is automatically set.
The node name is here renamed to anynode Site SBC.
Enable Proxy SBC operation
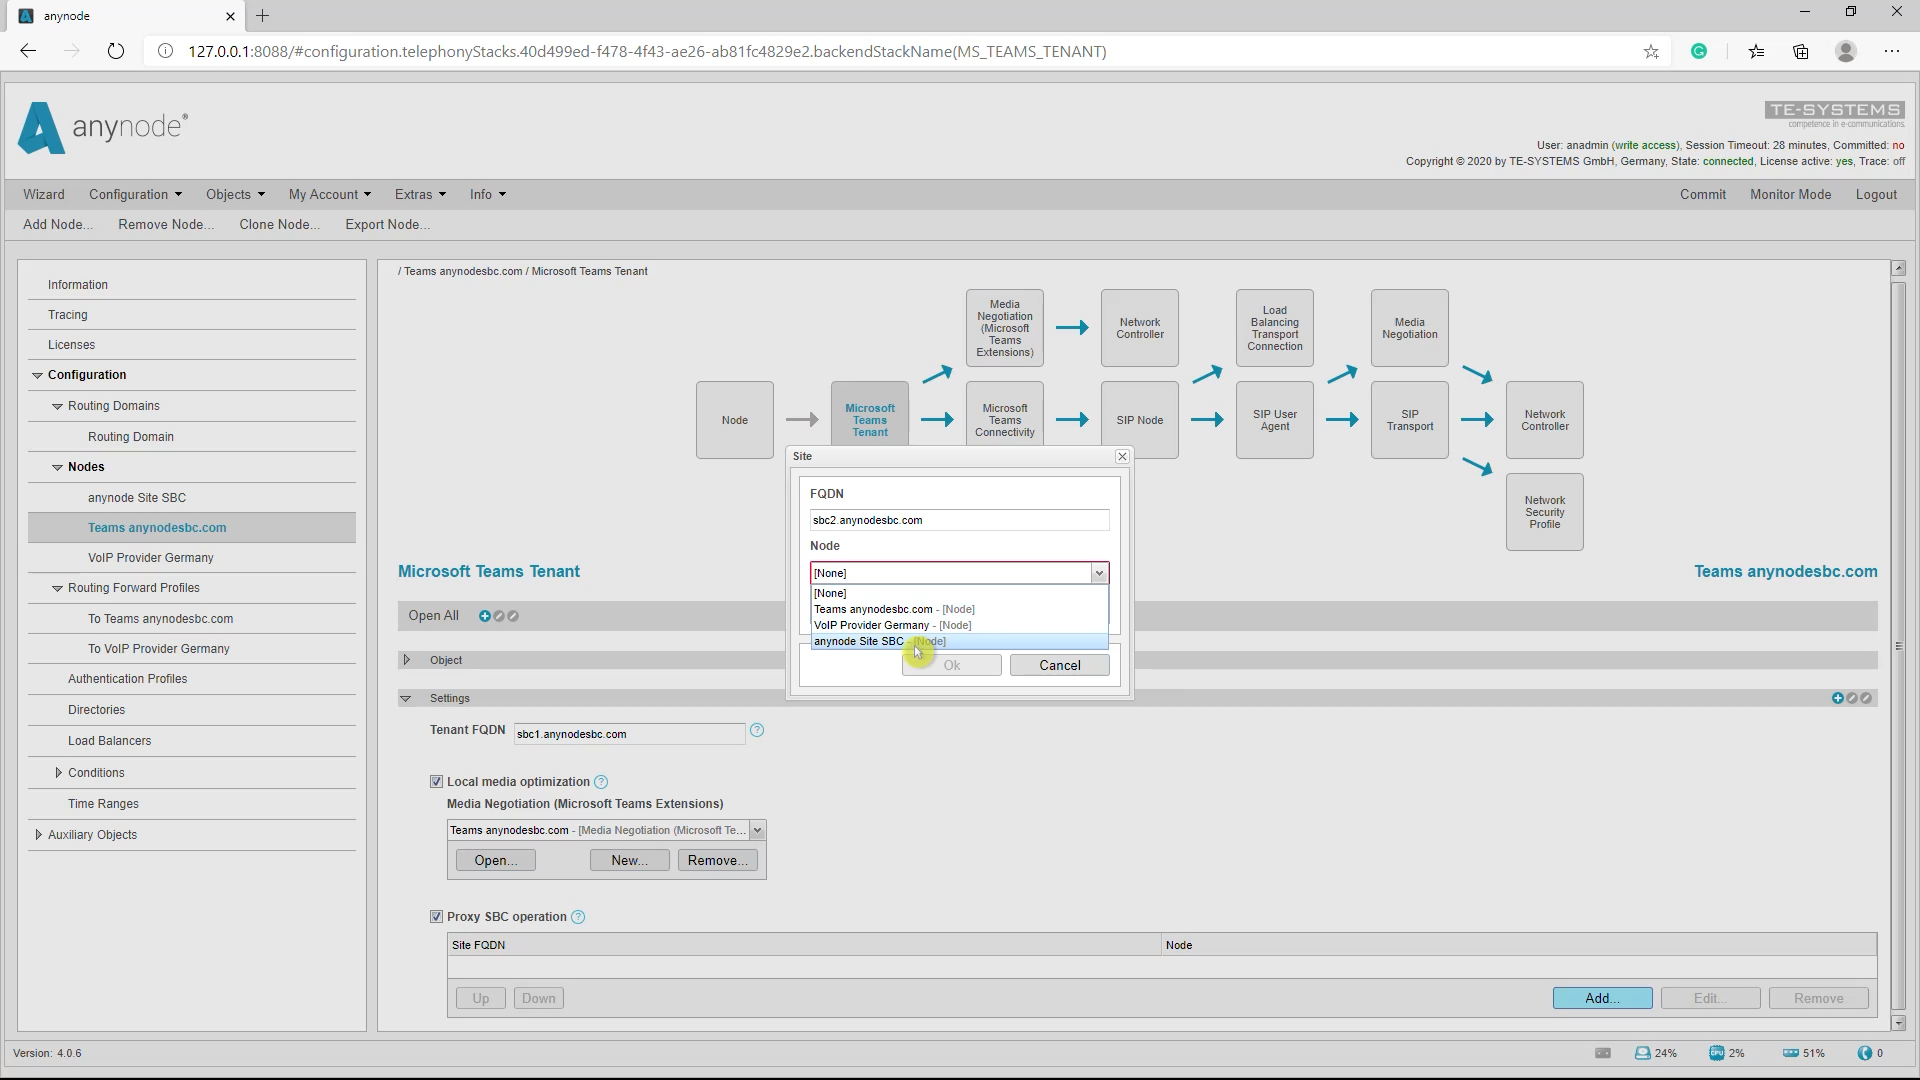
As only anynode’s Proxy SBC node interacts directly with the Microsoft Teams Direct Routing trunk the corresponding Site SBC FQDN must now being set. This has to be added within the Microsoft Teams Tenant configuration dialog.
Enable Proxy SBC operation and push the Add button.
Nun fügen Sie den erforderlichen Eintrag hinzu, in diesem Beispiel verwenden wir den FQDN sbc2.anynodesbc.com mit dem Site SBC Node.
The FQDN of the Site SBC is now set.
Site SBC configuration
The Site SBC, the anynode SBC of the tenant located in the USA, is configured as described next. As the Site SBC is also connected to a local SIP provider, the assistant’s Microsoft Teams Direct Routing and a VoIP Provider relationship will be selected again.
The Microsoft Teams node defaults are set and its details must be configured.
For the Site SBC location, the Proxy SBC node has to be created. A proxy SBC must have been created beforehand and now we take the third option and create a node that connects to this proxy SBC.
Select the corresponding internal network interface that is required for the Proxy SBC interaction.
Next, set the required local ports.
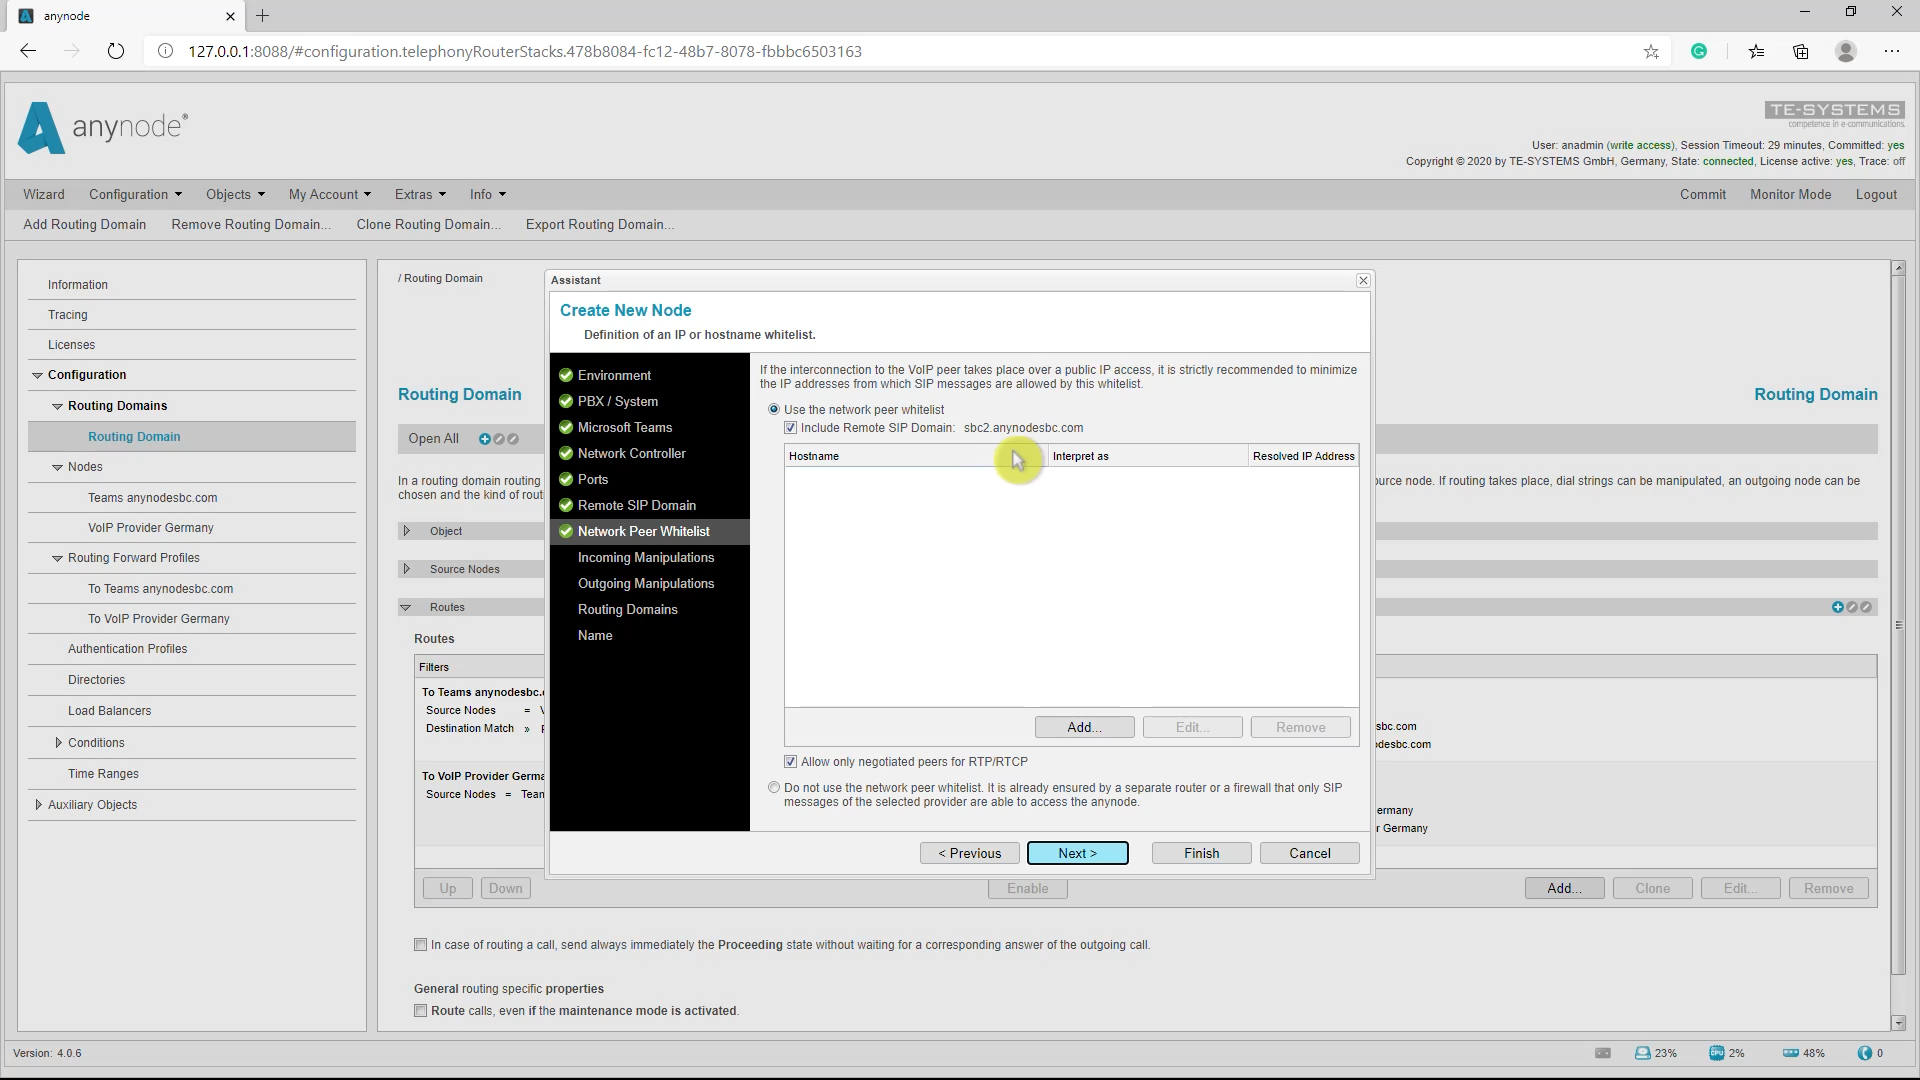
The FQDN SBC1.anynodesbc.com can be reached externally. At this moment, however, an internal connection is configured. At this moment, however, an internal connection is configured. The internal IP address of the proxy server(i.e. the IP address that was set on the Proxy SBC at the SiteSBC node at the network controller) should be used here.
No incoming and outgoing dial string manipulations are required in this example.
The initial Routing Domain will be set after running through anynode’s wizard in a new setup. The node name is here renamed to Proxy SBC Germany.
Now the Node Interconnection Assistantgives an overview of the completed configuration.
Proceed with NEXT to configure the SIP provider node and the Routing decisions for the selected VoIP scenario.
Please note again that the provider related configuration steps are not shown in detail.
For the routing, the recommended Use dial string routing method“Use Direct Routing with prefix filter” is used. This ensures that the routing is restricted to a specific dial string. In this example the routing is set as shown below. If everything is set continue with Finish to complete the guided setup in the anynode wizard. Don’t forget to Commit afterwards to save the newly created configuration.
If everything is set continue with Finish to complete the guided setup in the anynode wizard. Don’t forget to Commit afterwards to save the newly created configuration.
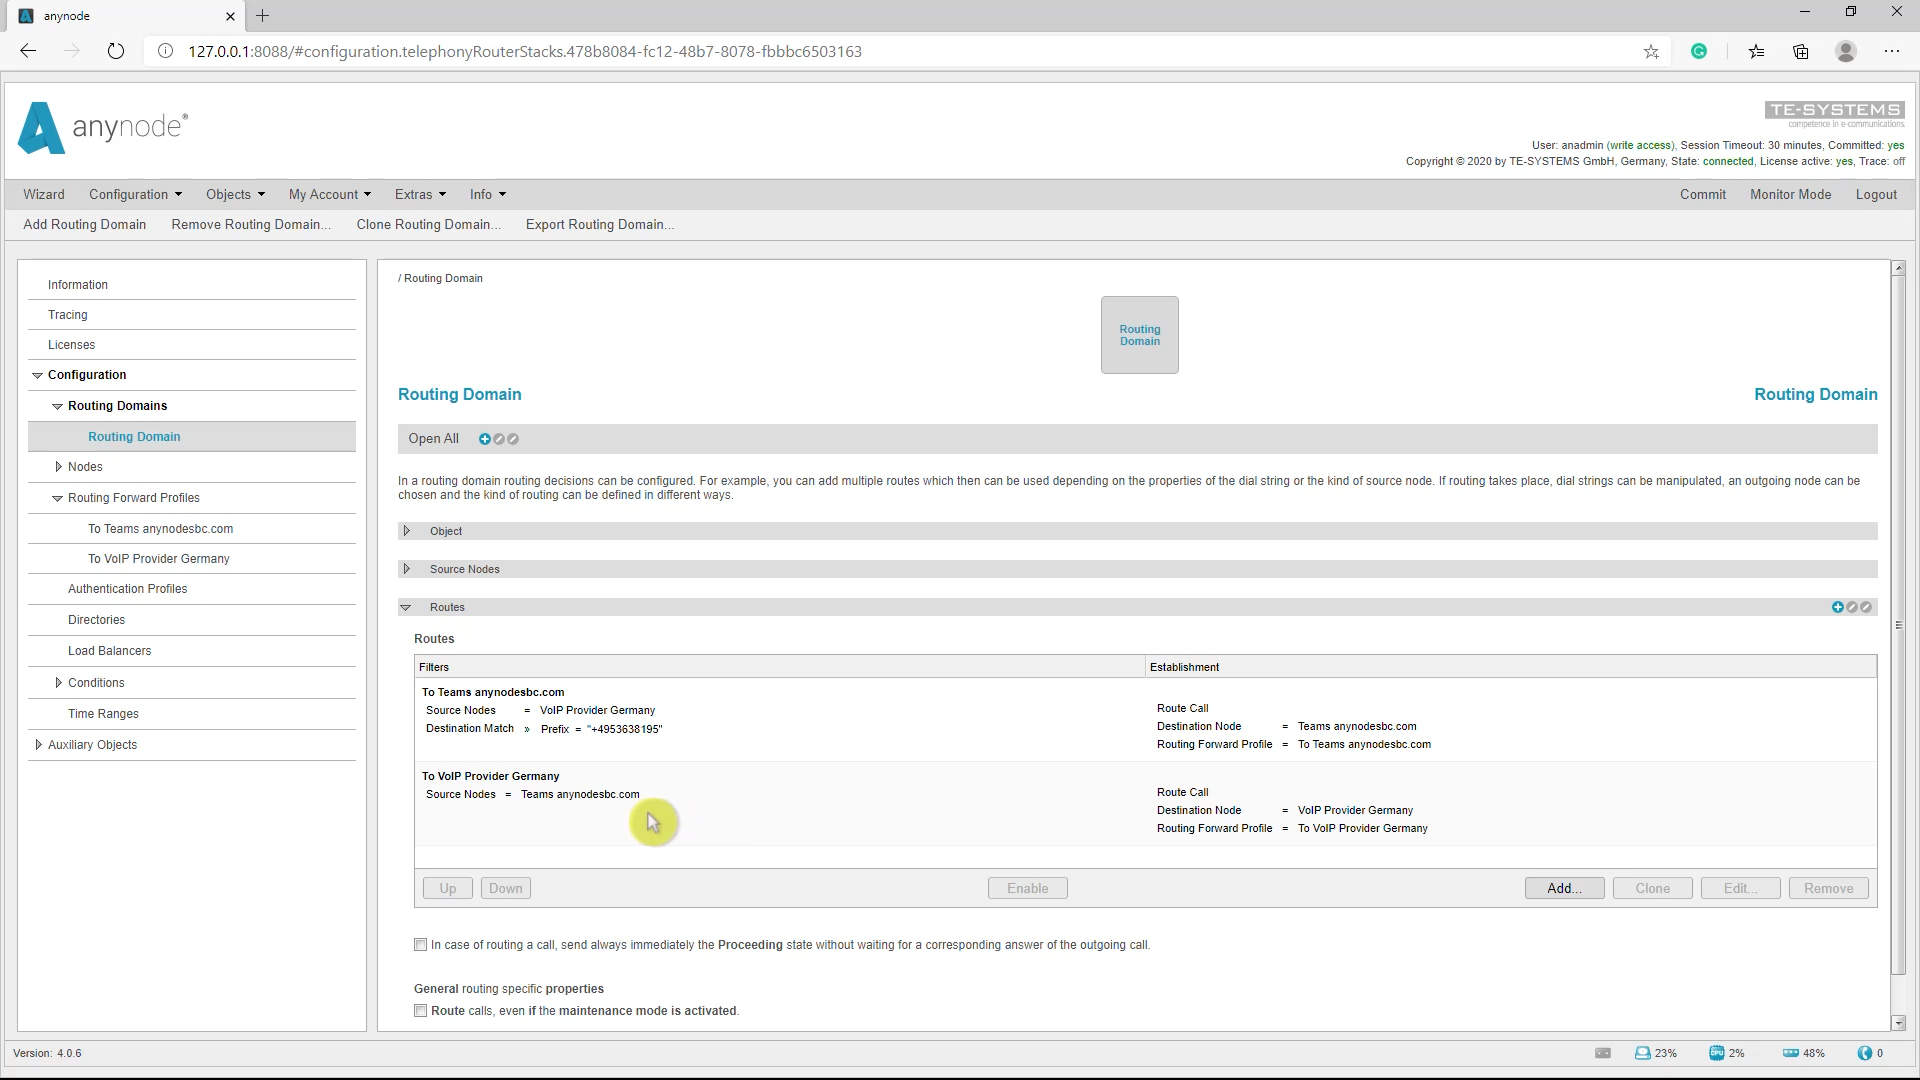
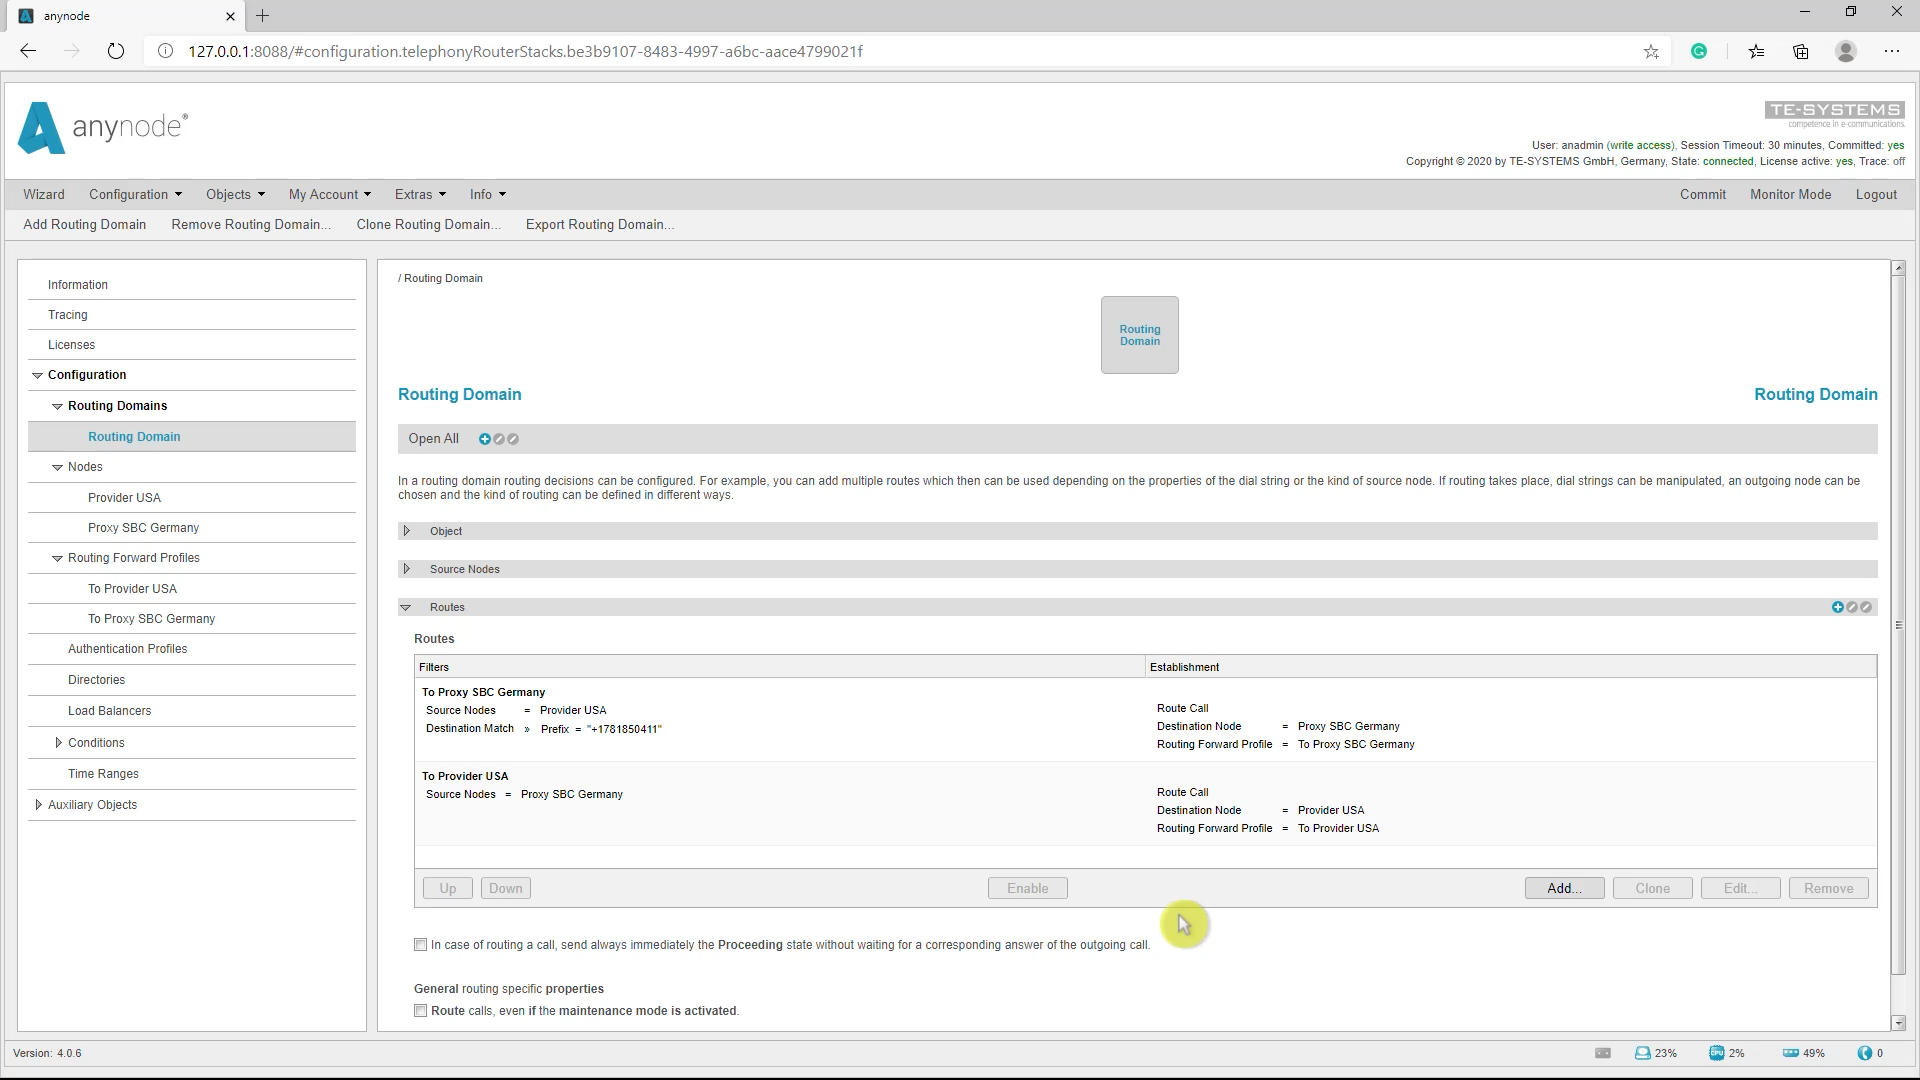
The created routing domain entries with their filter and profile relations for the anynode’s Site SBC of this example are shown next:
Check anynode trace for option 2
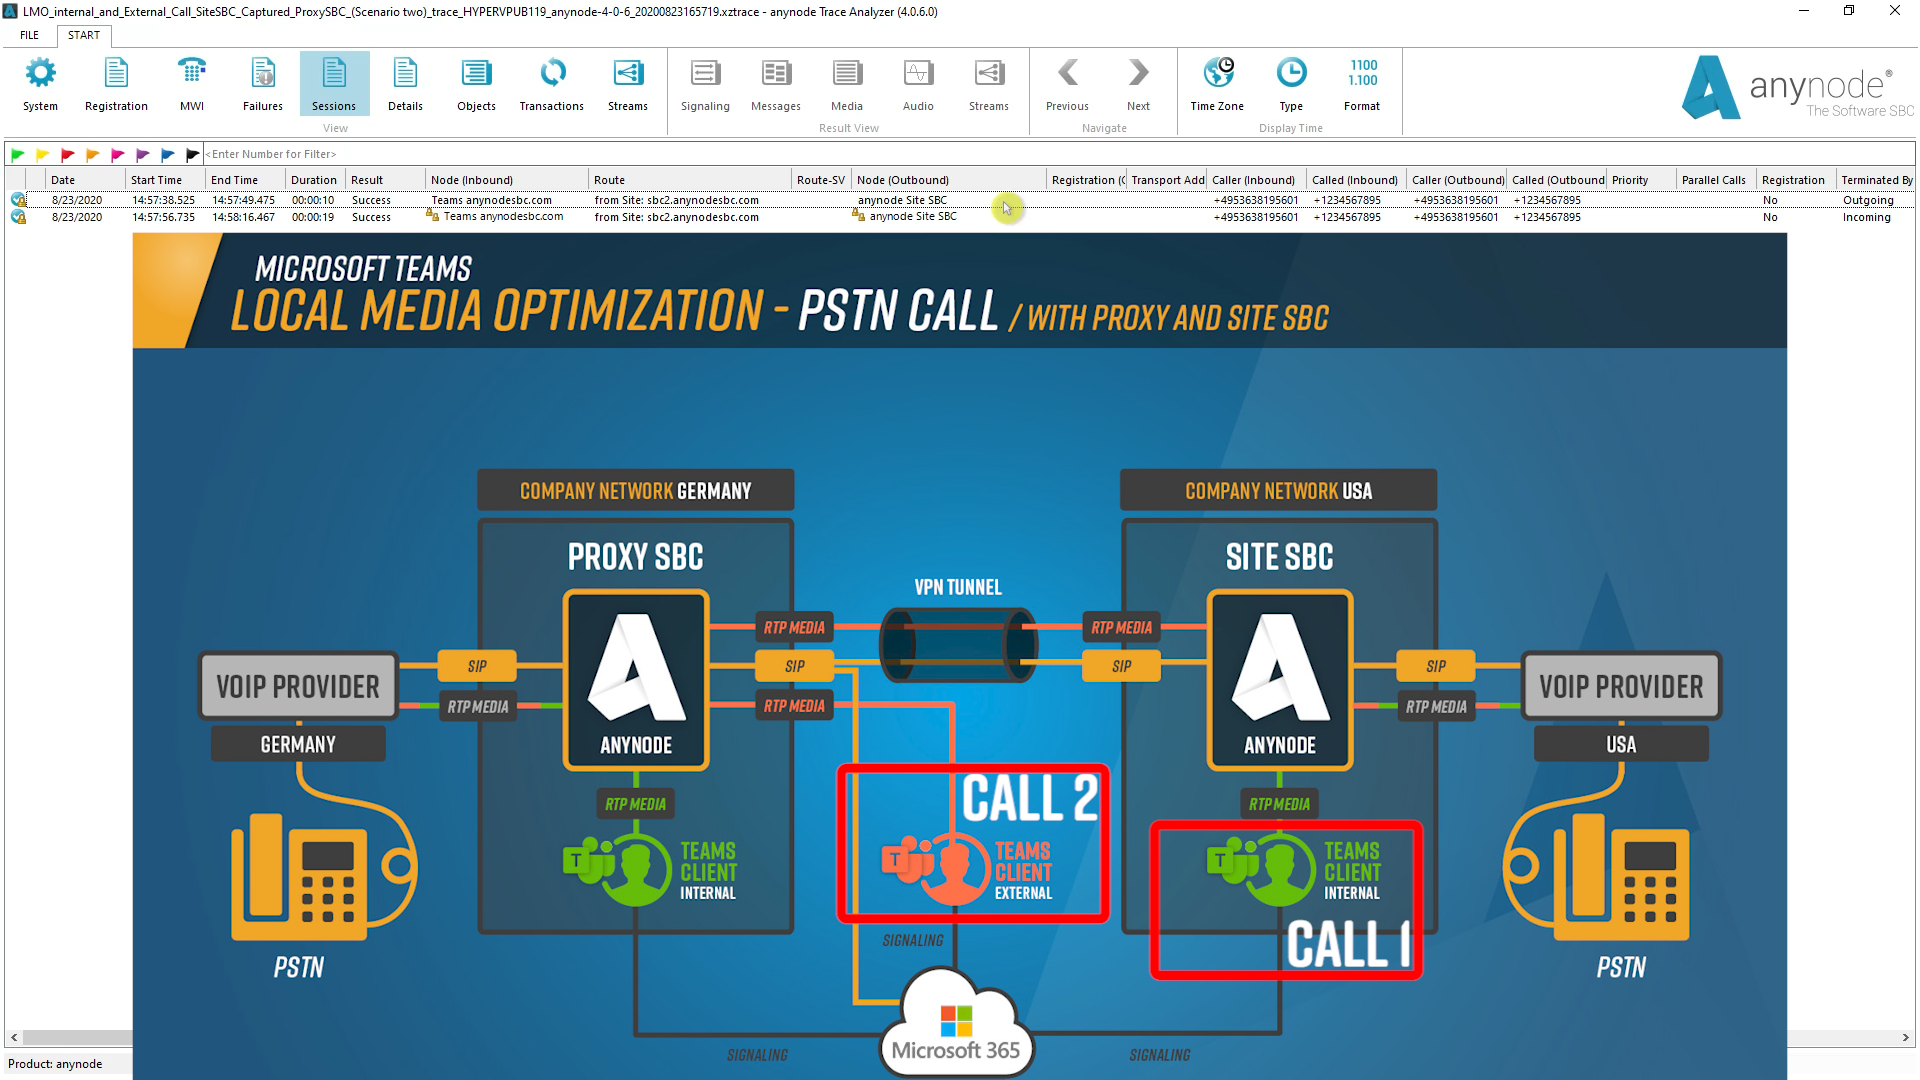
Let us now take a look at the successful configuration in a recorded trace. We have two calls again, one from a Teams participant who is in the USA office and the second call is from the same Teams user who, however, makes a call from his Teams client on the mobile phone outside the company network.
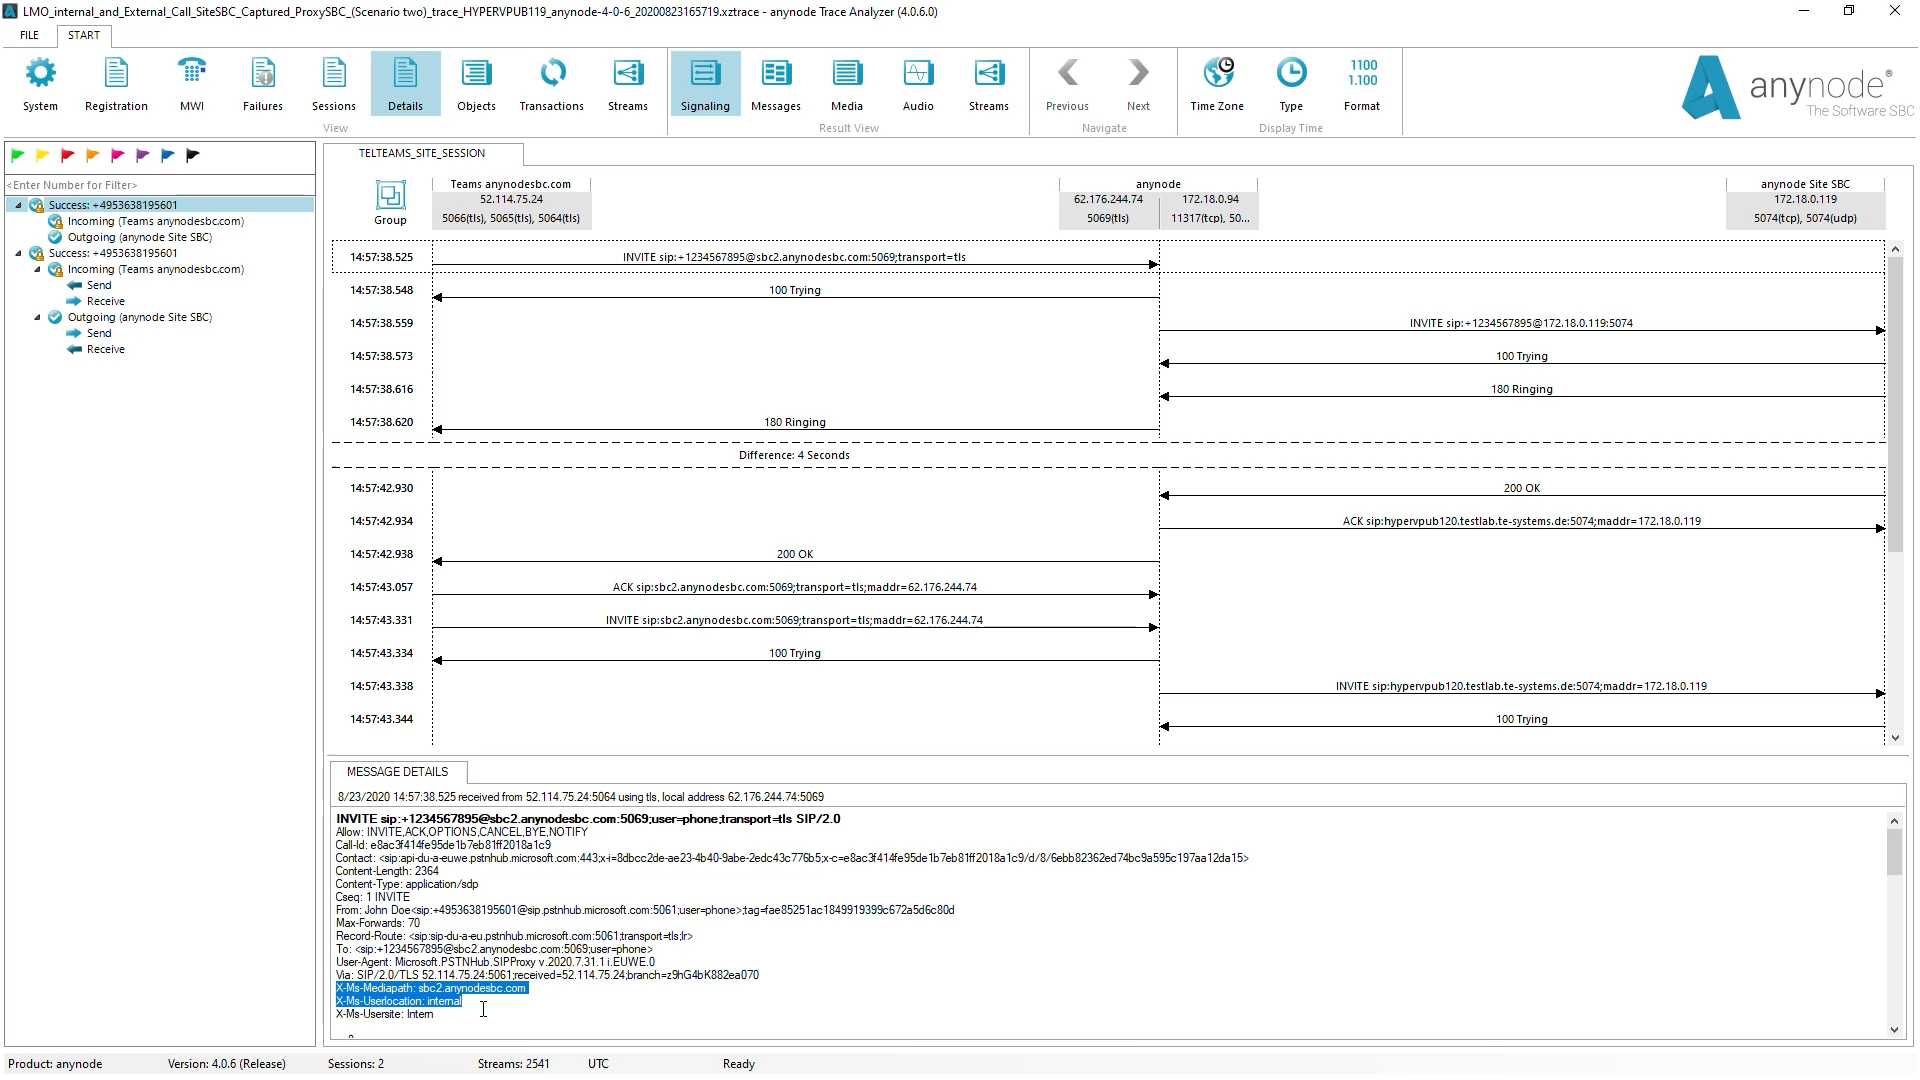
Here is the first call where the user dials an American number. We see here that the user is internal and the media should only go via SBC2, i.e. via our SiteSBC and NOT via this proxy SBC here.
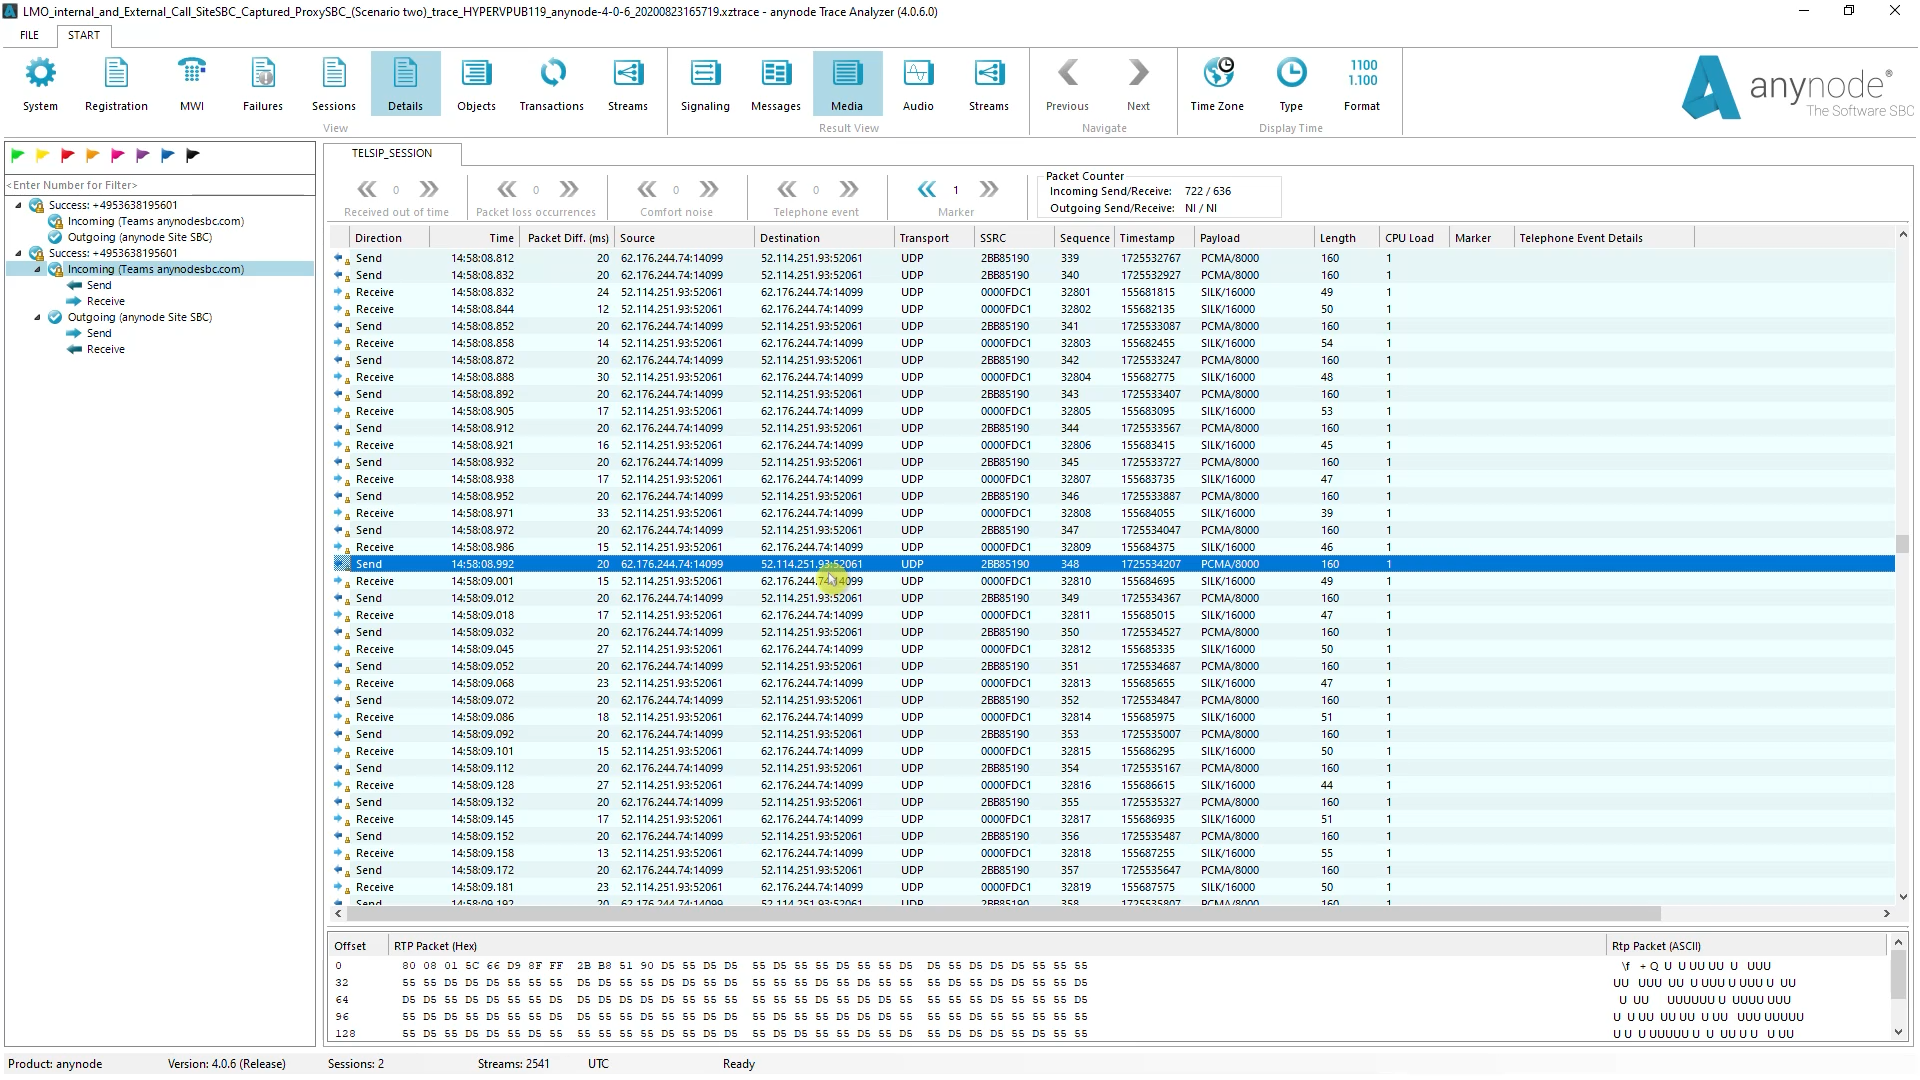
You can already see that here, there are no media here, because of course no media have been negotiated. Here the media are negotiated locally with the SBC2, i.e. our site SBC. The media go directly from the Teams client to the SBC 2.
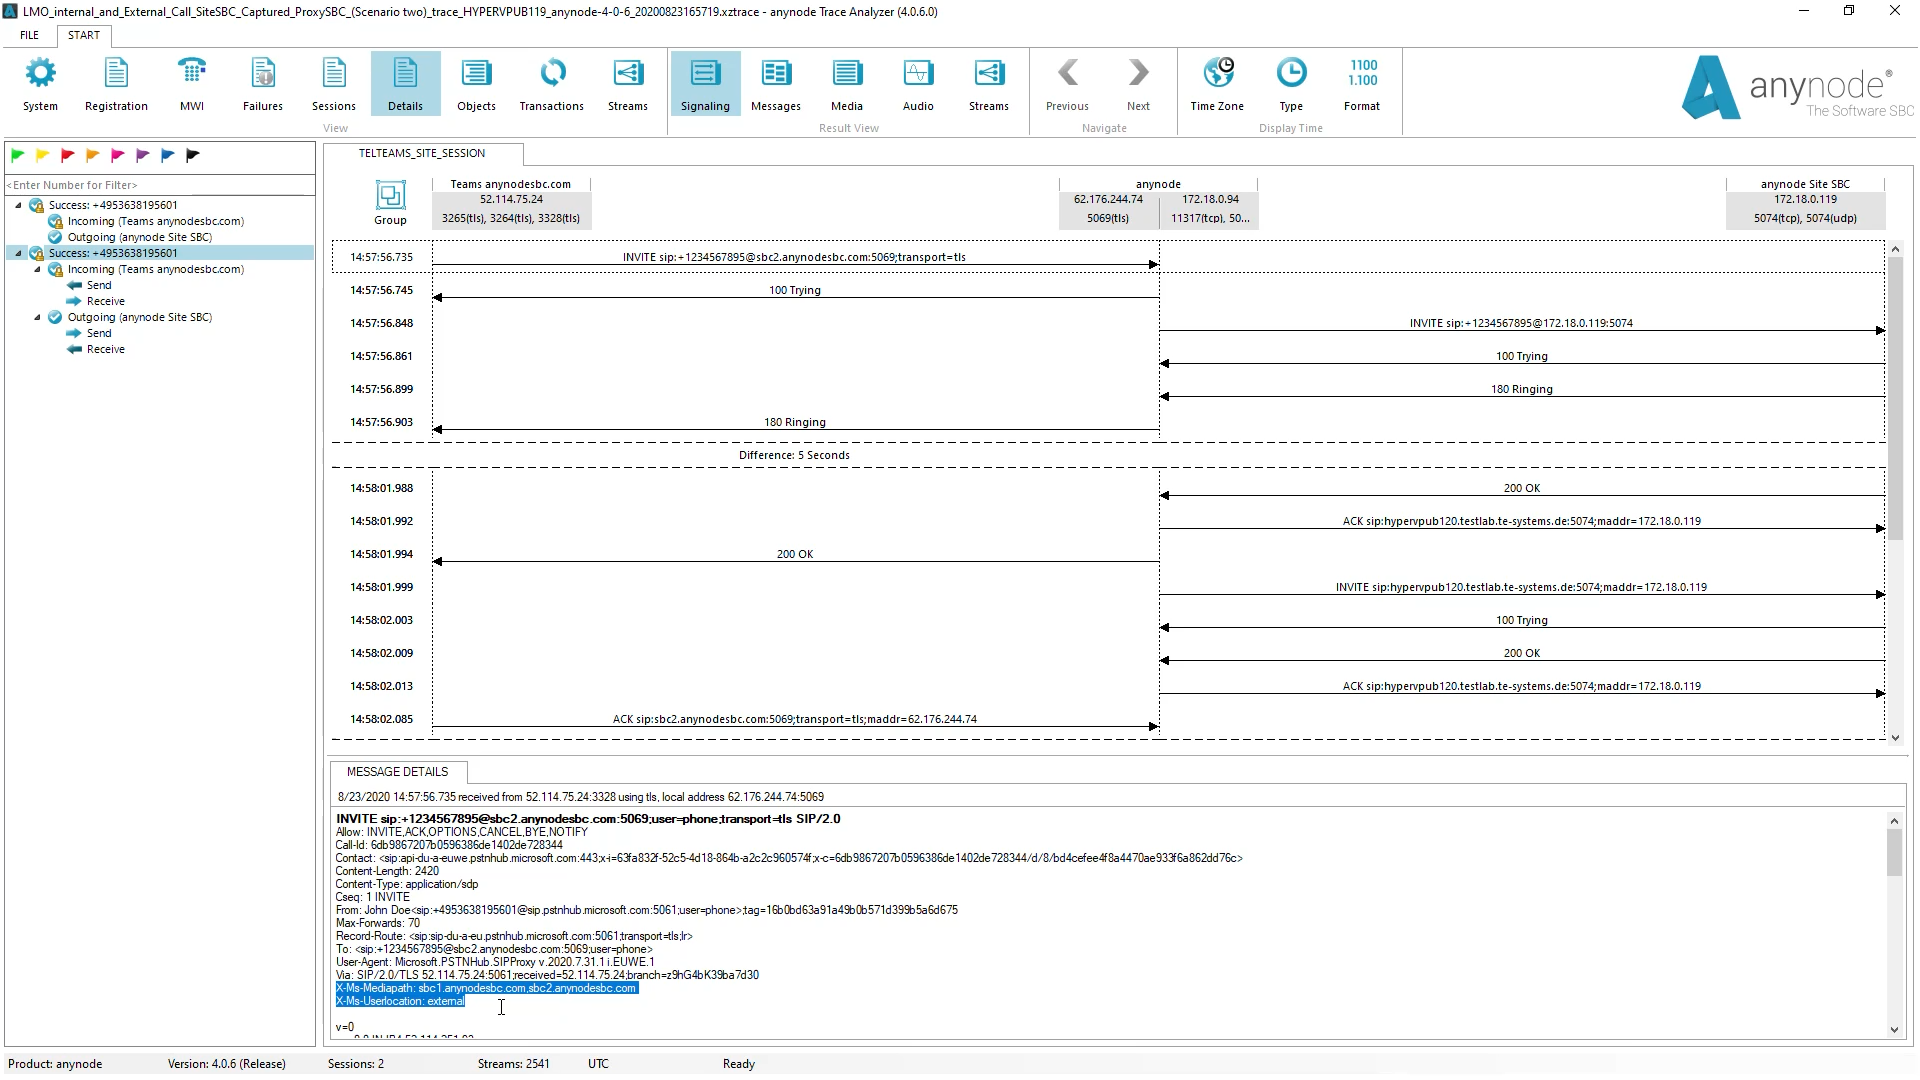
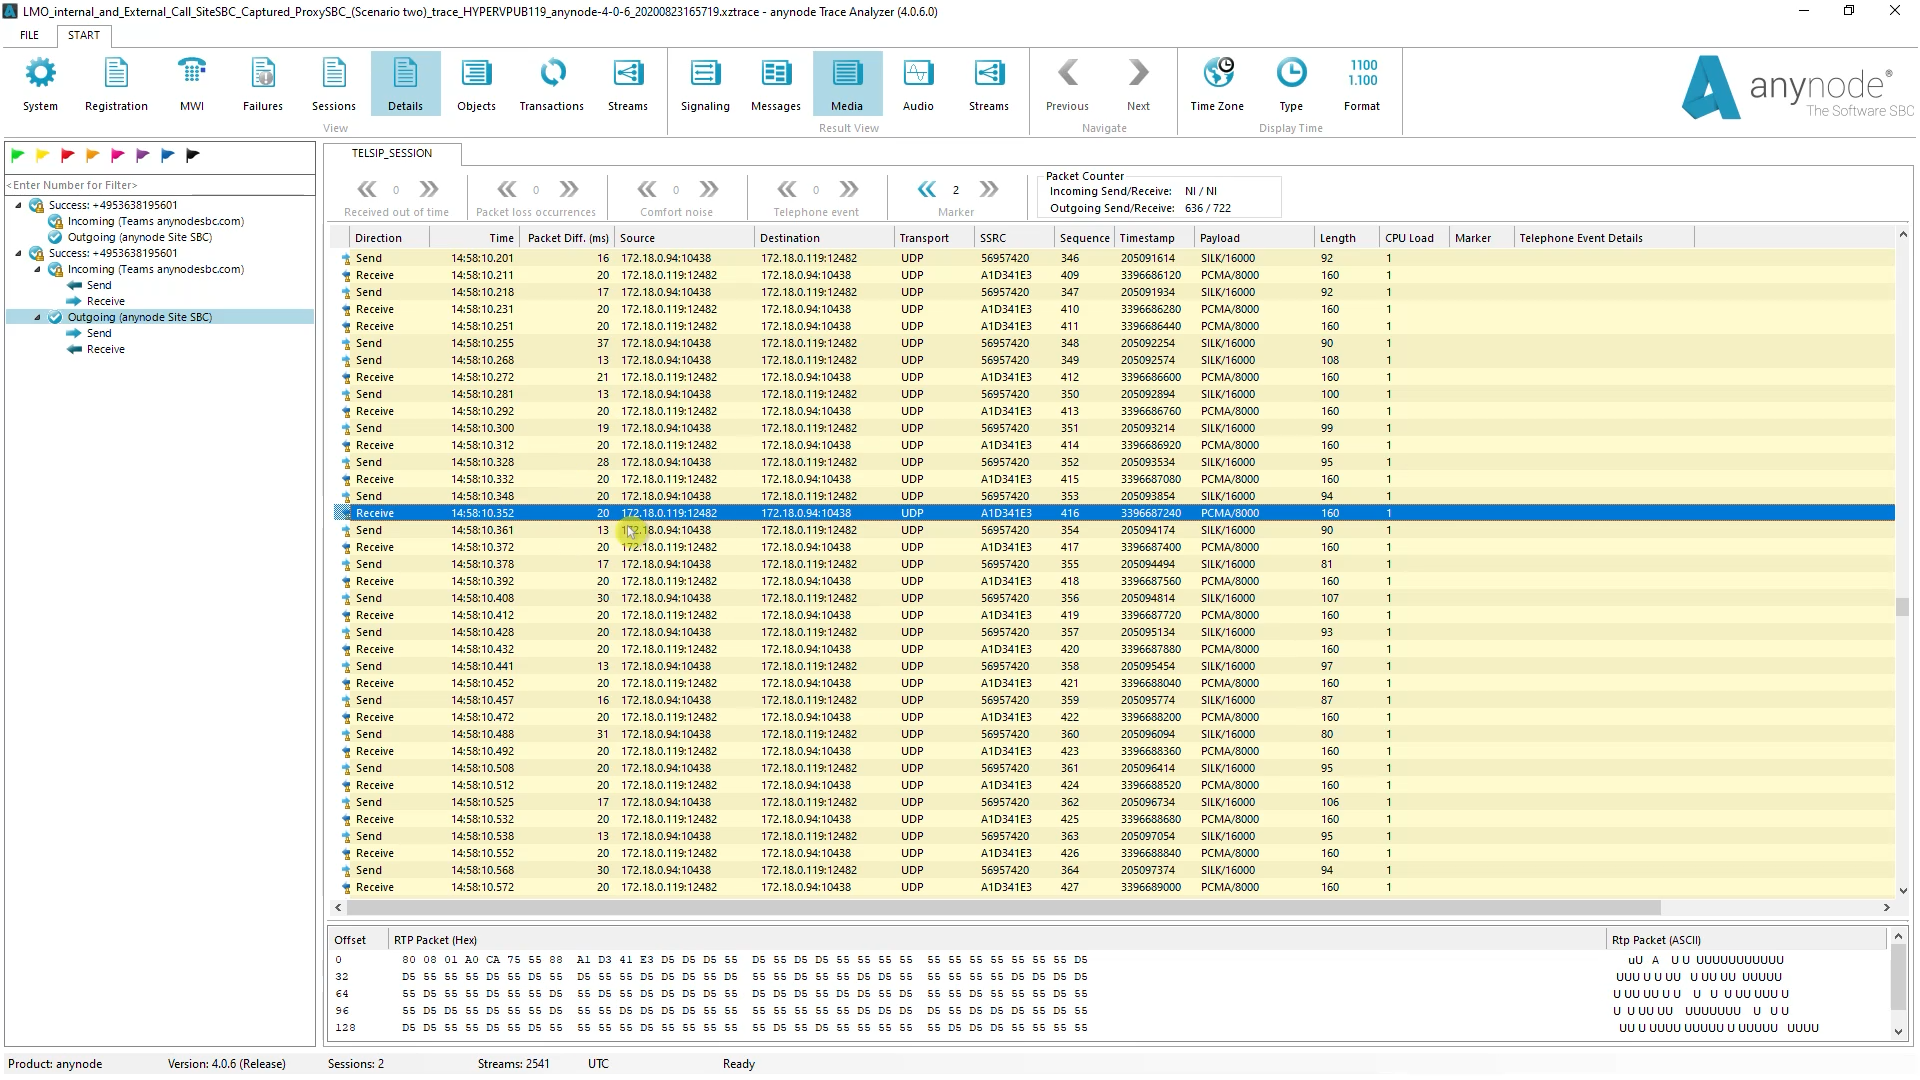
In the second call, the external Teams client was used and is not connected to the company network. At this point, we are informed that the Teams User is external and the media should go via SBC 1 and SBC 2. This means that all media go through the proxy SBC. This can be seen well in the media view.
This can be seen well in the media view. Here you can see that the media data from the external IP address goes from this Proxy SBC to the Microsoft Relay and from the Microsoft Relay back to the proxy. With the outgoing media data, the data is sent from the local IP address to the Site SBC. And from there the data is received.


