


1Introduction
This document is intended to support you with enabling and configuring anynode’s Media Recording feature for an existing anynode
setup.The following sections describe the essential configuration steps for that.It also gives an example of integrating a
third-party application via anynode’s REST API for accessing all recordings via a PowerShell script.
Additional anynode information and documents(TechNotes)can be found on our websitehttps:in ourCommunityor on theYouTube
channel.
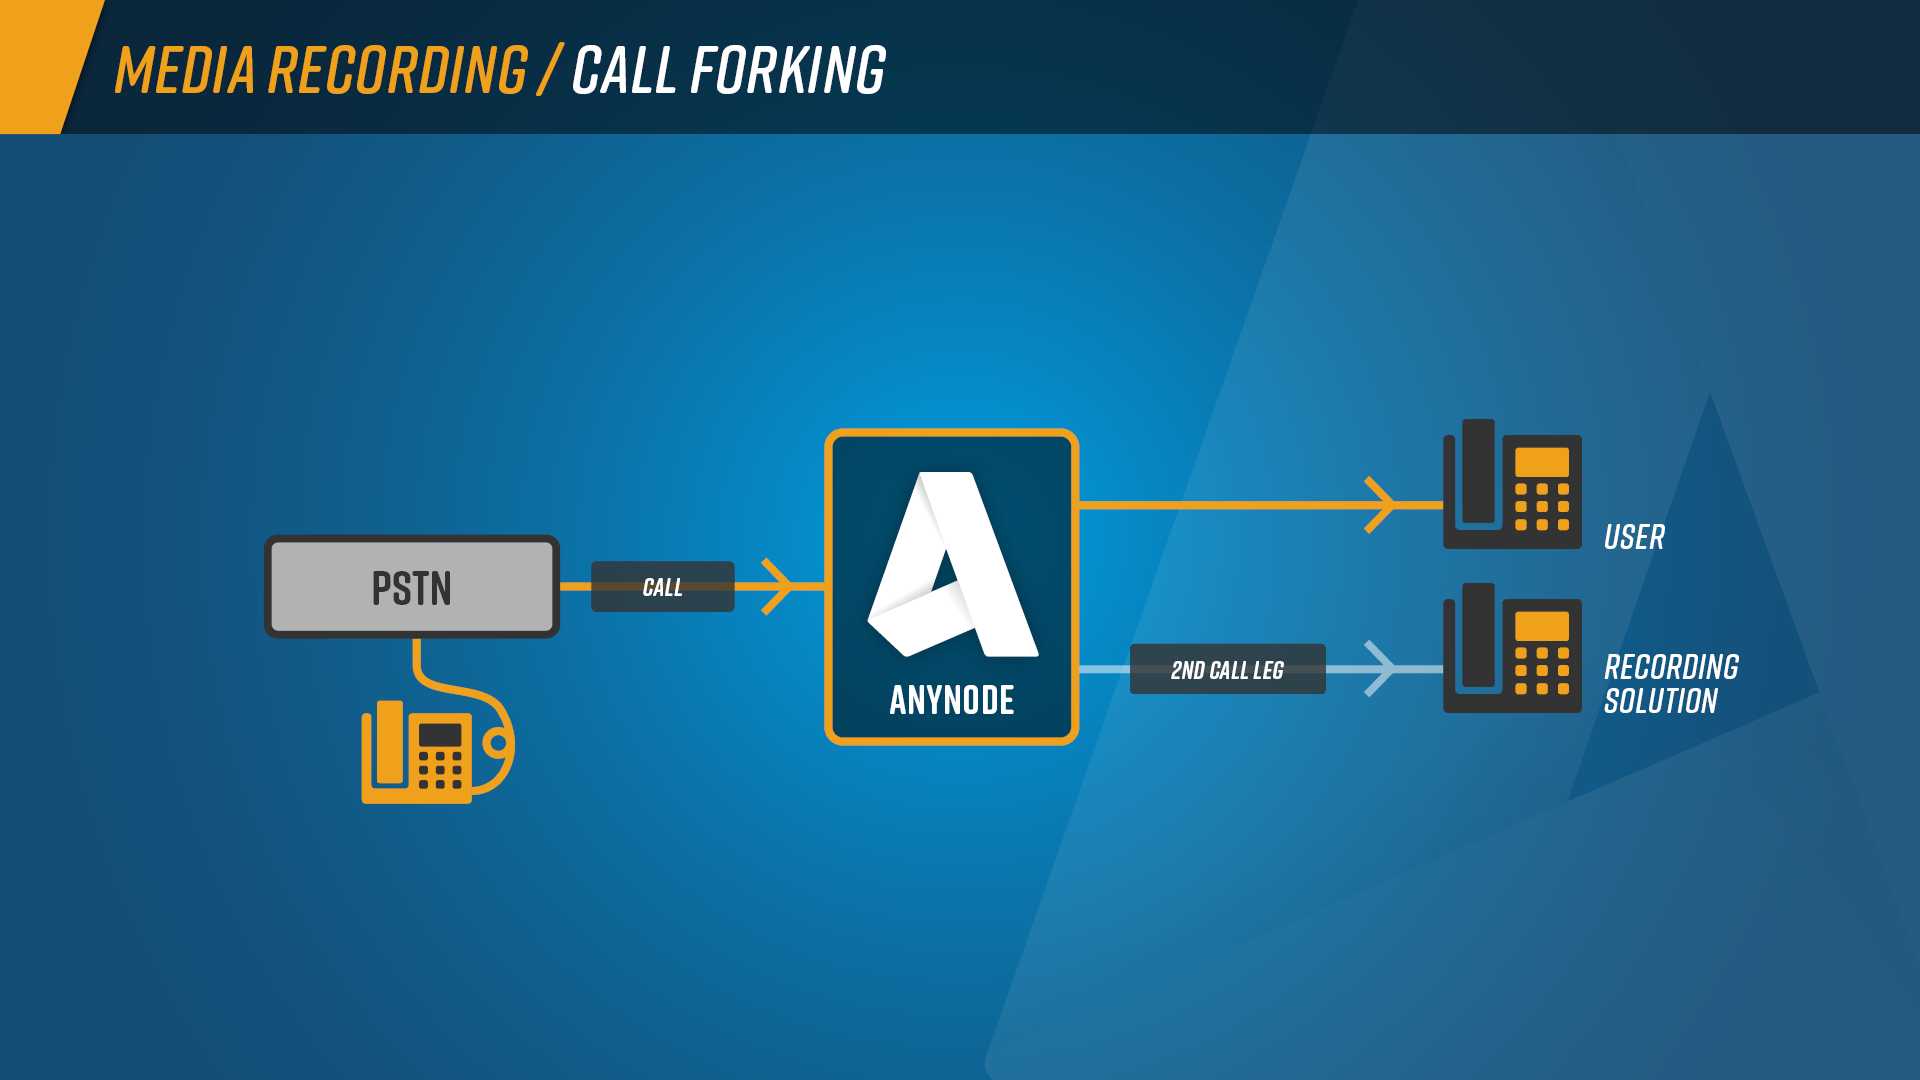
anynode supports two types of recording.Occasional recording where the calls do not need any retouching work like search
or captioning can use the easy file recording.Call details and media files are available through the REST API interface.
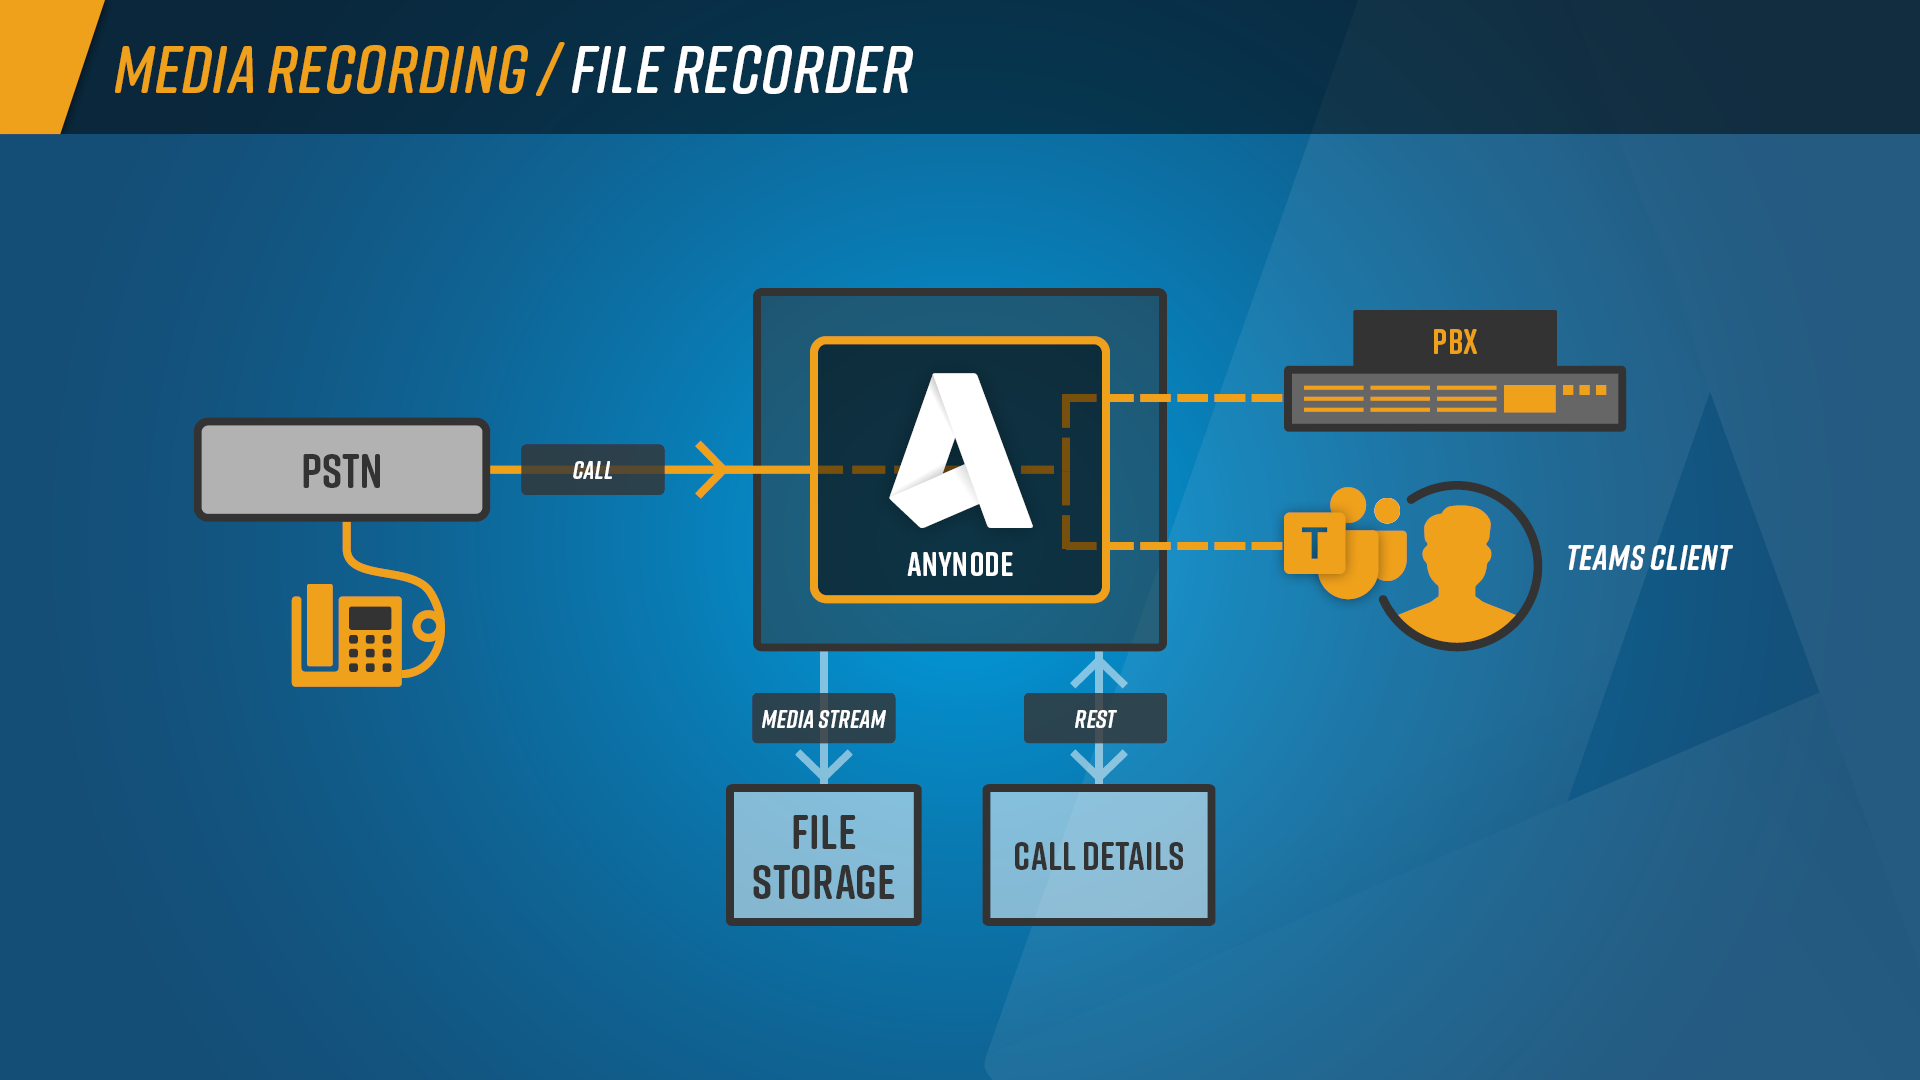
When companies need to fulfill legal regulations and compliance guidelines or handle vast amounts of recorded data,integrating
third-party call recording solutions via call forking is the best way.An optional announcement before the connection of both
audio streams will ensure the call is not recorded without permission.Many configuration options make the connection implementation
flexible and fast.
2Media Recording Requirements
Please take note of the following requirements for Media Recording:
-
Latest anynode version or at minimum an installation of version 4.6.0.
-
Appropriate network access,network routing and administration rights.
-
Accessible,installed and configured VoIP environment.
-
VoIP credentials for the involved nodes for allowing appropriate configurations.
-
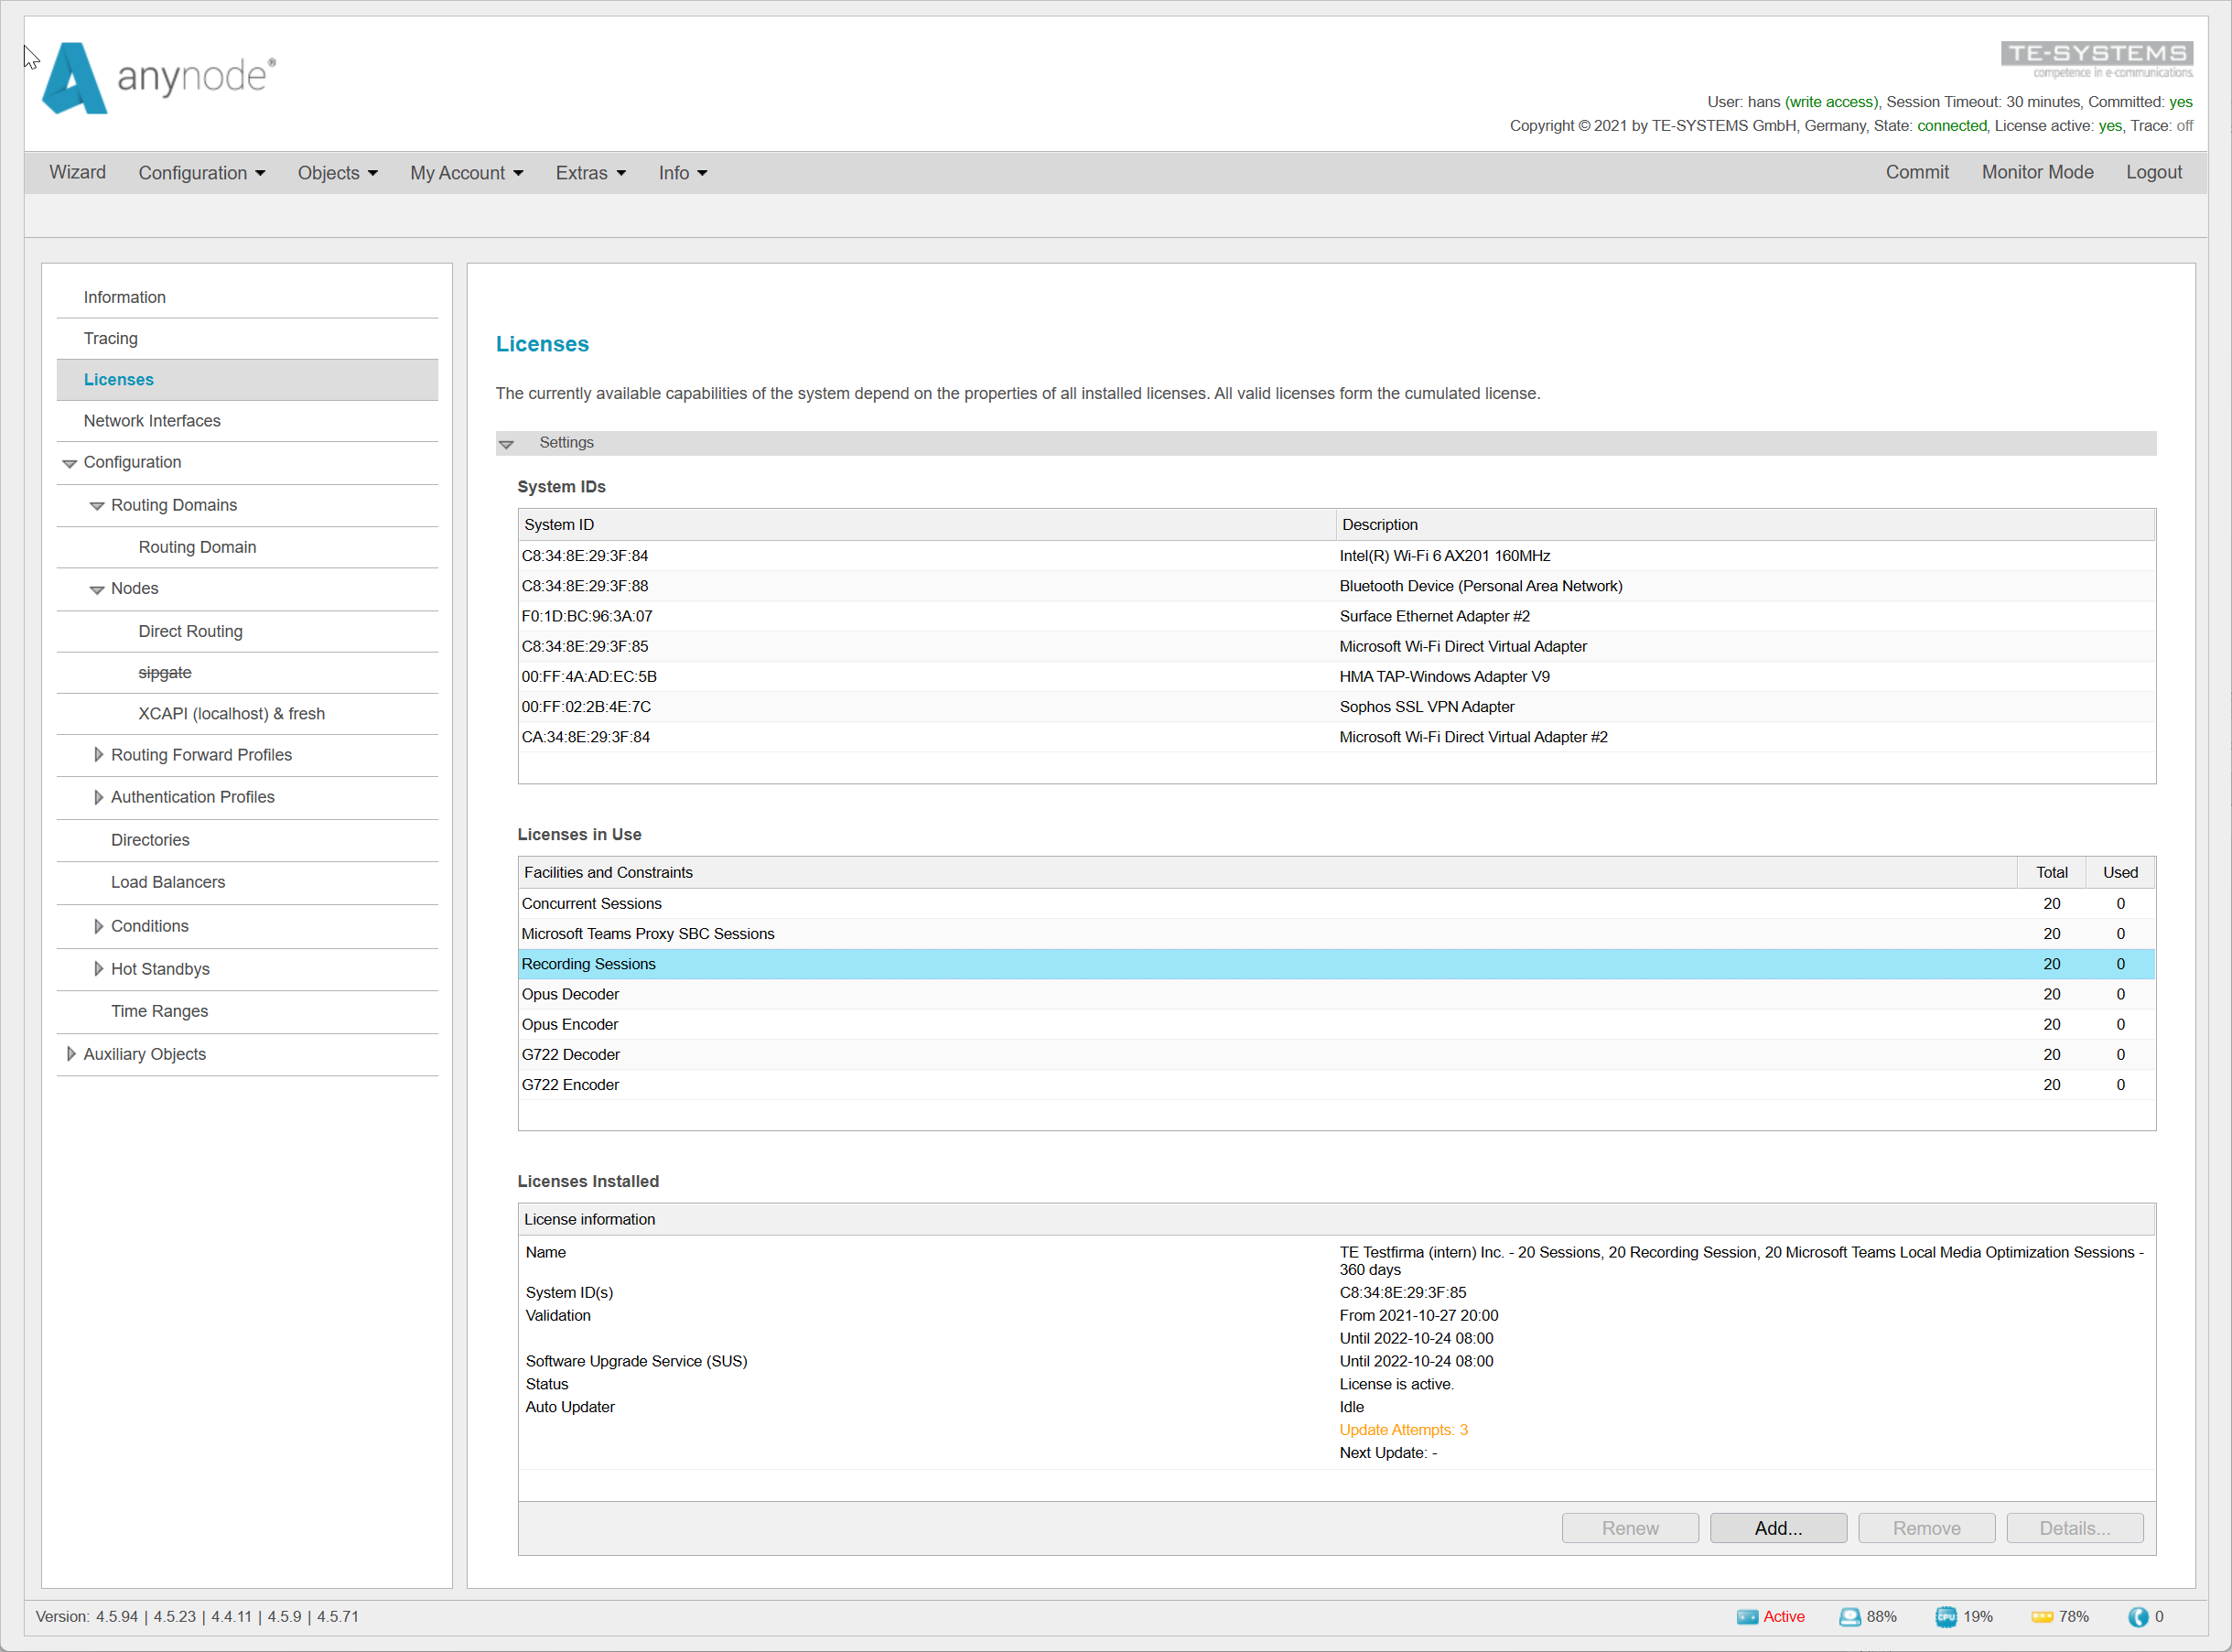
A valid Recording Session license as shown in the License chapter of this document.
An authorized anynode frontend user for accessing media recordings.An example is given in the section User Authorization
for Accessing Media Recordings.G.711 codec negotiation if using the media recording.wav audio file format.Additional information and an example
can be found in the chapters Media Recorder Settings and Media Negotiation.
Please be sure to observe any applicable national and international legal requirements for voice and media recordings
and privacy in your jurisdiction.
2.1License
As mentioned previously,ensure that anynode’s license includes the Recording Sessions facility for enabling the Media
Recording feature.If your anynode does not have Recording Sessions included,don´t hesitate to ask our sales team for a
trial license atsales@te-systems.com.
2.2User Authorization for Accessing Media Recordings
Accessing media recordings directly through anynode’s frontend requires appropriate user authorization.Authorized users
must own the Media Recorder role and be configured through the frontend’s User Management.The screenshot gives an example
of where the configuration takes place.
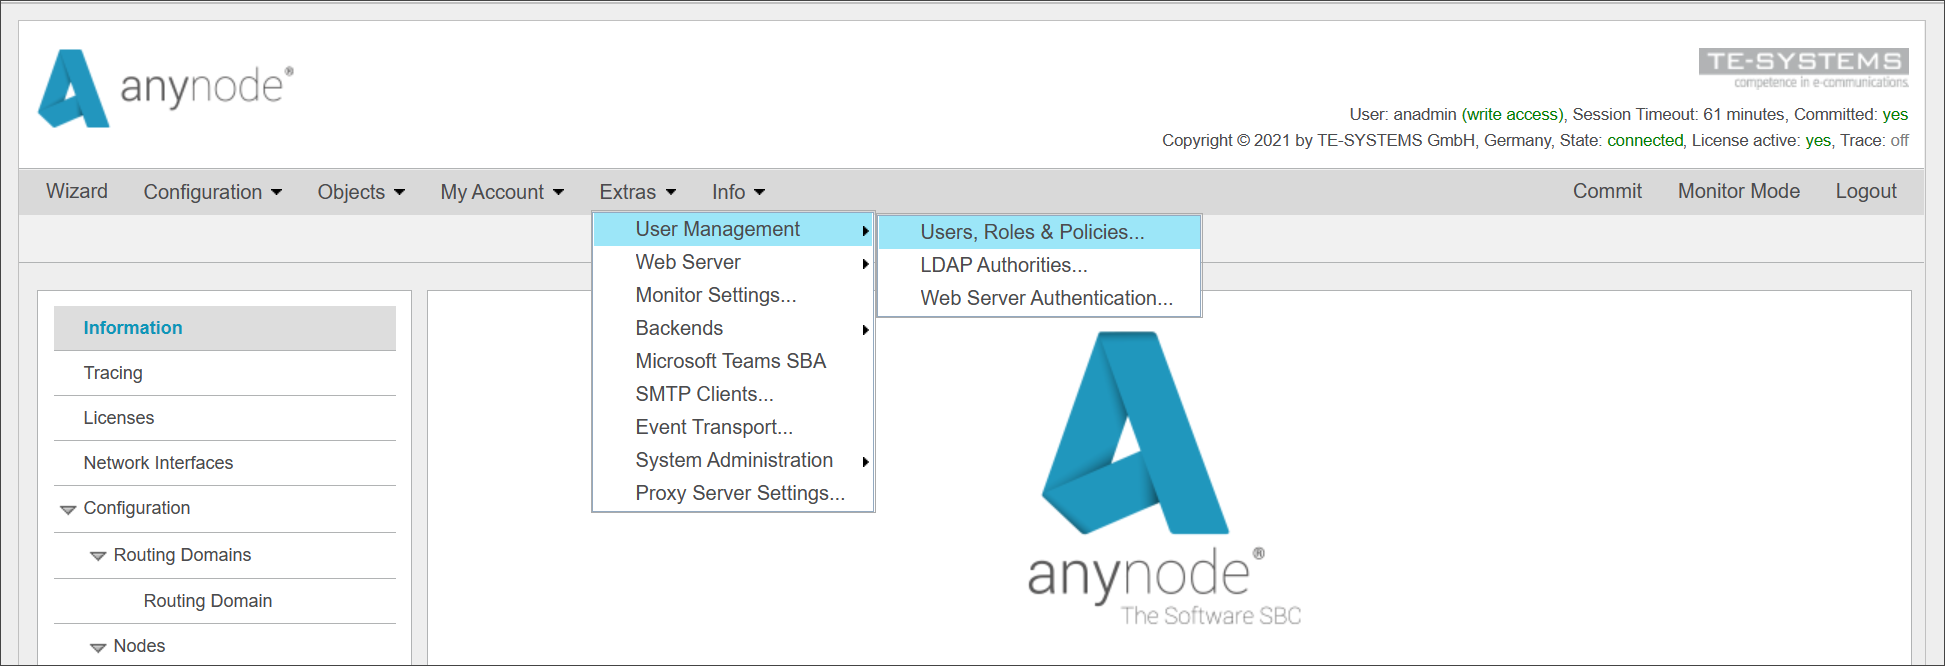
Please note that anynode’s default useranadmincannot be used for accessing media recordings for security
reasons.This default user can only grant media recording roles to other frontend users.
3Configuration
3.1Routing Domain
For enabling Media Recording,the associated route entry with its destination node and appropriate Routing Forward Profile
must be configured.In this example,the Other VoIP System destination node is enabled for recording media.
As shown in the screenshot below,the appropriate Routing Domain entry with its selected destination node is using the
Media Recording[Incoming Node]forward profile.The routing profile with its adjustments and enhancements will be described
next.
3.2Routing Forward Profile
3.2.1Media Recorder Settings
The Media Recorder defaults usually work well and will be used in this example.You can specify several settings like
the send and/or receive direction that should be recorded and the kind of media data(audio,audio events,fax).You
can choose the audio format of the target files,like XZREC(a proprietary format used by anynode which contains all
payload data),WAVE(a commonly used waveform audio file format that is enabled by default),or even raw G.711 binary
data.Also,the behavior in case of any recording errors(by default Hang up)can be selected.
3.3Call History
TheCall Historycan be reviewed via anynode’s frontend Dashboard in the Monitor Mode.As for the active sessions,moving the mouse pointer over the relevant entry will display more session details.A double-click onto a call history entry
opens a new window with several session details.
The recorded media sessions can be accessed by an authorized user,which was previously described.The recorded media
sessions will be displayed with a noticeable blue colored recording icon.By double-clicking on the call history entry,its
details will be shown.In there,the recorded media streams with the chosen recording file format will be displayed.Please
note,if an unauthorized frontend user attempts to access media recordings,(No permission to access media recordings)will
be shown instead.The recorded file can be directly downloaded by clicking on the available recording file.Each recorded
media stream has a unique identifier.An example is given in the screenshot below.Such identifiers can also be used by third-party
applications via anynode’s REST API.In this context,the best integration example for accessing the media recordings via
a PowerShell script will be described in the Appendix.

3.4Storage Period for Media Recordings
The storage period for media recordings can be chosen through the frontend’s Monitor Settings,as shown below.
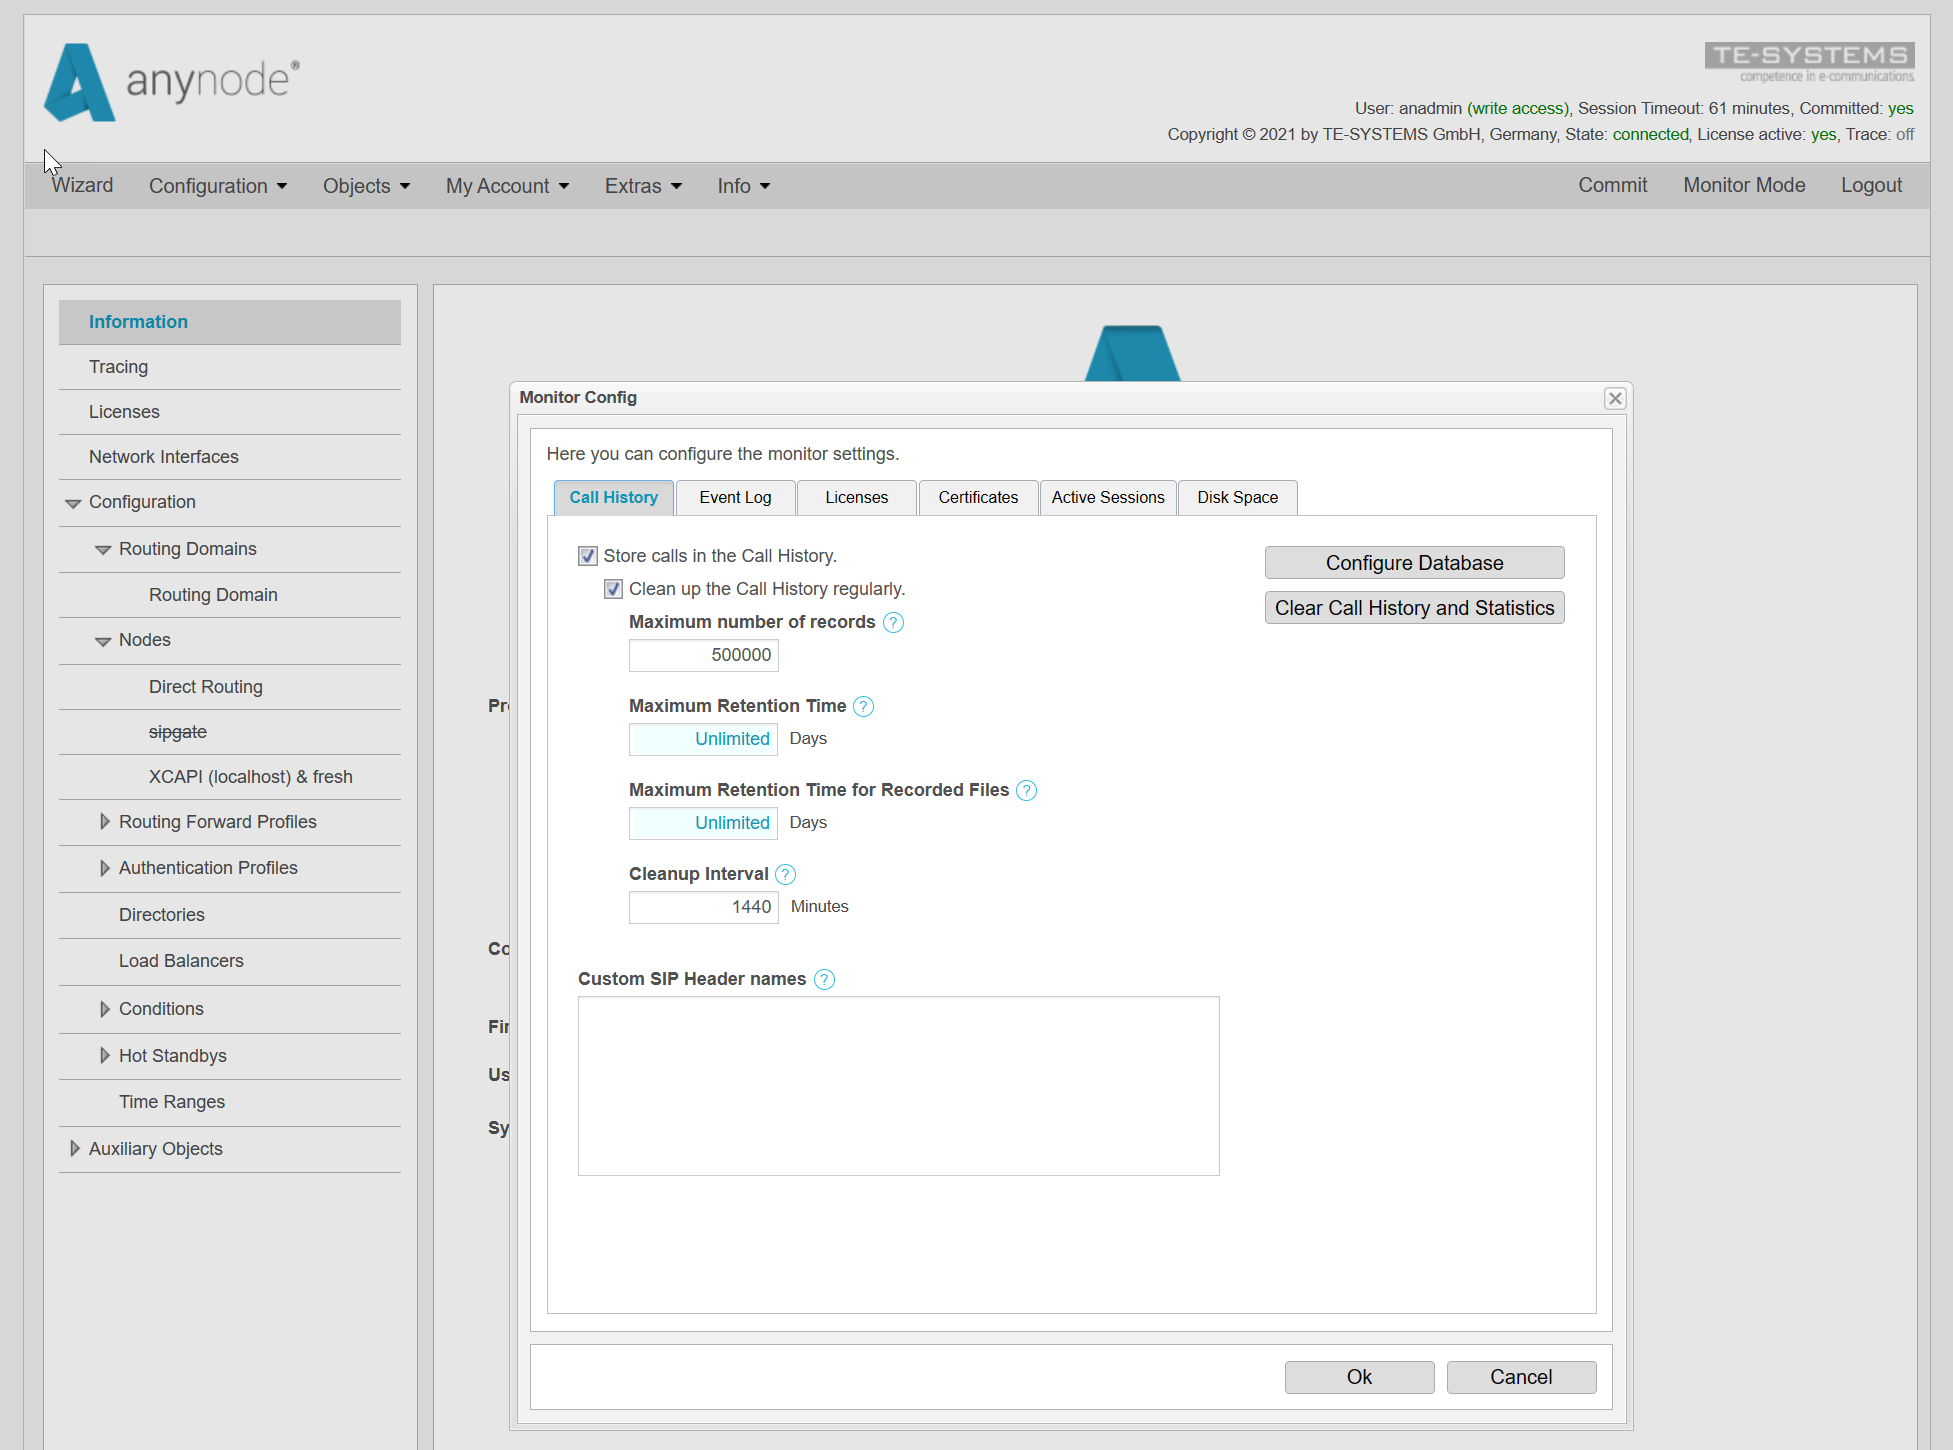
You might have to adjust this period to meet all national and international privacy and data protection regulations,such as the European GDPR or DSGVO.